
Rustic Rosemary Garlic No-Knead Bread

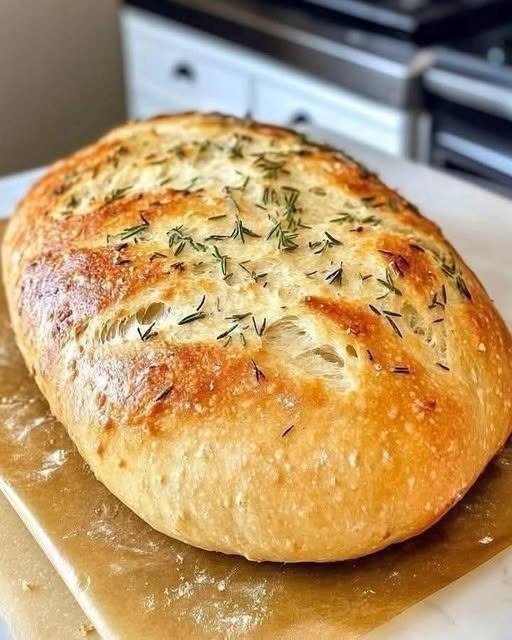
There’s something about homemade bread that makes the whole kitchen feel cozy. I usually make this Rosemary Garlic No-Knead Bread when I want something that looks impressive but doesn’t require a lot of hands-on work.
Honestly, this is one of those recipes where the dough does most of the work for you. You simply mix the ingredients, let the dough slowly rise, shape it, and bake it until the outside becomes beautifully golden and crisp.
The fresh rosemary adds a wonderful earthy aroma, while garlic gives the bread a savory flavor that makes it hard to stop at just one slice. The inside stays soft and chewy while the crust gets that satisfying artisan-style crunch.
It’s especially delicious warm from the oven with butter, but I also love serving it alongside soups, stews, pasta, and roasted meats.
Ingredients
For the Bread
- 3 cups (375 g) all-purpose flour or bread flour
- 1½ cups (360 ml) warm water
- 2 tsp instant yeast
- 1½ tsp salt
- 1 tbsp olive oil
- 2 tbsp fresh rosemary, finely chopped
- 3 cloves garlic, finely minced
- 1 tsp honey or sugar
For the Top
- 1 tbsp olive oil
- 1 tbsp fresh rosemary
- A small pinch of coarse sea salt
- 1 small garlic clove, finely minced, optional
Step-by-Step Method
1. Mix the Dough
In a large mixing bowl, combine the flour, yeast, salt, chopped rosemary, and minced garlic.
Add the warm water, olive oil, and honey.
Using a wooden spoon or spatula, mix until a sticky, shaggy dough forms. You don’t need to knead it.
I usually mix just until there are no large patches of dry flour. The dough should look rough and slightly sticky.
2. Let the Dough Rise
Cover the bowl tightly with plastic wrap or a clean kitchen towel.
Let the dough rise at room temperature for approximately 1½–2 hours, or until it has noticeably increased in size and looks bubbly.
For even more flavor, you can refrigerate the covered dough overnight and bake it the next day.
3. Shape the Dough
Lightly flour your work surface.
Gently transfer the dough onto the floured surface. Try not to knock out all the air.
Fold the edges toward the center a few times, then gently shape the dough into a round loaf.
Place it on a piece of parchment paper and let it rest for about 30 minutes.
4. Preheat the Oven
Place a Dutch oven with its lid inside the oven.
Preheat the oven to 450°F (230°C) and allow the Dutch oven to heat for at least 30 minutes.
The hot Dutch oven is important because it creates the intense heat and steam needed for that beautiful crust.
5. Prepare the Loaf
Carefully transfer the dough, along with the parchment paper, into the hot Dutch oven.
Brush or lightly drizzle the top with olive oil.
Sprinkle with fresh rosemary and a little coarse sea salt.
Using a sharp knife or bread lame, make a shallow slash across the top of the dough. This gives the bread room to expand while baking.
6. Bake
Cover the Dutch oven with its lid.
Bake for 25–30 minutes.
Then carefully remove the lid and continue baking for another 15–20 minutes, until the bread is deeply golden brown and crisp.
The exact baking time can vary slightly depending on your oven.
7. Cool Before Slicing
Carefully remove the bread from the Dutch oven and place it on a wire rack.
Let it cool for at least 30–45 minutes before slicing.
I know it’s tempting to cut into it immediately, but letting the bread cool allows the inside to finish setting. Otherwise, the center can become gummy.
Cooking Tips
Use Fresh Rosemary
Fresh rosemary gives this bread a much stronger aroma and flavor than dried rosemary.
Don’t Add Too Much Flour
The dough should be slightly sticky. Adding too much flour can make the finished bread dense instead of light and chewy.
Don’t Skip the Preheating
A thoroughly heated Dutch oven is one of the secrets to achieving that crisp artisan-style crust.
Be Careful With Garlic
Fresh garlic adds wonderful flavor, but don’t use an excessive amount because it can become bitter or burn on the surface.
Let the Bread Cool
Give the loaf enough time to cool before slicing. This helps preserve the soft, chewy interior.
For Extra Flavor
For a stronger rosemary-garlic flavor, let the dough rise slowly in the refrigerator overnight.
Serving Suggestions
This bread is incredibly versatile. Serve it with:
- Creamy tomato soup
- Chicken noodle soup
- Beef stew
- Pasta
- Spaghetti and meatballs
- Roasted chicken
- Grilled steak
- Creamy dips
- Olive oil and balsamic vinegar
- Whipped garlic butter
My favorite way to eat it is while it’s still slightly warm, spread with salted butter. Simple, but honestly, so good.
How to Store Homemade Bread
Once completely cooled, store the bread in a paper bag or bread box at room temperature for up to 2–3 days.
Avoid storing it in the refrigerator because refrigeration can make homemade bread stale faster.
For longer storage, slice the bread and freeze it in an airtight freezer bag for up to 3 months.
Nutrition Information
Approximate per serving, based on 10 servings:
- Calories: 190 kcal
- Protein: 5 g
- Carbohydrates: 34 g
- Fat: 4 g
- Saturated Fat: 0.6 g
- Fiber: 1.5 g
- Sugar: 1 g
- Sodium: 360 mg
Nutrition information is an estimate and will vary depending on the flour, amount of oil, and serving size.
Conclusion
This Rustic Rosemary Garlic No-Knead Bread is proof that homemade artisan-style bread doesn’t have to be complicated. With just a handful of basic ingredients and a little patience, you can make a gorgeous golden loaf with a crisp crust and soft, chewy center.
I usually serve it warm with butter, but it’s just as delicious alongside a hearty soup or pasta dinner. And if you have leftovers, don’t worry—they make incredible toast the next morning.
Honestly, once you try making bread this way, you may never look at store-bought bread quite the same again!
Frequently Asked Questions
1. Can I use dried rosemary instead of fresh?
Yes. Use about 2 teaspoons of dried rosemary in place of the fresh rosemary. Fresh rosemary is preferred for a brighter flavor, but dried works well too.
2. Can I make this bread without a Dutch oven?
Yes. You can bake it on a preheated baking sheet or pizza stone, but a Dutch oven is best for creating the steam needed for a crisp crust.
3. Can I prepare the dough the night before?
Absolutely. After mixing the dough, cover it and refrigerate overnight. The slow fermentation can actually give the bread a deeper, more developed flavor.
4. Why is my bread dense?
The most common reasons are too much flour, insufficient rising time, or yeast that isn’t active. Make sure the dough has enough time to rise and avoid adding excessive flour.
5. How do I get a darker, crispier crust?
Bake uncovered for the final 15–20 minutes and allow the loaf to develop a deep golden-brown color. Don’t remove it too early—the darker crust adds a lot of flavor.