
Easy No-Knead Homemade Bread Recipe

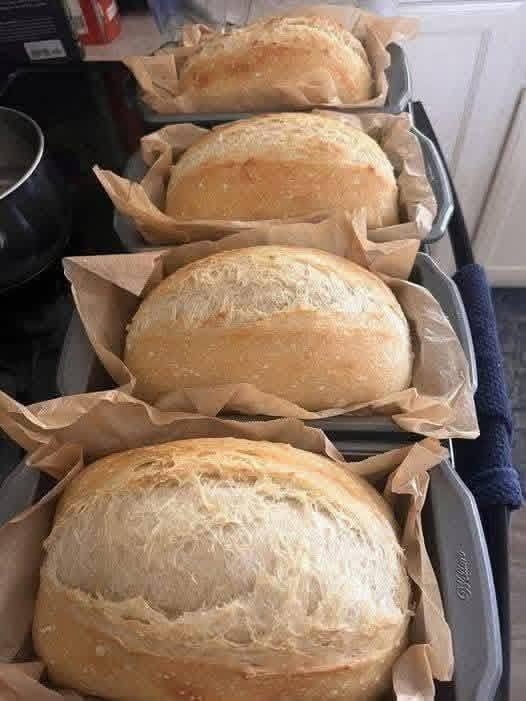
I used to think making homemade bread required lots of kneading, expensive ingredients, and special equipment. But this easy no-knead bread recipe makes everything so much simpler. You just mix a few basic ingredients, let the dough rise, and bake it until golden.
What I love most about this recipe is that it requires no eggs, no butter, and no kneading. You don’t even need a stand mixer. If you have flour, yeast, water, salt, and a little sugar, you are ready to make fresh bread at home.
I usually make a couple of loaves so there is enough for breakfast, sandwiches, and toast throughout the week. It is simple, affordable, and perfect for anyone who wants delicious homemade bread without complicated steps.
Ingredients for No-Knead Homemade Bread
- 4 cups all-purpose flour (approximately 500 g)
- 2¼ teaspoons instant yeast
- 1¾ cups warm water (approximately 415 ml)
- 1 teaspoon sugar
- 1½ teaspoons salt
- 1 tablespoon olive oil (optional, for a softer texture)
These simple ingredients are all you need for a basic homemade loaf. The olive oil is optional, so you can leave it out if you want to keep the recipe as simple as possible.
Step-by-Step Instructions
Step 1: Mix the Dry Ingredients
In a large mixing bowl, combine the flour, instant yeast, sugar, and salt. Stir everything together until evenly mixed.
I usually choose a large bowl because the dough needs enough space to expand while rising.
Step 2: Add the Warm Water
Gradually pour the warm water into the dry ingredients. Mix with a wooden spoon until a sticky, rough dough forms.
Don’t worry if the dough looks shaggy or feels stickier than traditional bread dough. That is completely normal for a no-knead recipe.
If the dough seems too dry, add a little more water, one tablespoon at a time.
Step 3: Let the Dough Rise
Cover the bowl with a clean kitchen towel or plastic wrap. Place it in a warm spot for about 1–2 hours, or until the dough has roughly doubled in size.
The rising time may vary depending on the temperature of your kitchen.
Honestly, this is the easiest part because you don’t have to knead or work the dough. Just let the yeast do its job.
Step 4: Shape the Bread
Lightly flour your work surface and gently transfer the dough onto it.
Divide the dough into two portions if you want two smaller loaves, or keep it as one larger loaf if your baking pan allows.
Shape the dough gently into rounds or ovals. Avoid adding too much extra flour, as this can make the bread dense.
Place the shaped dough into greased loaf pans or onto a parchment-lined baking tray.
Step 5: Let the Dough Rise Again
Cover the shaped dough loosely and allow it to rise for another 30–45 minutes, until it looks slightly puffy.
Meanwhile, preheat your oven to 400°F (200°C).
Step 6: Bake Until Golden Brown
Bake the bread for approximately 30–40 minutes, depending on the size and shape of the loaf.
The crust should be golden brown, and the bread should sound hollow when tapped on the bottom. If using a food thermometer, aim for an internal temperature of around 190–200°F (88–93°C).
If the top browns too quickly, loosely cover it with aluminum foil for the remaining baking time.
Step 7: Cool and Slice
Remove the bread from the oven and transfer it to a wire rack.
Allow it to cool for at least 30–45 minutes before slicing. I know it is tempting to cut into a warm loaf right away, but cooling helps the inside finish setting and prevents a gummy texture.
Once cooled, slice the bread and enjoy it with your favorite toppings!
Tips for Perfect Homemade Bread
- Use warm water: Water should be warm, not hot. Around 100–110°F (38–43°C) works well.
- Measure the flour carefully: Too much flour can make the bread heavy and dry. Weighing the flour is the most accurate method.
- Be patient: If your kitchen is cool, the dough may need more time to rise.
- Don’t knead: Simply mix the ingredients until a rough dough forms.
- Avoid adding too much flour: A slightly sticky dough helps produce a softer loaf.
- Let it cool properly: Cutting too early can make the inside gummy.
- Check for doneness: The crust should be golden, and the loaf should sound hollow when tapped.
Serving Suggestions
This homemade bread is incredibly versatile. Here are a few delicious ways to enjoy it:
- Breakfast toast: Serve with jam, honey, peanut butter, or scrambled eggs.
- Sandwiches: Use slices for chicken, cheese, or vegetable sandwiches.
- With soup: Pair it with tomato soup, lentil soup, or vegetable soup.
- Garlic bread: Brush slices with olive oil, garlic, and herbs, then toast until crisp.
- Afternoon snack: Enjoy a slice with tea or coffee.
- French toast: Use slightly stale slices to make a delicious breakfast.
I usually enjoy the first few slices while the bread is still slightly warm, with a little butter or jam. It is simple but absolutely delicious!
How to Store Homemade Bread
Allow the bread to cool completely before storing it.
- At room temperature: Keep in an airtight bag or container for about 2–3 days.
- In the refrigerator: Refrigeration can make bread stale faster, so it is usually not the best option.
- In the freezer: Slice the loaf, place the slices in a freezer-safe bag, and freeze for up to 3 months.
You can toast frozen slices directly from the freezer whenever you need them.
Approximate Nutrition Information
Estimated nutrition per slice, assuming 16 slices from the recipe:
- Calories: 125–135
- Carbohydrates: 26 g
- Protein: 4 g
- Fat: 0.5–1 g
- Fiber: 1 g
- Sugar: Less than 1 g
These are approximate values and may vary depending on the flour, loaf size, and whether you use optional olive oil. Toppings are not included.
Frequently Asked Questions
1. Can I make bread without eggs and butter?
Yes! This recipe uses flour, water, yeast, salt, and sugar. Eggs and butter are not necessary for a simple homemade loaf.
2. Can I use active dry yeast instead of instant yeast?
Yes. Mix the active dry yeast with some of the warm water and sugar, then let it sit for 5–10 minutes until foamy. Add it to the remaining ingredients and continue with the recipe.
3. Why is my bread dense instead of fluffy?
Dense bread can result from adding too much flour, using inactive yeast, or not allowing enough time for the dough to rise. Measure carefully and let the dough become puffy before baking.
4. Can I use whole-wheat flour?
Yes. For a softer loaf, start by replacing about one-quarter to one-half of the all-purpose flour with whole-wheat flour. You may need to add a little extra water because whole-wheat flour absorbs more liquid.
5. Can I prepare the dough ahead of time?
Yes. You can mix the dough, cover it, and refrigerate it overnight for a slower rise. The next day, allow it to warm up and become puffy before shaping or baking, adjusting the rising time as needed.
Conclusion
This easy no-knead homemade bread recipe proves that making fresh bread doesn’t have to be complicated or expensive. With a handful of everyday ingredients, a little patience, and no kneading at all, you can make a delicious loaf with a golden crust and soft interior.
I love how easy it is to prepare and how well it works for breakfast, sandwiches, and family meals. Best of all, it requires no eggs, no butter, and no special equipment.