
Cheesy Beef Crunchwrap Recipe

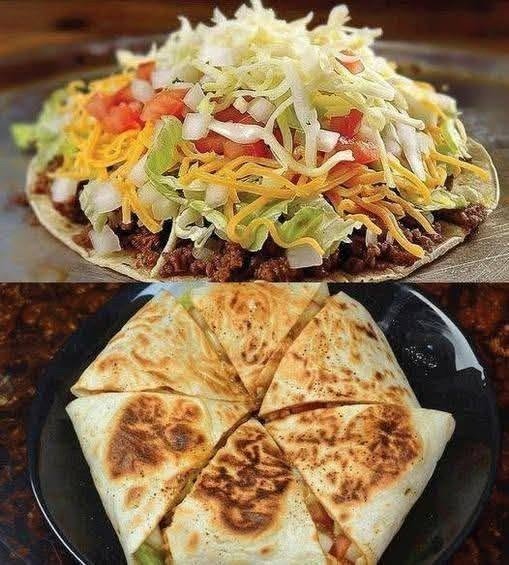
If there’s one thing I love about homemade fast food, it’s being able to recreate those crispy, cheesy favorites right in my own kitchen. These cheesy beef crunchwraps are one of my go-to recipes when I’m craving something filling, flavorful, and a little indulgent.
Inspired by the delicious wraps in the picture, this recipe combines seasoned ground beef, warm tortillas, crunchy tostadas, fresh lettuce, juicy tomatoes, and plenty of shredded cheese. Everything is folded into a neat package and toasted in a skillet until the tortilla turns golden brown and crispy.
Honestly, the best part is that first bite. You get the savory beef, creamy cheese, fresh vegetables, and satisfying crunch all at once. It’s like enjoying your favorite fast-food wrap, but homemade and customized exactly how you like it.
I usually make these for a quick weeknight dinner, but they’re also great for casual gatherings, game nights, or weekends when everyone wants something fun to eat. You don’t need any special equipment, and the ingredients are easy to find at most grocery stores.
If you love cheesy beef wraps, crispy quesadillas, or homemade Tex-Mex meals, this easy crunchwrap recipe is definitely worth trying!
Why You’ll Love This Homemade Crunchwrap Recipe
- Crispy on the outside: Toasting the folded tortilla in a skillet creates a delicious golden crust.
- Cheesy and satisfying: Melted cheese brings all the savory fillings together.
- Easy to customize: Add jalapeños, beans, guacamole, or your favorite sauce.
- Perfect for busy evenings: The filling can be prepared ahead of time.
- Great for the whole family: Everyone can choose their favorite toppings.
Ingredients You’ll Need
This recipe makes approximately 4 large homemade beef crunchwraps.
For the Beef Filling
- 1 pound (450 g) ground beef
- 1 tablespoon olive oil, if needed
- 1 small onion, finely chopped
- 2 cloves garlic, minced
- 2 teaspoons taco seasoning
- ½ teaspoon paprika
- ½ teaspoon ground cumin
- Salt and black pepper, to taste
- ¼ cup (60 ml) water
- ½ cup (120 g) salsa or thick tomato sauce
Tip: Store-bought taco seasoning works perfectly. If you don’t have any, use a mixture of chili powder, cumin, paprika, garlic powder, onion powder, salt, and pepper.
For Assembling the Crunchwraps
- 4 large flour tortillas, about 12 inches (30 cm) wide
- 4 small tostada shells or sturdy round tortilla chips arranged in a flat layer
- 1 cup (100–115 g) shredded cheddar cheese
- 1 cup (100–115 g) shredded Monterey Jack cheese or mozzarella
- 1 cup shredded iceberg lettuce
- 2 medium tomatoes, diced
- ½ cup sour cream
- ½ cup nacho cheese sauce
- ¼ cup diced onion, optional
- 1 tablespoon butter or oil, for toasting
Optional Toppings
You can also add:
- Sliced jalapeños
- Black beans or refried beans
- Guacamole or sliced avocado
- Hot sauce
- Fresh cilantro
- Pickled red onions
I usually keep the filling simple with beef and cheese, then let the fresh vegetables and sauces bring everything together.
How to Make Cheesy Beef Crunchwraps
Step 1: Cook the Ground Beef
Heat a large skillet over medium heat. Add the olive oil if needed, followed by the ground beef.
Cook for approximately 6–8 minutes, breaking the meat apart with a wooden spoon until it’s browned and no longer pink.
Add the chopped onion and cook for another 2–3 minutes until softened. Stir in the garlic, taco seasoning, paprika, cumin, salt, and black pepper.
Pour in the water and salsa, then stir everything together. Let the mixture simmer for 3–5 minutes until the sauce thickens and coats the beef.
The filling should be juicy but not watery. Too much liquid can make the tortillas soggy, so let the mixture cook down if necessary.
Set the beef aside while you prepare the remaining ingredients. For food safety, ground beef should reach an internal temperature of 160°F (71°C).
Step 2: Prepare the Toppings
Shred the lettuce, dice the tomatoes, and grate the cheese if you’re using a block.
Place the sour cream, nacho cheese sauce, vegetables, and shredded cheese in separate bowls so everything is ready to assemble.
I find this little bit of preparation makes the process much easier, especially if you’re making several crunchwraps at once.
If your tomatoes are especially juicy, remove some of their seeds and liquid. This helps prevent the finished wraps from becoming soggy.
Step 3: Warm the Tortillas
Place the large flour tortillas in the microwave for about 10–15 seconds, or warm them briefly in a dry skillet.
You want them soft and flexible rather than hot or crispy. Warm tortillas are much easier to fold without tearing.
If you’re using refrigerated tortillas, don’t skip this step. It makes a noticeable difference when you’re trying to seal the crunchwrap.
Step 4: Layer the Filling
Lay one large tortilla flat on a clean surface.
Add the ingredients in the following order, keeping the filling centered and leaving a wide border around the edges:
- Spoon a generous portion of seasoned ground beef into the center.
- Drizzle over some nacho cheese sauce.
- Sprinkle with cheddar and Monterey Jack cheese.
- Place a tostada shell over the beef and cheese.
- Spread sour cream over the tostada.
- Add shredded lettuce, diced tomatoes, and optional onions.
Don’t overfill the tortilla. It’s tempting to pile on everything, but leaving enough room around the edges makes folding much easier.
Step 5: Fold the Crunchwrap
Here’s the trickiest part, but it’s easier than it looks!
Starting at one edge, fold the tortilla toward the center over the filling. Continue working around the tortilla, making small overlapping folds until the filling is enclosed.
You should end up with a roughly hexagonal shape.
If the center is too large to cover with the tortilla flaps, place a small piece cut from a spare tortilla over the filling before folding. This helps seal any exposed areas.
Turn the crunchwrap seam-side down and gently press it to hold its shape.
Repeat with the remaining tortillas and filling.
Step 6: Toast Until Golden and Crispy
Heat a clean skillet over medium heat and add a little butter or oil.
Carefully place one crunchwrap in the skillet with the folded side facing down. Press gently with a spatula to help seal the folds.
Cook for about 2–3 minutes, until the bottom is golden brown and crisp. Flip carefully and cook the other side for another 2–3 minutes.
The cheese should be melted, and the tortilla should have a beautifully toasted exterior.
If the tortilla is browning too quickly, reduce the heat slightly. Medium or medium-low heat gives the filling time to warm through without burning the outside.
Repeat with the remaining crunchwraps, adding a little more butter or oil as needed.
Step 7: Slice and Serve
Let each crunchwrap rest for a minute before cutting it in half.
Use a sharp knife to slice through the crispy tortilla and reveal the layers of seasoned beef, melted cheese, crunchy tostada, and fresh toppings.
Serve immediately while the tortilla is crisp and the cheese is warm.
Honestly, these are best eaten straight from the skillet. That combination of crunchy tortilla and soft, cheesy filling is hard to beat!
Tips for the Best Homemade Crunchwraps
Use Large Flour Tortillas
Large burrito-size tortillas are ideal because they give you enough room to wrap the filling securely. Smaller tortillas can be difficult to fold around all the ingredients.
Don’t Make the Filling Too Wet
Excess liquid can soften the tortilla and make the crunchwrap difficult to seal. Simmer the beef mixture until it’s thick and spoonable.
Keep Cold Ingredients Away From the Bottom
The cheese sauce and beef should form the main warm layers, while the lettuce and tomatoes work best closer to the top, above the tostada. This helps preserve the crunch.
Don’t Overstuff the Wraps
A generously filled crunchwrap is wonderful, but too much filling can cause the tortilla to tear. Use moderate portions and keep the ingredients in the center.
Cook Seam-Side Down First
This is one of my favorite tricks. Starting with the folded side against the skillet helps the tortilla stay closed while it toasts.
Use Medium Heat
High heat can burn the tortilla before the cheese melts. A moderate temperature gives you a crisp exterior and a warm, gooey center.
Easy Variations to Try
Chicken Crunchwrap
Replace the ground beef with seasoned shredded chicken or finely chopped cooked chicken. Add a little taco seasoning and salsa to keep the filling moist.
Spicy Beef Crunchwrap
Add chopped jalapeños, hot sauce, or a pinch of cayenne pepper to the beef. Pepper Jack cheese is another great option for extra heat.
Vegetarian Crunchwrap
Replace the beef with seasoned black beans, refried beans, or a mixture of beans and sautéed vegetables. Add extra cheese or avocado for a satisfying filling.
Extra-Cheesy Crunchwrap
Use a combination of cheddar, Monterey Jack, and nacho cheese sauce. For the best texture, keep the cheese sauce thick rather than runny.
Crunchwrap with Homemade Sauce
Mix ½ cup sour cream with 1 tablespoon lime juice, a pinch of garlic powder, and a little salt. This quick sauce adds a creamy, tangy flavor that works beautifully with the beef.
What to Serve with Crunchwraps
These cheesy beef crunchwraps are filling on their own, but they’re even better with a few easy sides.
- Mexican rice: A warm, flavorful side that makes the meal more substantial.
- Guacamole: Creamy avocado balances the savory beef and crunchy tortilla.
- Fresh salsa or pico de gallo: Adds freshness and a little acidity.
- Corn salad: Sweet corn, lime juice, cilantro, and a pinch of chili powder make a refreshing side.
- Seasoned potato wedges: Perfect if you’re recreating a fast-food-style dinner at home.
- Tortilla chips and queso: A fun option for sharing with friends.
- Simple green salad: A lighter side to balance the cheesy filling.
For a casual dinner, I usually serve the crunchwraps with salsa, guacamole, and a few lime wedges.
How to Store and Reheat Leftovers
Storing Leftovers
For the best texture, store leftover cooked beef separately from the fresh lettuce, tomatoes, sour cream, and tostada shells whenever possible.
Refrigerate the cooked beef in an airtight container within 2 hours of cooking and use it within 3–4 days.
If you’ve already assembled and toasted the crunchwraps, refrigerate them promptly in an airtight container. They are best enjoyed within 2–3 days for quality.
Reheating Crunchwraps
The skillet is my preferred method because it helps restore the crispy tortilla.
- Heat a skillet over medium-low heat.
- Add the crunchwrap and cover loosely.
- Heat for several minutes on each side until hot throughout.
- Check that the center reaches 165°F (74°C) before serving.
An air fryer also works well. Reheat at approximately 350°F (175°C) for 4–7 minutes, checking frequently.
The microwave is convenient, but it tends to soften the tortilla. If you use it, finish the crunchwrap in a hot skillet for a minute or two to restore some crispness.
For the best results, add fresh lettuce, tomatoes, and sour cream after reheating.
Nutrition Information
The following values are approximate estimates for one crunchwrap, assuming the recipe makes four servings. Actual nutrition depends on the beef’s fat content, tortilla size, cheese, and quantity of sauces used.
Estimated nutrition per serving:
- Calories: 750–850
- Protein: 35–40 g
- Carbohydrates: 65–75 g
- Total fat: 35–42 g
- Saturated fat: 13–17 g
- Fiber: 5–7 g
- Sugar: 5–8 g
- Sodium: 1,200–1,600 mg
How to Make It Lighter
If you’d like a lighter version, try these simple changes:
- Use lean ground beef or ground turkey.
- Reduce the amount of shredded cheese.
- Choose a smaller tortilla.
- Replace some of the beef with black beans.
- Use plain Greek yogurt instead of sour cream.
- Add extra lettuce, tomatoes, and other vegetables.
These changes can reduce calories and fat while keeping the crunchwrap flavorful and satisfying.
Frequently Asked Questions
1. What is a crunchwrap made of?
A crunchwrap typically contains seasoned meat, melted cheese, a crunchy tostada shell, sour cream, lettuce, tomatoes, and a large flour tortilla folded around the filling. This homemade version uses ground beef, cheddar, Monterey Jack, and nacho cheese sauce for a rich, cheesy flavor.
2. Can I make crunchwraps without a tostada shell?
Yes! You can use a handful of sturdy tortilla chips arranged in a single layer or use a small, crisp tortilla. The tostada shell gives the crunchwrap its signature crunch, but the recipe still tastes delicious without it.
3. How do I stop my crunchwrap from falling apart?
Use a large, flexible tortilla, avoid overfilling it, and fold the edges tightly toward the center. Place the crunchwrap seam-side down in the skillet first and let it toast before flipping. This helps seal the folds and keeps everything together.
4. Can I prepare crunchwraps ahead of time?
You can prepare the beef filling, shred the cheese, and chop the vegetables in advance. Store the components separately in the refrigerator and assemble the crunchwraps shortly before cooking. This keeps the lettuce fresh and the tostada crunchy.
5. Can I freeze homemade crunchwraps?
You can freeze cooked beef filling and assembled crunchwraps, although the lettuce, tomatoes, and sour cream don’t freeze particularly well. For the best results, freeze the cooked beef separately or assemble wraps using beef and cheese without fresh vegetables or sour cream. Thaw in the refrigerator, reheat thoroughly, and add the fresh toppings afterward.