
Homemade Soft Milk Bread Recipe

There is something so comforting about homemade bread fresh from the oven. The smell fills the kitchen, the crust turns beautifully golden, and the inside stays soft enough to pull apart with your hands. Honestly, once you get used to making your own bread, even a simple loaf from the grocery store can feel a little less exciting!
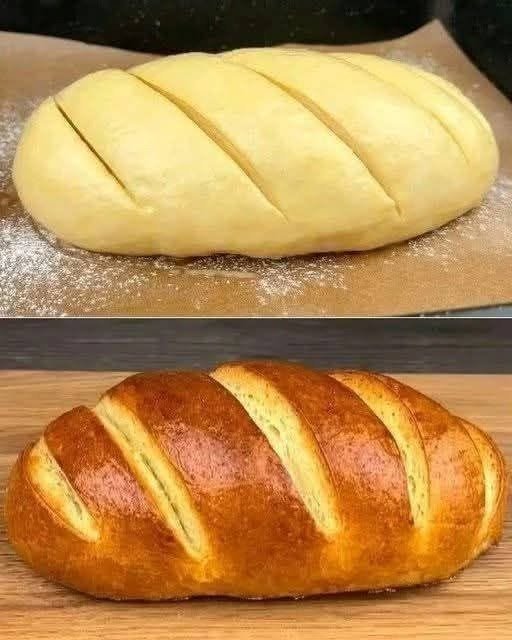
This homemade soft milk bread is one of my favorite recipes when I’m craving a tender loaf with a lightly sweet flavor and a beautiful golden crust. As shown in the picture, the loaf has a smooth top with diagonal slashes that open up as the bread rises and bakes, giving it that lovely bakery-style appearance.
I usually make this bread for breakfast, afternoon tea, or whenever I want something homemade to serve with butter and jam. It is also delicious toasted, turned into sandwiches, or served alongside a warm bowl of soup.
The secret to getting that soft texture is using milk, butter, and a properly kneaded dough. Give the dough enough time to rise, score the top before baking, and brush it with egg wash for that shiny, golden finish.
If you’ve never made bread from scratch before, don’t worry. I’ll walk you through each step so you can make a beautiful loaf in your own kitchen.
Why You’ll Love This Homemade Milk Bread Recipe
- Soft and fluffy texture: Milk and butter help create a tender crumb.
- Beautiful golden crust: An egg wash gives the loaf an attractive bakery-style shine.
- Lightly sweet flavor: Just enough sugar makes it delicious without turning it into dessert.
- Simple ingredients: You can make it with everyday baking staples.
- Versatile and delicious: Enjoy it with sweet toppings, savory fillings, or simply a little butter.
- Beginner-friendly: The method is straightforward, even if you’re new to yeast baking.
Ingredients You’ll Need
This recipe makes 1 medium loaf, approximately 10–12 slices.
- 3 cups (375 g) all-purpose flour or bread flour
- ¾ cup (180 ml) warm milk
- 2 tablespoons granulated sugar
- 2¼ teaspoons instant yeast (1 standard packet)
- 1 large egg, at room temperature
- 3 tablespoons (42 g) unsalted butter, softened
- 1 teaspoon salt
For the Golden Egg Wash
- 1 egg
- 1 tablespoon milk
Optional Finishing Touch
- 1 tablespoon melted butter, for brushing after baking
A little ingredient advice: I usually use whole milk because it gives the bread a richer flavor and softer texture. Bread flour can create a slightly chewier loaf, while all-purpose flour works perfectly well for a tender homemade bread.
How to Make Soft Homemade Milk Bread
Step 1: Prepare the Yeast Mixture
Pour the warm milk into a large mixing bowl. It should feel comfortably warm, not hot. Aim for approximately 100–110°F (38–43°C) if you’re using active dry yeast.
Add the sugar and yeast, then stir gently.
If using active dry yeast, let the mixture sit for about 5–10 minutes until it becomes foamy. If using instant yeast, you can generally mix it directly with the flour and other ingredients.
Honestly, checking the yeast is worth the extra moment when you’re unsure whether it’s fresh. Yeast that no longer works properly can leave you with a dense loaf that barely rises.
Step 2: Mix the Dough
Add the flour, egg, and salt to the milk mixture. Stir with a wooden spoon or spatula until a rough dough forms.
Add the softened butter and continue mixing until it is incorporated.
At first, the dough may feel sticky and uneven. That’s completely normal. Resist the temptation to add too much extra flour right away because a slightly tacky dough usually produces softer bread.
Step 3: Knead Until Smooth and Elastic
Transfer the dough to a lightly floured work surface.
Knead by pushing the dough away with the heel of your hand, folding it back toward you, and turning it slightly. Continue for approximately 8–12 minutes by hand, or 6–8 minutes in a stand mixer fitted with a dough hook.
The dough should become smooth, elastic, and slightly tacky rather than wet and sticky.
To test it, gently stretch a small piece between your fingers. If it stretches into a thin membrane before tearing, it has developed good gluten structure.
I usually find that taking the time to knead properly makes a noticeable difference in the final texture.
Step 4: Let the Dough Rise
Shape the dough into a ball and place it in a lightly greased bowl.
Cover with plastic wrap, a clean kitchen towel, or a reusable bowl cover. Leave it in a warm, draft-free spot for approximately 60–90 minutes, or until it has doubled in size.
The exact time depends on your kitchen temperature, so look at the dough rather than relying entirely on the clock.
A warm room helps the yeast work more efficiently, but avoid placing the bowl somewhere excessively hot.
Step 5: Shape the Loaf
Once the dough has doubled, gently press it to release excess gas.
Transfer it to a lightly floured surface and shape it into a smooth oval loaf, tucking the edges underneath to create a neat top.
Place the shaped loaf on a parchment-lined baking tray, leaving enough room for it to expand.
For a more traditional sandwich loaf, you can place the dough into a greased loaf pan instead.
Step 6: Allow the Second Rise
Cover the shaped dough loosely and let it rise for another 30–45 minutes, or until noticeably puffy.
This second rise is important because it helps create a lighter, softer interior.
I usually check the dough by gently pressing it with a fingertip. If the indentation springs back slowly and partially, the loaf is generally ready to bake.
If it springs back immediately, it may need a little more time.
Step 7: Score the Top
Preheat your oven to 350°F (175°C).
In a small bowl, whisk together the egg and tablespoon of milk to make the egg wash.
Brush a thin, even layer over the surface of the loaf.
Using a sharp bread lame or very sharp knife, make 3–5 diagonal slashes across the top, about ¼ inch (6 mm) deep.
As the loaf bakes, these cuts open up and create the attractive ridges seen in the picture.
Be gentle when scoring so you don’t deflate the risen dough.
Step 8: Bake Until Golden Brown
Place the loaf in the preheated oven and bake for approximately 25–35 minutes, depending on its size and shape.
The crust should become deep golden brown, while the loaf should feel light but set.
If you have an instant-read thermometer, the center should reach approximately 190–200°F (88–93°C).
If the top browns too quickly before the center is baked, loosely cover it with aluminum foil for the remaining baking time.
Step 9: Brush With Butter and Cool
Remove the bread from the oven and let it rest on the baking tray for a few minutes.
If you’d like an extra-soft crust and richer flavor, brush the warm loaf with a little melted butter.
Transfer it to a wire rack and let it cool for at least 30–45 minutes before slicing.
I know it’s tempting to cut into warm bread immediately, but allowing it to cool helps the interior finish setting and prevents a gummy texture.
Once cooled, slice and enjoy your homemade milk bread!
Tips for the Softest, Fluffiest Milk Bread
1. Use Warm, Not Hot, Milk
Milk that is too hot can damage the yeast. Aim for a comfortably warm temperature, around 100–110°F (38–43°C), especially when using active dry yeast.
2. Measure the Flour Carefully
Too much flour is one of the most common reasons homemade bread turns out dry or dense.
For the best results, weigh the flour if possible. If you’re using measuring cups, spoon the flour into the cup and level it off rather than packing it down.
3. Don’t Rush the Rising Time
Yeast dough needs enough time to develop structure and flavor. A cool kitchen may require a longer rise, while a warmer kitchen may speed things up.
Wait until the dough has visibly expanded rather than rushing to the next step.
4. Knead Until the Dough Is Elastic
Proper kneading develops gluten, which helps the loaf hold its shape and rise beautifully.
If the dough is slightly tacky, that’s usually fine. Add extra flour only a little at a time if the dough is genuinely too sticky to handle.
5. Avoid Overproofing
If the dough rises too much, it may collapse or bake into a loaf with a weak structure. Keep an eye on the dough during the second rise, especially in a warm kitchen.
6. Use Egg Wash for a Shiny Finish
Egg wash helps create the rich golden color shown in the picture. For a softer, less shiny crust, you can brush the loaf with milk instead.
7. Let the Bread Cool Before Slicing
Cooling allows the crumb to settle and makes slicing much easier. If you cut into it too early, the interior may appear sticky even when the bread has baked properly.
What to Serve With Homemade Milk Bread
One of my favorite things about this bread is how many different ways you can enjoy it.
For Breakfast
Serve warm slices with butter, strawberry jam, honey, or peanut butter. Pair them with scrambled eggs, tea, or coffee for a simple breakfast.
For Afternoon Tea
Milk bread is lovely with a cup of chai, black tea, or coffee. Add a little butter or your favorite fruit preserve for an easy afternoon treat.
For Sandwiches
Once cooled, slice the loaf and use it for egg sandwiches, chicken sandwiches, cheese sandwiches, or simple cucumber sandwiches.
For a Sweet Snack
Toast a slice and drizzle it with honey, or spread it with chocolate hazelnut spread. You can also sprinkle cinnamon sugar over buttered toast for a quick sweet treat.
Alongside Soups and Stews
Serve thick slices with tomato soup, creamy mushroom soup, or a hearty vegetable stew. The tender bread is perfect for soaking up flavorful sauces.
For French Toast
Slightly thick slices work beautifully for French toast. Dip them in a mixture of beaten egg, milk, cinnamon, and a little vanilla, then cook in a buttered skillet until golden.
How to Store Homemade Milk Bread
Homemade bread doesn’t contain the same preservatives as many commercial loaves, so storing it properly helps keep it fresh.
At room temperature: Allow the loaf to cool completely, then store it in an airtight bread bag or container for approximately 2–3 days. Keep it in a cool, dry place away from direct sunlight.
In the refrigerator: Refrigeration can make bread stale more quickly, so I generally avoid it unless the kitchen is very warm or humid and other storage options aren’t practical.
In the freezer: Slice the cooled loaf, place the slices in a freezer-safe bag, and freeze for up to 2–3 months for best quality. Separating slices with small pieces of parchment paper makes it easier to remove only what you need.
To reheat: Toast individual slices straight from frozen, or warm thawed slices briefly in a toaster oven. For a whole loaf, wrap it loosely in foil and warm it in a low oven until heated through.
Nutrition Information
The following nutrition information is approximate for one slice, assuming the loaf makes 12 slices and includes the egg wash but not the optional butter brushed on after baking.
| Nutrient | Approximate Amount |
|---|---|
| Calories | 165 kcal |
| Carbohydrates | 26 g |
| Protein | 5 g |
| Total fat | 4 g |
| Saturated fat | 2 g |
| Fiber | 1 g |
| Sugar | 3 g |
| Sodium | 220 mg |
Actual values depend on the flour, milk, butter, egg size, and slice thickness. Adding jam, honey, or extra butter will increase the total calories.
Frequently Asked Questions
1. Why is my homemade milk bread dense instead of fluffy?
Dense bread can result from too much flour, insufficient kneading, inactive yeast, or not allowing the dough enough time to rise. Measure the ingredients carefully, knead until the dough is elastic, and allow it to double during the first rise.
2. Can I make milk bread without a stand mixer?
Absolutely! A stand mixer is convenient, but you can knead the dough by hand. It usually takes about 8–12 minutes to develop a smooth, elastic texture. Use lightly floured hands and a work surface rather than adding large amounts of extra flour.
3. Can I use water instead of milk?
Yes, you can substitute water for milk, but the loaf will have a slightly different texture and flavor. Milk contributes richness and tenderness, so the finished bread may be less soft and flavorful when made with water alone.
4. Why didn’t my bread rise properly?
Your yeast may be old, the milk may have been too hot, or the dough may have been kept in a place that was too cold. Check the yeast’s expiration date and give the dough enough time to rise in a comfortably warm environment.
5. Can I make this milk bread ahead of time?
Yes! You can prepare the dough, allow it to rise, shape it, and refrigerate it overnight for a slower second rise. Cover it well to prevent the surface from drying out. Before baking, let it sit at room temperature until appropriately puffy, then apply the egg wash, score, and bake. Timing will vary depending on how cold the dough is.
Final Thoughts
This homemade soft milk bread is a lovely recipe to have on hand when you want something simple, comforting, and genuinely delicious. The tender interior, lightly sweet flavor, and shiny golden crust make it perfect for everything from breakfast toast to sandwiches and afternoon snacks.
I usually enjoy the first slice with a little butter while the bread is still slightly warm, and honestly, it’s hard to beat that simple combination.
Don’t worry if your first loaf isn’t perfectly shaped. Bread-making gets easier with practice, and even an imperfect loaf can taste wonderful.
Remember to knead the dough properly, give it enough time to rise, score the top gently, and let the finished bread cool before slicing.