
Cottage Cheese Chocolate Mousse

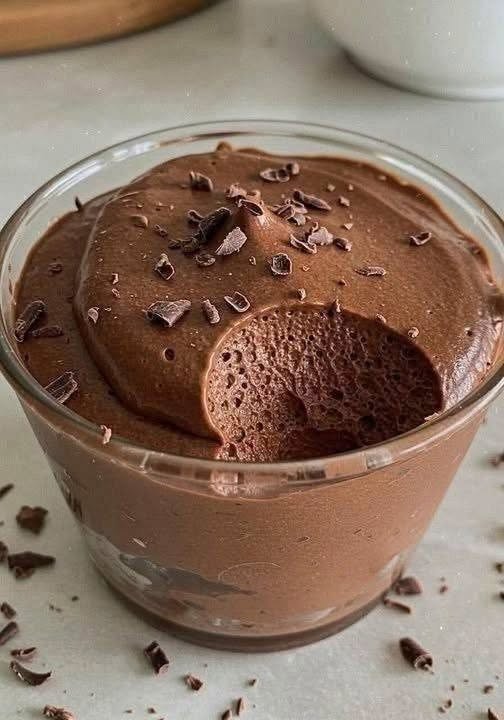
Honestly, I was a little skeptical about using cottage cheese in a chocolate dessert at first. Cottage cheese and chocolate mousse don’t exactly sound like a classic combination, do they? But once you blend everything together, the texture transforms into something wonderfully smooth. The tanginess of the cottage cheese becomes much less noticeable, and the cocoa powder gives it that deep chocolate flavor we all crave.
I usually make this recipe when I want something sweet after dinner but don’t feel like baking an entire cake or preparing an elaborate dessert. It takes just a few minutes to blend, and after a little time in the refrigerator, it becomes a lovely chilled treat.
The best part? Cottage cheese adds protein, making this a more filling alternative to traditional chocolate mousse. You can keep it simple with just a few ingredients or dress it up with chocolate shavings, fresh berries, or a little whipped cream.
If you’re looking for an easy high-protein chocolate dessert that feels indulgent without being overly complicated, let’s make it!
Why You’ll Love This Cottage Cheese Chocolate Mousse
- Rich chocolate flavor: Unsweetened cocoa powder creates a deep, chocolatey taste.
- Protein-packed: Cottage cheese provides a natural source of protein.
- Quick and easy: No baking, stovetop cooking, or complicated equipment required.
- Creamy texture: Blending breaks down the cottage cheese curds for a smooth, mousse-like consistency.
- Easy to customize: Adjust the sweetness and add your favorite toppings.
- Perfect for meal prep: Make it ahead and keep individual portions in the refrigerator for an easy dessert or snack.
Ingredients for Cottage Cheese Chocolate Mousse
You only need a handful of simple ingredients to make this creamy chocolate mousse. The quantities below make approximately two servings.
Ingredients
- 1 cup cottage cheese: The base of the mousse. Full-fat cottage cheese generally gives a richer texture, while low-fat cottage cheese works well too.
- 2 tablespoons unsweetened cocoa powder: Adds the chocolate flavor. Use good-quality cocoa powder for the best results.
- 2–3 tablespoons maple syrup or honey: For sweetness. Start with two tablespoons and add more if needed.
- 1 teaspoon vanilla extract: Gives the mousse a lovely dessert-like aroma and rounds out the chocolate flavor.
- 1–3 tablespoons milk: Optional, for adjusting the consistency. Regular milk or an unsweetened plant-based alternative works.
- A tiny pinch of salt: Optional, but it helps bring out the chocolate flavor.
Optional toppings
- Dark chocolate shavings
- Fresh strawberries or raspberries
- Mini chocolate chips
- A spoonful of Greek yogurt
- Chopped nuts or toasted hazelnuts
- A light dusting of cocoa powder
I usually keep the toppings simple because the chocolate mousse is delicious on its own. A few dark chocolate shavings are often all it needs.
How to Make Cottage Cheese Chocolate Mousse
Prep time: 5 minutes
Chilling time: 30–60 minutes, optional
Total time: Approximately 5–65 minutes
Servings: 2
Difficulty: Easy
Step 1: Add the ingredients to a blender
Place the cottage cheese, cocoa powder, maple syrup or honey, vanilla extract, and a tiny pinch of salt into a blender or food processor.
Make sure to use unsweetened cocoa powder rather than sweetened hot chocolate mix so you can control the flavor and sweetness yourself.
Step 2: Blend until completely smooth
Blend the ingredients for about 1–2 minutes, stopping occasionally to scrape down the sides if necessary.
This is the most important step in the whole recipe. Cottage cheese naturally has small curds, and simply stirring everything together won’t give you that classic mousse-like consistency.
I usually blend a little longer than I think I need to. The mixture should look glossy and creamy, with no visible cottage cheese lumps.
If the mousse seems too thick for your blender, add milk one tablespoon at a time until it blends comfortably. Try not to add too much, though, because you want the finished mousse to hold its shape.
Step 3: Taste and adjust
Give the mousse a quick taste before transferring it to serving bowls.
Want it sweeter? Add a little more maple syrup or honey. Prefer a darker chocolate flavor? Add another teaspoon of cocoa powder.
Keep in mind that cocoa powder can taste slightly bitter on its own, so the right amount of sweetener makes a big difference.
Honestly, I prefer my chocolate desserts moderately sweet, so I start with two tablespoons of maple syrup and adjust from there.
Step 4: Spoon into serving glasses
Divide the mousse between two small dessert glasses, ramekins, or bowls.
For a prettier presentation, smooth the tops with the back of a spoon. You can also gently tap the glasses on the counter to help settle the mousse.
At this point, you can enjoy it immediately if you’re craving chocolate. However, chilling it makes the texture firmer and allows the flavors to come together.
Step 5: Chill until set
Place the mousse in the refrigerator for 30–60 minutes.
The mousse will become thicker and more spoonable as it chills. It won’t necessarily have the exact airy texture of traditional whipped-cream mousse, but it should be smooth, rich, and creamy.
If you’re preparing dessert for guests, I recommend making it a few hours ahead. That way, you can simply add the toppings and serve when everyone is ready.
Step 6: Add your favorite toppings and serve
Finish with dark chocolate shavings, fresh berries, or a sprinkle of cocoa powder.
I love serving this mousse in clear glasses because the chocolate color looks beautiful, especially with a few chocolate curls scattered over the top.
Grab a spoon and enjoy your homemade cottage cheese chocolate mousse!
Tips for the Best Cottage Cheese Chocolate Mousse
A recipe this simple doesn’t need many tricks, but a few small details can make a noticeable difference.
1. Use a good blender
A high-speed blender or food processor works best for breaking down the cottage cheese curds. If your blender struggles with small quantities, scrape down the sides regularly or use a container suited to smaller batches.
The smoother the mixture, the more luxurious the mousse will feel.
2. Choose cottage cheese based on your preferred texture
Full-fat cottage cheese usually produces a richer, creamier result. Low-fat cottage cheese can make a lighter mousse, although the final texture may be slightly less indulgent.
If your cottage cheese is particularly watery, you can drain off a little excess liquid before blending.
3. Don’t add too much milk
It’s tempting to thin the mixture if it looks thick in the blender, but remember that a mousse should be thick enough to hold its shape.
Add milk gradually, only when necessary.
4. Adjust the sweetness gradually
Different cocoa powders have different levels of bitterness, and everyone’s sweet tooth is a little different.
Start with two tablespoons of maple syrup or honey, blend, and taste before adding more.
5. Let it chill
Although chilling is optional, I think it makes the biggest difference after blending. The mousse firms up, the chocolate flavor becomes more rounded, and the dessert feels more like something you’d order at a café.
6. Use toppings that complement the chocolate
Fresh raspberries add a pleasant tartness, while toasted nuts provide a little crunch. Dark chocolate shavings make the dessert feel extra special without requiring much effort.
7. Don’t expect traditional whipped mousse
This recipe gets its creamy texture from blended cottage cheese rather than whipped cream or whipped egg whites. The result is dense, silky, and spoonable rather than especially airy.
That’s part of what makes it so easy to prepare!
Delicious Variations to Try
One of my favorite things about this recipe is how easy it is to change the flavor without starting from scratch.
Peanut Butter Chocolate Mousse
Blend in one tablespoon of peanut butter for a rich chocolate-peanut butter combination. You may need a little extra sweetener depending on the peanut butter you use.
Mocha Cottage Cheese Mousse
Add ½ teaspoon of instant espresso powder to deepen the chocolate flavor. It gives the mousse a subtle coffee note without making it taste overwhelmingly like coffee.
Chocolate Strawberry Mousse
Blend in two or three strawberries for a fruity twist, or simply serve fresh sliced strawberries on top.
Keep in mind that adding fresh fruit can change the texture and water content.
Chocolate Banana Mousse
Blend in half a ripe banana for natural sweetness and a mild banana flavor. Because bananas change the consistency and nutrition, you may want to use less maple syrup.
Dark Chocolate Mousse
Use a high-quality unsweetened cocoa powder and a little extra vanilla. Finish with finely grated dark chocolate for a dessert that tastes wonderfully rich.
Sugar-Free Cottage Cheese Chocolate Mousse
If you prefer to avoid added sugar, replace the maple syrup or honey with a sweetener suitable for your dietary needs. Adjust the amount according to the sweetener’s instructions and your taste.
Remember that sugar-free doesn’t automatically mean calorie-free, and the nutrition will depend on the ingredients you choose.
Serving Suggestions
This chocolate mousse is versatile enough for an afternoon snack, a quick dessert, or a make-ahead treat for guests.
Here are a few easy ways to serve it:
- After-dinner dessert: Serve in small glasses with a few dark chocolate curls.
- With fresh fruit: Pair with strawberries, raspberries, or sliced banana.
- As a dessert parfait: Layer the mousse with Greek yogurt and fresh berries.
- For a special occasion: Serve in elegant dessert glasses with chocolate shavings and a small mint leaf.
- As a sweet snack: Keep a portion chilled for when a chocolate craving strikes.
- With a crunchy topping: Add chopped almonds, hazelnuts, or a small amount of granola just before serving.
If you’re serving this to guests, I recommend preparing the mousse in individual glasses rather than one large bowl. It looks more polished and saves you from portioning it out at the table.
How to Store Cottage Cheese Chocolate Mousse
In the refrigerator: Store the mousse in an airtight container or covered individual serving glasses for up to 3 days. For the best texture and freshness, I prefer eating it within the first 1–2 days.
Before serving: Give it a gentle stir if you notice any separation. Add fresh toppings just before serving so they don’t release moisture into the mousse.
Can you freeze it? You can freeze it in a freezer-safe container, but the texture may change after thawing. It can become slightly grainy or watery, so refrigeration is the better option if you want the smoothest result.
I wouldn’t leave this dairy-based dessert sitting at room temperature for an extended period. Keep it refrigerated until you’re ready to serve.
Cottage Cheese Chocolate Mousse Nutrition Information
The exact nutrition depends on the cottage cheese brand, fat percentage, sweetener, and toppings you use.
The following is an approximate estimate for one serving, assuming the recipe makes two servings and uses full-fat cottage cheese, two tablespoons of unsweetened cocoa powder, two tablespoons of maple syrup, vanilla, and no optional milk or toppings.
| Nutrient | Approximate amount per serving |
|---|---|
| Calories | 175–200 kcal |
| Protein | 13–15 g |
| Carbohydrates | 18–22 g |
| Fat | 6–8 g |
| Sugar | 15–18 g |
| Fiber | 2–3 g |
These values are estimates, not laboratory-tested nutrition facts. Cottage cheese brands vary considerably in protein and fat content, so check your product label for a more accurate calculation.
Using low-fat cottage cheese may reduce the calories and fat, while adding peanut butter, chocolate chips, or other toppings will increase the totals.
The main nutritional advantage of this dessert is that cottage cheese contributes protein while the cocoa powder adds chocolate flavor without requiring a large amount of chocolate or cream.
Frequently Asked Questions
1. Does cottage cheese chocolate mousse taste like cottage cheese?
Not much once it’s blended properly. The cocoa powder, vanilla, and sweetener help balance the mild tanginess of cottage cheese. The key is blending until the mixture is completely smooth.
If you’re sensitive to the taste of cottage cheese, try a slightly sweeter version with a little extra vanilla.
2. Can I make cottage cheese chocolate mousse without a blender?
A food processor is a great alternative. An immersion blender may also work, depending on the size of your container and the power of the blender.
Hand-mixing with a spoon or whisk generally won’t remove the cottage cheese curds completely, so the mousse may turn out grainy.
3. Is cottage cheese chocolate mousse high in protein?
Yes, it can be a protein-rich dessert compared with many traditional chocolate mousse recipes. Cottage cheese provides most of the protein, and the exact amount depends on the brand and serving size.
With the ingredients listed here, you can expect approximately 13–15 grams of protein per serving, although this will vary.
4. Can I make this recipe ahead of time?
Absolutely! This is one of the easiest desserts to prepare ahead. Blend the ingredients, divide the mixture into serving glasses, cover, and refrigerate.
It’s usually best within 1–2 days, although it can be kept refrigerated for up to 3 days. Add toppings just before serving for the freshest presentation.
5. Why is my cottage cheese chocolate mousse grainy or runny?
A grainy texture usually means the cottage cheese hasn’t been blended long enough. Continue blending and scrape down the sides of your blender as needed.
If the mousse is runny, you may have added too much milk or used particularly watery cottage cheese. Next time, drain excess liquid and add any milk gradually. Chilling the finished mousse can also help it firm up.
Final Thoughts
This cottage cheese chocolate mousse is proof that a simple dessert can still feel special. With just a few everyday ingredients and a blender, you can make a creamy, chocolatey treat that’s easy to customize and contains a useful amount of protein.
I usually reach for this recipe when I want something sweet without the effort of baking. It’s quick enough for a regular weekday, but with a few chocolate shavings and fresh berries, it’s also lovely enough to serve to guests.