
Easy Microwave Bread in a Mug Recipe

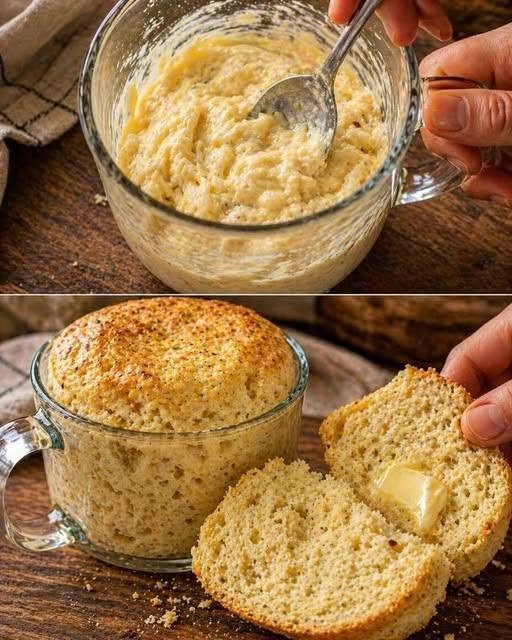
Have you ever wanted warm, freshly baked bread but didn’t want to wait for dough to rise or turn on the oven? That’s exactly why I love this easy microwave bread in a mug recipe. It is quick, simple, and made with everyday ingredients you probably already have in your kitchen.
Honestly, there is something so satisfying about mixing a few ingredients in a mug, popping it into the microwave, and watching it turn into a fluffy little loaf in just a couple of minutes. The bread in the picture has a lovely golden-looking top and a soft, airy inside that is perfect for spreading with butter.
I usually make this recipe when I need a quick breakfast, a simple afternoon snack, or a small serving of homemade bread without making an entire loaf. You don’t need a stand mixer, special baking equipment, or much cleanup. Just grab a microwave-safe mug, a spoon, and a handful of pantry staples.
This quick microwave bread is best enjoyed warm, especially with a little butter melting into the middle. You can also customize it with herbs, cheese, garlic powder, or your favorite seasonings to make it your own.
Let’s get started!
Why You’ll Love This Microwave Bread Recipe
- Ready in minutes: You can have fresh, warm bread in about 5 minutes.
- Simple ingredients: No complicated baking ingredients are required.
- No oven needed: Perfect for small kitchens, dorm rooms, or hot summer days.
- Small-batch recipe: Makes one generous serving, so you don’t have a whole loaf to finish.
- Easy to customize: Add cheese, herbs, spices, or seeds for extra flavor.
- Beginner-friendly: If you can stir ingredients together, you can make this bread.
Recipe Details
- Prep time: 3 minutes
- Cook time: 1½–2½ minutes
- Total time: Approximately 5 minutes
- Servings: 1
- Cooking method: Microwave
- Category: Quick bread, breakfast, snack
Ingredients for Microwave Bread in a Mug
You only need a few basic ingredients for this quick homemade bread.
Main Ingredients
- 4 tablespoons all-purpose flour: Forms the base of the bread and gives it structure.
- ¼ teaspoon baking powder: Helps the bread rise and become light and fluffy.
- 1 small pinch of salt: Brings out the flavor.
- 1 large egg: Adds moisture, structure, and richness.
- 1 tablespoon milk: Helps create a softer texture.
- 1 teaspoon melted butter or olive oil: Adds moisture and improves the flavor.
Optional Toppings and Add-Ins
- 1 teaspoon grated Parmesan cheese: For a savory, cheesy flavor.
- ¼ teaspoon garlic powder: Perfect for garlic bread lovers.
- ½ teaspoon dried oregano or mixed herbs: Adds a subtle herby taste.
- A pinch of black pepper: Gives the bread a little extra flavor.
- A small pat of butter: For serving while the bread is still warm.
A quick note: The exact texture depends on your microwave, mug size, and ingredient measurements. This version is a simple, egg-based microwave bread designed to give you a soft, fluffy result similar to the bread shown in the picture.
How to Make Microwave Bread in a Mug
Follow these easy steps to make your own warm mug bread at home.
Step 1: Choose a Microwave-Safe Mug
Use a wide, microwave-safe ceramic or glass mug with a capacity of at least 12 ounces. A wider mug helps the bread cook more evenly and gives it room to rise.
Lightly grease the inside with butter or oil to prevent sticking.
I usually choose a mug with straight sides because the bread is easier to remove once it has cooled slightly.
Step 2: Mix the Dry Ingredients
Add the flour, baking powder, and salt to the mug.
Stir with a fork or small spoon until everything is evenly combined. Make sure there are no lumps of baking powder, as they can leave an unpleasant taste in the finished bread.
If you’re making a cheesy or herby version, you can add the dry seasonings at this stage.
Step 3: Add the Wet Ingredients
Crack the egg into a separate small bowl and beat it lightly with a fork. Add the beaten egg, milk, and melted butter or oil to the mug.
Mix everything thoroughly until you have a smooth, thick batter with no dry flour remaining at the bottom.
Honestly, this is the step where I take an extra few seconds to scrape around the sides and bottom of the mug. Proper mixing helps the bread cook more evenly.
If the batter seems extremely thick, add another teaspoon of milk. It should be thick but easy to stir.
Step 4: Microwave the Bread
Place the mug in the microwave and cook on HIGH for approximately 90 seconds to start.
Check the center. If it is still wet or undercooked, continue cooking in 10–15-second intervals until the bread is set. Depending on your microwave’s power and the mug you use, the total cooking time may be around 1½–2½ minutes or longer.
The bread should rise, look set on top, and spring back lightly when touched.
Important: Microwave wattage varies, so cooking time is only a guide. Because this recipe contains egg, make sure the center is fully cooked before eating. If checking with a food thermometer, the center should reach 165°F (74°C).
Step 5: Let It Rest
Carefully remove the mug from the microwave using an oven mitt or towel because the mug may be very hot.
Let the bread rest for 1–2 minutes. This allows the steam to settle and makes it easier to remove.
Run a butter knife around the edge if needed, then gently turn the bread out onto a plate.
Step 6: Add Butter and Serve
Slice the bread in half or into thick pieces. Spread a little butter over the warm surface and let it melt into the soft crumb.
For extra flavor, sprinkle a little black pepper, dried herbs, or grated cheese on top.
Your homemade microwave bread is ready to enjoy!
Tips for the Best Fluffy Microwave Bread
Measure the Flour Correctly
Too much flour can make mug bread dense and dry. Spoon the flour into your measuring spoon and level it off instead of packing it tightly.
Don’t Overmix the Batter
Mix until the ingredients are combined and the batter is smooth. Excessive mixing can make the texture tougher than necessary.
Use Fresh Baking Powder
Baking powder helps the bread rise. If yours has been sitting in the cupboard for a long time, it may have lost some of its effectiveness.
Watch the Cooking Time
Microwave bread can go from soft to rubbery if cooked for too long. Start with 90 seconds and add short bursts as needed.
Let the Bread Rest
I know it’s tempting to dig in immediately, but giving the bread a minute or two to rest makes a noticeable difference in its texture.
Choose a Wide Mug
A wide mug allows the batter to spread out more evenly. Avoid filling the mug more than halfway, since the bread may rise as it cooks.
Delicious Variations to Try
One of my favorite things about this recipe is how easy it is to change the flavor.
Cheesy Microwave Bread
Add 1–2 tablespoons of grated cheddar or Parmesan to the batter. A little garlic powder makes it taste even better.
Garlic Herb Mug Bread
Mix in garlic powder, dried oregano, parsley, and a pinch of black pepper. Brush the cooked bread with melted garlic butter for a delicious savory snack.
Spicy Mug Bread
Add a pinch of chili flakes, paprika, or cayenne pepper. This version goes well with soups and spicy dips.
Whole Wheat Mug Bread
Replace half of the all-purpose flour with whole wheat flour. You may need an extra teaspoon or two of milk because whole wheat flour absorbs more moisture.
Seeded Microwave Bread
Add a teaspoon of sesame seeds, sunflower seeds, or flaxseeds for a little crunch. Keep the additions modest so the bread stays light.
Sweet Cinnamon Mug Bread
For a sweeter version, add 1–2 teaspoons of sugar and a pinch of cinnamon. Leave out the savory herbs and pepper. The texture will be more like a quick breakfast bread than a traditional loaf.
What to Serve with Microwave Bread
This little loaf is surprisingly versatile. Here are some easy ways to enjoy it.
- Butter and honey: A simple combination for breakfast or an afternoon snack.
- Scrambled eggs: Serve alongside eggs for a more filling morning meal.
- Cheese and sliced tomatoes: Turn the bread into a quick savory snack.
- Soup: Pair it with tomato soup, vegetable soup, or creamy mushroom soup.
- Hummus: A tasty option for dipping warm bread into something creamy.
- Jam or fruit preserves: Ideal if you prefer a slightly sweet breakfast.
- Avocado: Top a slice with mashed avocado, salt, and black pepper.
If I am making this for breakfast, I usually keep things simple with butter and a cup of tea or coffee. For lunch, I prefer the garlic-herb version served alongside soup.
Common Mistakes to Avoid
Using too much flour: This can make the bread dry and heavy. Measure carefully.
Using a mug that is too small: The batter needs space to rise. Choose a large, microwave-safe mug.
Stopping the cooking too early: A set-looking top doesn’t always mean the center is fully cooked. Check the middle carefully.
Cooking for too long: Excessive microwave cooking can produce a rubbery texture. Use short cooking intervals near the end.
Expecting an oven-baked crust: Microwave bread generally has a soft surface rather than the crisp crust of conventional oven-baked bread. The golden color shown in photos can vary depending on ingredients and preparation.
Storage and Reheating
Microwave mug bread tastes best freshly made, while it is still warm and soft.
At room temperature: If you don’t eat it immediately, let it cool and avoid leaving it out for more than two hours.
In the refrigerator: Store cooled bread in an airtight container for up to 2–3 days.
Reheating: Microwave a slice for about 10–15 seconds, then check the texture. Heat for a few more seconds if needed.
The bread may become a little firmer after refrigeration, so adding a tiny amount of butter before reheating can help improve the texture.
For food safety, refrigerate leftovers promptly and discard them if they have been left out too long.
Approximate Nutrition Information
The following nutrition estimate is for one mug of bread made with the ingredients listed above, including the egg, flour, milk, and butter. Optional cheese and toppings are not included.
- Calories: 290 kcal
- Protein: 11 g
- Carbohydrates: 29 g
- Fat: 14 g
- Saturated fat: 5 g
- Fiber: 1 g
- Sugar: 2 g
- Sodium: 400–500 mg
These values are estimates and may vary depending on the exact ingredients, portion sizes, and brands used.
Frequently Asked Questions
1. Can I make microwave bread in a mug without yeast?
Yes! This recipe uses baking powder instead of yeast, so there is no need to wait for the dough to rise. It is a quick bread, which makes it ideal when you want something homemade in just a few minutes.
2. Why did my microwave mug bread turn out rubbery?
The most common reason is overcooking. Microwaves cook quickly, and even an extra 30 seconds can make a difference. Start with 90 seconds and continue in short intervals until the center is fully cooked. Too much flour can also contribute to a dense texture.
3. Can I make this recipe without eggs?
Yes, although the texture will change. You can experiment with 1 tablespoon of plain yogurt or a suitable commercial egg replacer, adding a little extra milk if necessary. The result may be denser and less airy than the egg-based version, and the cooking time may need adjustment.
4. Can I make microwave bread with self-rising flour?
Yes. Replace the all-purpose flour and baking powder with 4 tablespoons of self-rising flour. Keep the salt very small or omit it, since self-rising flour already contains salt. The final texture may vary slightly by brand.
5. Is microwave bread in a mug suitable for breakfast?
Absolutely! It is a convenient option for a quick breakfast, especially when served with eggs, cheese, nut butter, or yogurt. Since one mug provides a relatively small serving, pair it with a protein-rich side and some fruit if you want a more balanced meal.