
Chunky Chocolate Chip Nut Cookies

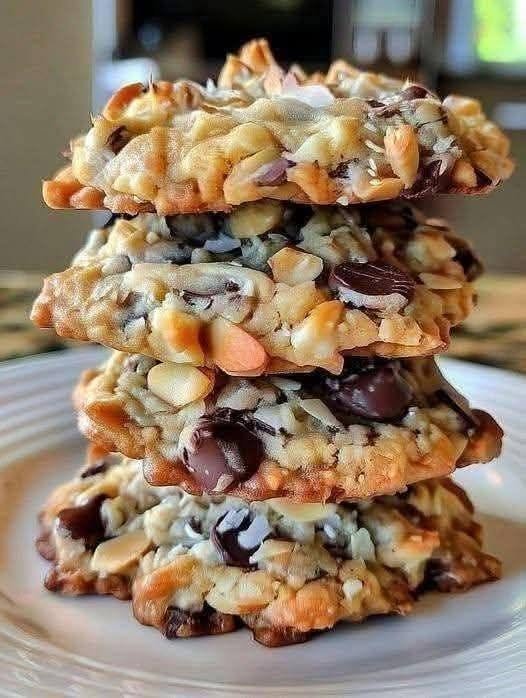
If you love cookies that are packed with chocolate, crunchy nuts, and plenty of buttery goodness, these Chunky Chocolate Chip Nut Cookies are going to become one of your favorite homemade treats!
There’s something special about homemade cookies. I love how the kitchen fills with that warm, sweet smell of butter, vanilla, and freshly baked chocolate. Honestly, sometimes I make a batch just because I’m craving something sweet with my afternoon coffee.
These cookies are a little different from ordinary chocolate chip cookies. They’re loaded with chopped nuts, generous chocolate chunks, and a soft, buttery dough that bakes into beautifully golden cookies. Every bite has a delicious combination of crunchy nuts, slightly crisp edges, and rich melted chocolate.
I usually prefer cookies that have plenty of texture rather than being completely soft and plain. That’s exactly what makes this recipe so good. The nuts add a lovely crunch, while the chocolate makes each cookie rich and satisfying.
The best part is that you don’t need any special equipment or complicated techniques. Just mix the ingredients, scoop the dough, and bake!
Whether you’re making them for your family, preparing homemade snacks, or looking for something delicious to serve with tea or coffee, these chunky nut chocolate chip cookies are always a wonderful choice.
Let’s get baking!
Why You’ll Love These Chunky Chocolate Chip Nut Cookies
- Loaded with chocolate: Every cookie has plenty of delicious chocolate chips or chunks.
- Extra crunchy: Chopped nuts add wonderful flavor and texture.
- Easy to prepare: No complicated baking techniques required.
- Perfect texture: Golden edges with a slightly chewy center.
- Great for sharing: Perfect for parties, lunchboxes, and homemade gifts.
- Customizable: Use your favorite combination of nuts and chocolate.
Recipe Details
- Preparation Time: 15 minutes
- Chilling Time: 30 minutes
- Cooking Time: 12–15 minutes
- Total Time: Approximately 1 hour
- Servings: 16 cookies
- Cuisine: American
- Course: Dessert, Snack
- Difficulty: Easy
Ingredients You’ll Need
These cookies use simple baking ingredients that you may already have in your kitchen.
For the Cookie Dough
- ½ cup (113 g) unsalted butter, softened
- ½ cup (100 g) brown sugar
- ¼ cup (50 g) granulated white sugar
- 1 large egg
- 1 teaspoon vanilla extract
- 1¼ cups (155 g) all-purpose flour
- ½ teaspoon baking soda
- ¼ teaspoon baking powder
- ¼ teaspoon salt
- ½ teaspoon ground cinnamon (optional)
For the Chocolate and Nut Mixture
- ½ cup dark chocolate chips or chocolate chunks
- ¼ cup milk chocolate chips
- ½ cup chopped almonds
- ¼ cup chopped peanuts or cashews
- ¼ cup chopped walnuts or pecans
- ¼ cup rolled oats (optional)
For Topping
- Extra chocolate chunks
- A few chopped almonds
- A small pinch of flaky sea salt (optional)
Ingredient Tip: I love using a mixture of dark and milk chocolate because it creates a lovely balance of rich and sweet flavors. You can also use whatever nuts you have available.
How to Make Chunky Chocolate Chip Nut Cookies
Follow these simple steps to make delicious homemade cookies with plenty of chocolate and crunchy nuts.
Step 1: Prepare the Oven
Preheat your oven to 350°F (175°C).
Line a large baking sheet with parchment paper.
This helps prevent the cookies from sticking and makes cleanup much easier.
Step 2: Cream the Butter and Sugars
In a large mixing bowl, add the softened butter, brown sugar, and granulated sugar.
Using a hand mixer or wooden spoon, mix until the ingredients become creamy and well combined.
This usually takes around 2–3 minutes with an electric mixer.
I like using both brown and white sugar because brown sugar gives the cookies a slightly chewy texture, while white sugar helps create those lovely golden edges.
Step 3: Add the Egg and Vanilla
Add the egg and vanilla extract to the butter mixture.
Beat until everything is smooth and fully incorporated.
Scrape down the sides of the bowl if necessary so all the ingredients are evenly mixed.
Step 4: Combine the Dry Ingredients
In a separate bowl, whisk together the all-purpose flour, baking soda, baking powder, salt, and optional cinnamon.
Gradually add the dry ingredients to the wet mixture.
Mix gently until a soft cookie dough forms.
Avoid overmixing because this can make the cookies dense or tough.
Step 5: Add Chocolate and Nuts
Now comes my favorite part!
Add the dark chocolate chips, milk chocolate chips, chopped almonds, peanuts, walnuts, and optional rolled oats.
Fold everything into the dough using a spatula.
Make sure the chocolate and nuts are evenly distributed throughout the mixture.
Honestly, don’t be afraid to add a few extra chocolate chunks if you love chocolate as much as I do!
Step 6: Chill the Cookie Dough
Cover the bowl with plastic wrap and refrigerate the dough for approximately 30 minutes.
Chilling helps the butter firm up and prevents the cookies from spreading too much during baking.
It also allows the flavors to develop, giving you a richer-tasting cookie.
Step 7: Shape the Cookies
Remove the chilled dough from the refrigerator.
Scoop approximately 2 tablespoons of dough for each cookie and roll gently into balls.
Place them on the prepared baking sheet, leaving about 2 inches of space between each cookie.
Gently press a few extra chocolate chunks and chopped nuts onto the tops.
For a chunky, bakery-style appearance, I usually leave the tops slightly uneven rather than flattening the dough completely.
Step 8: Bake Until Golden
Place the baking sheet in the preheated oven.
Bake for approximately 12–15 minutes, or until the edges are lightly golden and the centers still look slightly soft.
Remember that cookies continue to firm up as they cool, so don’t wait until the centers look completely hard.
If you prefer crispier cookies, leave them in the oven for another minute or two, keeping a close eye on them.
Step 9: Cool and Enjoy
Remove the baking sheet from the oven.
If desired, sprinkle a little flaky sea salt over the warm cookies.
Allow them to rest on the baking sheet for about 5 minutes before transferring them to a wire cooling rack.
This helps the cookies set without breaking.
Once cooled slightly, they’re ready to enjoy!
You’ll love the combination of buttery cookie dough, crunchy nuts, and delicious chocolate in every bite.
My Best Tips for Perfect Nut Chocolate Chip Cookies
Here are a few simple tips I usually follow to get delicious cookies every time.
1. Use softened butter. Butter should be soft enough to press with your finger but not melted. Melted butter can cause excessive spreading.
2. Don’t skip chilling. Refrigerating the dough helps control spreading and improves the cookie texture.
3. Use different types of nuts. Almonds, walnuts, pecans, hazelnuts, and peanuts all work beautifully.
4. Toast the nuts first. Lightly toasting the nuts in a dry skillet for a few minutes can bring out their natural flavor. Let them cool before adding them to the dough.
5. Don’t overmix the dough. Once the flour is incorporated, stop mixing. Overworking the dough can make the cookies tough.
6. Use good-quality chocolate. Chocolate chunks create delicious melted pockets throughout the cookies.
7. Don’t overbake. The centers should look slightly soft when you remove the cookies from the oven.
8. Make bakery-style cookies. Add a few extra chocolate chunks and nuts on top before baking for a beautiful, chunky appearance.
What Nuts Work Best in These Cookies?
One thing I love about this recipe is that you can use almost any nuts you enjoy.
Here are some delicious options:
- Almonds: Add a lovely crunchy texture and mild nutty flavor.
- Walnuts: Give the cookies a rich, slightly earthy taste.
- Pecans: Add a buttery flavor that pairs beautifully with chocolate.
- Peanuts: Create a delicious sweet-and-salty combination.
- Cashews: Add a creamy, slightly sweet crunch.
- Hazelnuts: Pair especially well with dark chocolate.
You can use one type of nut or combine several varieties.
If you’re making these cookies for guests, remember to check for nut allergies and clearly label the ingredients.
What to Serve with Chocolate Chip Nut Cookies
These cookies are delicious on their own, but they become even more enjoyable when served with your favorite drink.
Here are some of my favorite pairings:
- A glass of cold milk: A classic combination that never disappoints.
- Hot coffee: The slightly bitter taste of coffee balances the sweetness of the cookies.
- Hot chocolate: Perfect for a cozy winter afternoon.
- Tea: Serve with black tea, green tea, or your favorite herbal tea.
- Vanilla ice cream: Sandwich a scoop of ice cream between two cookies for a delicious dessert.
- Fresh berries: Strawberries or raspberries add a refreshing contrast.
For a special dessert, warm a cookie slightly and serve it with vanilla ice cream and a drizzle of melted chocolate.
Easy Variations to Try
Want to make these cookies a little different? Here are some easy ideas.
1. Double Chocolate Nut Cookies
Replace 2 tablespoons of flour with unsweetened cocoa powder and use extra chocolate chunks for a rich chocolate flavor.
2. Oatmeal Chocolate Chip Nut Cookies
Add ½ cup rolled oats to the dough for a heartier texture and extra chewiness.
3. Peanut Butter Chocolate Chip Cookies
Replace 2 tablespoons of softened butter with creamy peanut butter for a delicious nutty flavor.
4. White Chocolate Almond Cookies
Use white chocolate chips and chopped almonds for a sweeter, buttery variation.
5. Cranberry Nut Cookies
Add ¼ cup dried cranberries for a sweet and slightly tangy flavor.
6. Salted Chocolate Nut Cookies
Sprinkle a little flaky sea salt over the cookies immediately after baking to balance the sweetness.
How to Store Homemade Nut Chocolate Chip Cookies
If you have leftover cookies, storing them properly will help maintain their delicious texture.
At Room Temperature: Allow the cookies to cool completely, then place them in an airtight container. Store at room temperature for up to 5–7 days.
In the Refrigerator: You can refrigerate the cookies in an airtight container for up to 10 days, although they may become firmer.
In the Freezer: Place completely cooled cookies in a freezer-safe container or bag. Freeze for up to 2–3 months for best quality.
To enjoy frozen cookies, allow them to thaw at room temperature or warm them briefly in the oven.
Can You Freeze the Cookie Dough?
Absolutely!
Freezing cookie dough is one of my favorite ways to prepare homemade cookies ahead of time.
Follow these simple steps:
- Prepare the cookie dough as directed.
- Scoop the dough into individual portions.
- Place the portions on a parchment-lined tray.
- Freeze until firm.
- Transfer the frozen dough balls to a freezer-safe bag.
- Label and store for up to 2–3 months.
When you’re ready to bake, arrange the frozen dough balls on a baking sheet and bake at 350°F (175°C), adding approximately 2–4 minutes to the usual baking time. Check for golden edges and set centers.
This way, you can enjoy freshly baked cookies whenever a craving strikes!
Approximate Nutrition Information
The following nutrition information is estimated per cookie, assuming the recipe makes 16 cookies.
| Nutrient | Approximate Amount |
|---|---|
| Calories | 225 kcal |
| Protein | 4 g |
| Carbohydrates | 25 g |
| Fat | 13 g |
| Saturated Fat | 6 g |
| Fiber | 2 g |
| Sugar | 15 g |
| Sodium | 120 mg |
Nutrition values are estimates and vary depending on the types of chocolate, nuts, and exact ingredient quantities used.
Frequently Asked Questions
1. Why did my chocolate chip nut cookies spread too much?
Cookies can spread excessively if the butter is too soft or melted, the dough is too warm, or there is not enough flour. Make sure to measure the flour correctly and chill the dough for at least 30 minutes before baking.
2. Can I use different nuts in this recipe?
Absolutely! Almonds, walnuts, pecans, cashews, hazelnuts, and peanuts are all delicious options. You can use one variety or combine several to create your own favorite nut mixture.
3. Can I make these cookies without oats?
Yes! The oats are completely optional in this recipe. You can leave them out without making any other changes. The cookies will still be delicious and chunky.
4. How do I make my cookies soft and chewy?
Use brown sugar, avoid overmixing the dough, chill before baking, and remove the cookies when their edges are golden but their centers still look slightly soft. Allow them to cool on the baking sheet so they can finish setting.
5. Can I make these cookies ahead of time?
Yes! You can prepare the dough up to 48 hours ahead and keep it covered in the refrigerator. You can also freeze individual dough portions for up to 2–3 months and bake them whenever you want freshly made cookies.