
Homemade Chocolate Cream Bars Recipe

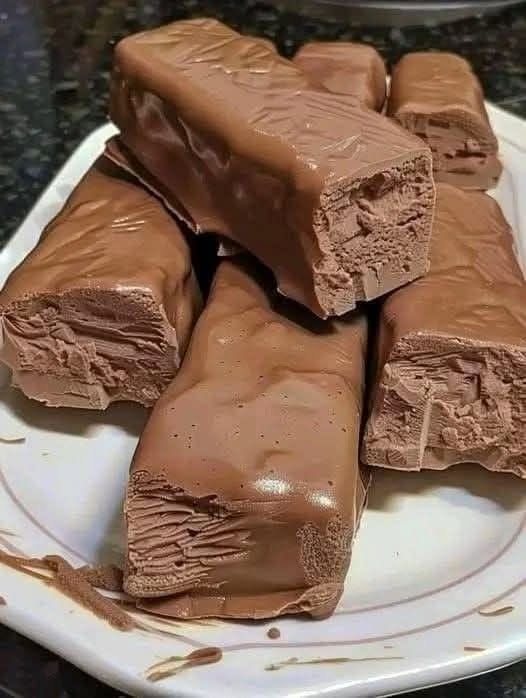
If you’re a chocolate lover like me, you’re going to fall in love with these homemade chocolate cream bars!
There’s something incredibly satisfying about making your own chocolate bars at home. You get that beautiful chocolate coating on the outside, followed by a soft, rich, and creamy chocolate filling that practically melts in your mouth.
Honestly, I love recipes like this because they look like something you’d buy from a fancy chocolate shop, but they’re surprisingly easy to prepare in your own kitchen.
I usually prefer homemade chocolate treats that don’t require complicated equipment or hours of baking. These chocolate cream bars are perfect because there’s no oven involved, and you only need a few simple ingredients.
The inside is wonderfully soft and fluffy, while the outside has a delicious milk chocolate shell. Once chilled and sliced into bars, they look absolutely beautiful on a serving plate.
They’re perfect for afternoon snacks, homemade gifts, birthday parties, or whenever you’re craving something sweet.
Let’s make them!
Why You’ll Love These Homemade Chocolate Bars
- No baking required: Everything comes together without turning on the oven.
- Rich chocolate flavor: Both the filling and coating are full of chocolate goodness.
- Beautiful texture: A soft, creamy centre covered with a smooth chocolate shell.
- Simple ingredients: You don’t need anything complicated.
- Perfect for gifting: Wrap individual bars in food-safe chocolate wrappers.
- Make-ahead friendly: Prepare them in advance and keep them chilled until serving.
Ingredients for Homemade Chocolate Cream Bars
Here is everything you’ll need to make these delicious homemade chocolate treats.
For the Chocolate Filling
- 250g milk chocolate: Creates the rich chocolate base of the filling.
- 150ml heavy whipping cream: Gives the centre a soft, creamy texture.
- 30g unsalted butter: Adds richness and smoothness.
- 2 tablespoons cocoa powder: Enhances the chocolate flavor.
- 1 teaspoon vanilla extract: Adds a lovely aroma.
- Pinch of salt: Balances the sweetness.
For the Chocolate Coating
- 300g milk chocolate: Used to create the outer chocolate shell.
- 1 tablespoon coconut oil: Helps make the melted chocolate smoother and easier to coat the bars.
Note: This version makes soft, creamy chocolate centres rather than a firm, chewy protein-bar or nougat texture.
How to Make Homemade Chocolate Cream Bars
Step 1: Prepare Your Baking Tray
Start by choosing a rectangular baking dish or loaf pan.
Line it with parchment paper, making sure there is enough overhang on the sides to help you lift out the chocolate filling later.
Set it aside while you prepare the mixture.
Step 2: Melt the Chocolate
Break the 250g milk chocolate into small pieces and place it in a heatproof bowl.
Heat the heavy cream in a small saucepan until steaming but not boiling.
Pour the warm cream over the chopped chocolate and leave it for approximately 2 minutes.
Gently stir until the chocolate melts completely and becomes smooth and glossy.
Add the butter, cocoa powder, vanilla extract, and a pinch of salt.
Stir until everything is beautifully combined.
Step 3: Whip the Chocolate Filling
Allow the chocolate mixture to cool until it is no longer warm but still soft.
Place it in the refrigerator until it becomes thick and spreadable, usually around 1–2 hours.
Once chilled, use an electric hand mixer to whip the mixture until it becomes lighter and fluffy.
I recommend starting at a low speed and gradually increasing it.
Don’t overwhip, as you want a smooth, airy filling rather than a grainy mixture.
Step 4: Shape the Chocolate Bars
Transfer the whipped chocolate filling into your prepared baking dish.
Spread it evenly using a spatula.
Aim for a thickness of approximately 2–3cm so that the finished bars have a nice chunky appearance.
Smooth the top and place the dish in the refrigerator for at least 2 hours, or until the filling is firm enough to cut.
Step 5: Cut Into Bars
Once the chocolate filling has set, lift it out of the dish using the parchment paper.
Place it on a clean cutting board.
Using a sharp knife, cut the filling into rectangular bars.
You can make them large or small depending on your preference.
If the mixture starts becoming soft while cutting, return it to the refrigerator for a few minutes.
Step 6: Prepare the Chocolate Coating
Break the remaining 300g milk chocolate into small pieces.
Place it in a heatproof bowl with the coconut oil.
Melt gently using a microwave in short 15–20-second intervals, stirring between each interval.
Alternatively, melt it over a saucepan of gently simmering water.
Stir until the chocolate is completely smooth.
Allow it to cool slightly so it isn’t too hot when coating the bars.
Step 7: Coat the Chocolate Bars
Remove the chilled chocolate centres from the refrigerator.
Using a fork or dipping tool, carefully dip each bar into the melted chocolate.
Make sure all sides are covered.
Allow the excess chocolate to drip back into the bowl before placing each coated bar onto a parchment-lined tray.
For an attractive finish, drizzle a little extra melted chocolate over the tops.
Step 8: Chill Until Set
Place the coated chocolate bars in the refrigerator for approximately 20–30 minutes, or until the chocolate shell has completely hardened.
Once set, transfer them to a serving plate.
Break one in half to reveal that beautiful chocolate centre!
Your homemade chocolate cream bars are ready to enjoy.
Tips for the Best Homemade Chocolate Bars
Here are a few little tricks I usually follow to get the best results.
1. Use good-quality chocolate.
Since chocolate is the main ingredient, its quality makes a big difference. Choose milk chocolate that you enjoy eating on its own.
2. Don’t overheat the chocolate.
Chocolate can easily become thick or grainy if overheated. Melt it gently and stir frequently.
3. Chill the filling properly.
The chocolate centres need to be firm enough to cut and dip. If they’re too soft, they may fall apart during coating.
4. Keep your utensils dry.
Even a small amount of water can cause melted chocolate to seize and become lumpy.
5. Use a sharp knife.
For neat, professional-looking bars, warm your knife slightly and wipe it clean between cuts.
6. Work in batches.
Keep the remaining chocolate centres in the refrigerator while coating a few at a time. This helps them stay firm.
7. Let the coating set completely.
Don’t rush this step. Allowing the chocolate shell to harden gives the bars their lovely finished appearance.
Delicious Variations to Try
Once you’ve mastered the basic recipe, there are plenty of ways to change things up.
- Dark chocolate bars: Use dark chocolate instead of milk chocolate for a richer, less sweet flavor.
- White chocolate bars: Replace the outer coating with melted white chocolate.
- Hazelnut chocolate bars: Add a little hazelnut spread to the filling for a delicious nutty flavor.
- Peanut butter chocolate bars: Swirl a few tablespoons of smooth peanut butter into the chocolate filling.
- Coconut chocolate bars: Add a little finely shredded coconut to the filling.
- Crunchy chocolate bars: Sprinkle crushed roasted nuts or crispy rice into the filling.
My personal favorite variation would be adding hazelnut spread. Chocolate and hazelnut are such a wonderful combination!
How to Serve Homemade Chocolate Cream Bars
These chocolate bars are delicious straight from the refrigerator.
Here are some lovely ways to enjoy them:
- Serve alongside a cup of hot coffee or tea.
- Add them to a homemade dessert platter.
- Cut them into smaller pieces for birthday parties.
- Wrap them individually for homemade edible gifts.
- Serve with fresh strawberries or raspberries.
- Chop them into pieces and use them as an ice cream topping.
They’re also lovely to serve after dinner when everyone wants just a little something sweet.
How to Store Homemade Chocolate Bars
Refrigerator: Store the bars in an airtight container in the refrigerator for up to 5 days. Because the filling contains cream, keep them refrigerated.
Freezer: Place the bars in a freezer-safe container with parchment paper between the layers. Freeze for up to 1 month for best quality.
Thawing: Allow frozen bars to thaw in the refrigerator before serving.
I personally prefer eating these slightly chilled because the filling stays firm while the chocolate coating gives a lovely little snap.
Approximate Nutrition Information
The following nutrition information is estimated per bar, assuming the recipe makes 12 bars.
- Calories: 290 kcal
- Protein: 4g
- Carbohydrates: 27g
- Fat: 19g
- Saturated Fat: 11g
- Sugar: 24g
- Fibre: 2g
- Sodium: 45mg
Nutrition information is approximate and will vary depending on the brand of chocolate and cream used.
Frequently Asked Questions
1. Can I make homemade chocolate cream bars without baking?
Absolutely! This is a completely no-bake recipe. The filling is prepared by melting and whipping chocolate with cream, then chilling it until firm. The finished bars are coated in melted chocolate and refrigerated until set.
2. Why is my chocolate filling too soft?
Your filling may not have chilled long enough, or the cream-to-chocolate ratio may be too high. Return it to the refrigerator until firm enough to handle. Make sure you use heavy whipping cream with a suitable fat content.
3. Can I use dark chocolate instead of milk chocolate?
Yes! Dark chocolate works beautifully in this recipe. It creates a deeper chocolate flavor and makes the bars less sweet. You can also use a combination of milk and dark chocolate.
4. How do I get a smooth chocolate coating?
Make sure your chocolate is completely melted and free from lumps. Adding a little coconut oil helps create a smoother coating. Also, ensure the chocolate centres are chilled and firm before dipping.
For a professional snap and shine, use properly tempered chocolate rather than simply melted chocolate.
5. Can I make these chocolate bars ahead of time?
Yes! These are perfect for preparing ahead. You can make them a day or two before serving and store them in an airtight container in the refrigerator. They’re especially convenient for parties, celebrations, and homemade food gifts.