
Air Fryer Hasselback Chicken with Bacon and Cheese

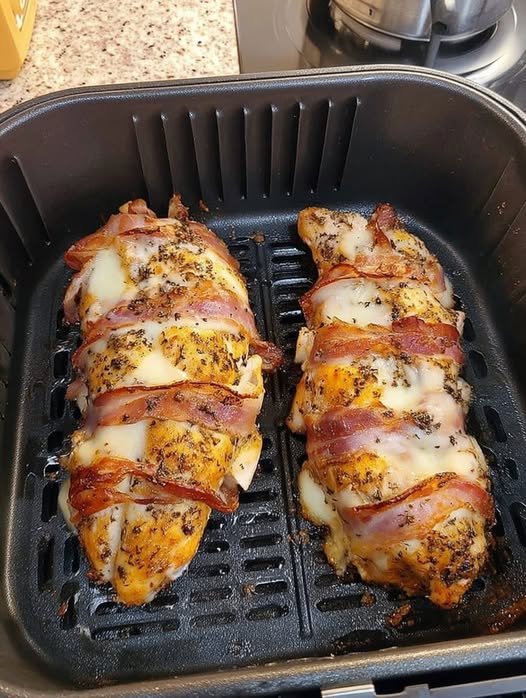
I love recipes that use simple ingredients but turn out looking and tasting amazing. Chicken breasts can sometimes get a little boring, especially when you cook them the same way every week. That’s why I enjoy making this recipe. The little cuts in the chicken allow all that delicious cheese and seasoning to get into every bite, while the bacon adds a smoky flavor and helps keep the chicken juicy.
I usually make this when I want something filling without spending hours in the kitchen. The air fryer does most of the work, giving the bacon beautifully browned edges and melting the cheese into all those little pockets.
The best part? You only need a handful of everyday ingredients. Serve it with roasted vegetables, a fresh salad, or some crispy potatoes, and you’ve got a satisfying meal the whole family will enjoy.
If you love bacon, melted cheese, and tender chicken, this easy air fryer chicken recipe is going to become a favorite!
Ingredients
This recipe makes 4 servings.
Main Ingredients
- 4 boneless, skinless chicken breasts
- 8–12 slices bacon, depending on the size of the chicken breasts
- 8 slices mozzarella cheese or provolone cheese
- 2 tablespoons olive oil
- 1 teaspoon garlic powder
- 1 teaspoon paprika
- 1 teaspoon Italian seasoning
- ½ teaspoon onion powder
- ½ teaspoon black pepper
- ½ teaspoon salt, or to taste
- 2 tablespoons fresh parsley, chopped (for garnish)
Optional Ingredients
- ½ teaspoon chili flakes for a little heat
- ¼ cup shredded cheddar cheese for extra cheesiness
- ½ teaspoon dried oregano for additional flavor
Step-by-Step Instructions
Step 1: Prepare the Chicken
Start by patting the chicken breasts dry with paper towels.
Place each chicken breast on a cutting board and use a sharp knife to make several deep cuts across the top, about ½–¾ inch apart.
Be careful not to cut all the way through the chicken. You want to create little pockets while keeping the bottom of each breast intact.
These cuts give the chicken its classic Hasselback appearance and provide plenty of room for the cheese.
Step 2: Season the Chicken
In a small bowl, combine the garlic powder, paprika, Italian seasoning, onion powder, black pepper, and salt.
Brush the chicken breasts lightly with olive oil, then rub the seasoning mixture over the tops and sides.
Make sure to get some seasoning inside the cuts for extra flavor.
I usually season the chicken generously because it makes a big difference in the final taste.
Step 3: Add the Cheese
Cut the mozzarella or provolone cheese into small pieces or strips.
Carefully tuck a piece of cheese into each cut in the chicken breasts.
Don’t worry if a little cheese sticks out. It will melt beautifully as the chicken cooks.
For an extra cheesy version, you can mix mozzarella with a little cheddar.
Step 4: Wrap with Bacon
Take 2–3 bacon slices for each chicken breast and gently wrap them around the chicken.
Position the bacon across the chicken so that it holds everything together while leaving some of the cheese-filled cuts visible.
Secure the bacon underneath the chicken if necessary using toothpicks. Remember to remove the toothpicks before serving.
Step 5: Preheat the Air Fryer
Preheat your air fryer to 375°F (190°C) for approximately 3 minutes, following your appliance’s instructions.
Lightly grease the air fryer basket if needed to prevent sticking.
Arrange the chicken breasts in a single layer, leaving a little space between each piece so the hot air can circulate properly.
Depending on the size of your air fryer, you may need to cook them in batches.
Step 6: Air Fry Until Golden and Cooked
Air fry the chicken at 375°F (190°C) for approximately 18–25 minutes, depending on the thickness of the chicken breasts and your air fryer.
Turn the chicken carefully halfway through if needed for more even bacon browning.
Check the thickest part of each chicken breast with a meat thermometer. The chicken must reach an internal temperature of 165°F (74°C) for safe consumption.
If the chicken is cooked but the bacon needs more browning, cook for another 2–3 minutes, watching carefully.
Cooking time can vary, so always use the internal temperature rather than appearance alone to determine doneness.
Step 7: Rest and Garnish
Once cooked, carefully remove the chicken from the air fryer and let it rest for about 5 minutes.
This helps the juices settle and keeps the chicken tender.
Sprinkle fresh parsley over the top and serve while the cheese is still warm and melted.
Enjoy every delicious bite!
Cooking Tips for Perfect Hasselback Chicken
1. Choose Chicken Breasts of Similar Size
Try to use chicken breasts that are similar in thickness. This helps everything cook evenly and prevents smaller pieces from drying out.
2. Don’t Cut All the Way Through
When making the Hasselback cuts, leave the bottom of the chicken breast intact. This keeps the cheese inside and makes the chicken easier to handle.
3. Use Cheese That Melts Well
Mozzarella, provolone, Monterey Jack, and cheddar are all delicious options. I usually prefer mozzarella because it melts beautifully and has a mild flavor.
4. Don’t Overcrowd the Air Fryer
Leave enough space around each chicken breast for proper air circulation. If necessary, cook in batches.
5. Keep an Eye on the Bacon
Bacon thickness varies, and some air fryers cook faster than others. If the bacon browns too quickly, reduce the temperature slightly and continue cooking until the chicken reaches 165°F.
6. Let the Chicken Rest
Give the chicken a few minutes to rest before cutting into it. This helps retain moisture and keeps the cheese from running out immediately.
7. Customize the Seasoning
Feel free to add Cajun seasoning, smoked paprika, cayenne pepper, or your favorite chicken seasoning blend.
What to Serve with Air Fryer Hasselback Chicken
This bacon and cheese chicken is filling on its own, but pairing it with the right sides makes it an even better meal.
Here are some of my favorite serving ideas:
Roasted Vegetables: Serve with broccoli, carrots, zucchini, or Brussels sprouts for a colorful and delicious dinner.
Garlic Mashed Potatoes: Creamy mashed potatoes are perfect alongside the smoky bacon and melted cheese.
Fresh Garden Salad: A simple salad with lettuce, tomatoes, cucumber, and your favorite dressing adds a refreshing contrast.
Cauliflower Rice: If you’re looking for a lower-carb side dish, cauliflower rice is a great option.
Air Fryer Potatoes: Crispy potato wedges or roasted baby potatoes make this a comforting family meal.
Steamed Green Beans: Lightly seasoned green beans are another easy side that complements the rich chicken perfectly.
Storage and Reheating Instructions
Refrigerator: Allow leftover chicken to cool and store it in an airtight container in the refrigerator for up to 3–4 days.
Reheating in the Air Fryer: Reheat at 325°F (165°C) for approximately 5–8 minutes, checking that the center reaches 165°F.
Microwave: Place a portion on a microwave-safe plate and heat in short intervals until thoroughly warmed. The bacon may lose some of its crispiness.
Freezing: You can freeze fully cooked chicken in an airtight freezer-safe container for up to 2–3 months for best quality. Thaw overnight in the refrigerator before reheating.
Make-Ahead Tip: You can prepare the chicken, make the Hasselback cuts, add the cheese, and wrap it with bacon several hours ahead. Keep it covered in the refrigerator until you’re ready to cook. Always cook it thoroughly before serving.
Approximate Nutrition Information
Estimated nutrition per serving, assuming 4 servings:
- Calories: 480
- Protein: 58 g
- Carbohydrates: 3 g
- Fat: 25 g
- Saturated Fat: 10 g
- Fiber: 0 g
- Sugar: 1 g
- Sodium: 850 mg
Nutrition values are approximate and will vary depending on the size of the chicken breasts, type of bacon, and amount of cheese used.
Frequently Asked Questions
1. Can I use chicken thighs instead of chicken breasts?
Yes! Boneless, skinless chicken thighs can also work. They are naturally juicier and have a slightly richer flavor. However, they are smaller and thinner, so adjust the cooking time and check that the thickest part reaches 165°F (74°C).
2. What is the best cheese for Hasselback chicken?
Mozzarella is a great choice because it melts smoothly and creates that delicious cheesy texture. Provolone, cheddar, Monterey Jack, and Swiss cheese are also excellent options.
3. Can I make Hasselback chicken without an air fryer?
Absolutely! Preheat your conventional oven to 400°F (200°C). Place the prepared chicken in a baking dish and bake for approximately 25–35 minutes, depending on thickness, until the thickest part reaches 165°F (74°C). Broil briefly if you want extra-browned bacon, watching carefully.
4. How do I keep the chicken from drying out?
The most important thing is not to overcook it. Use chicken breasts of similar size, avoid excessively high temperatures, and check the internal temperature with a meat thermometer. Letting the chicken rest for 5 minutes before serving also helps.
5. Can I make this recipe ahead of time?
Yes! Prepare the seasoned chicken, add the cheese, and wrap it with bacon ahead of time. Store it covered in the refrigerator and air fry when you’re ready. For the best texture, I recommend cooking it fresh rather than reheating it.
Conclusion
This Air Fryer Hasselback Chicken with Bacon and Cheese is one of those recipes that makes an ordinary dinner feel extra special. The chicken turns out tender and juicy, the bacon adds a delicious smoky crunch, and the melted cheese tucked into every little pocket makes each bite irresistible.
Honestly, I love how easy this recipe is. You don’t need complicated ingredients or hours of preparation to make a meal that looks impressive and tastes amazing.