
Easy Dutch Oven Crusty Bread Recipe

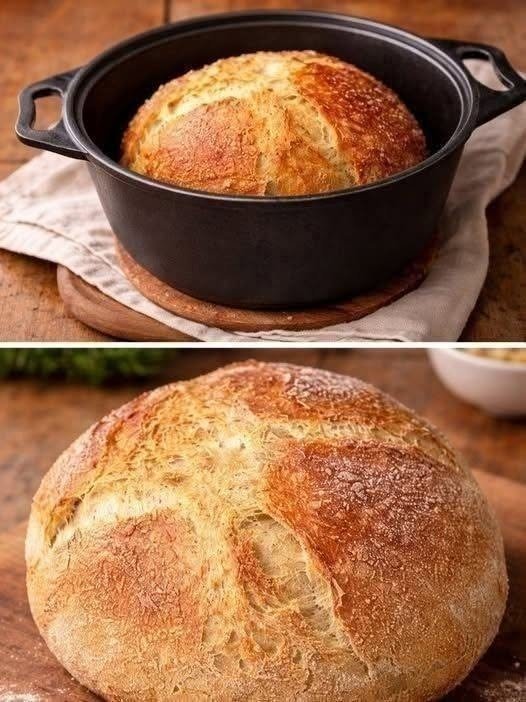
There is something incredibly satisfying about pulling a beautiful loaf of homemade bread out of the oven. That golden, crackly crust, the rustic appearance, and the soft, airy inside make it hard to believe you can create bakery-style bread in your own kitchen with just a few basic ingredients.
Honestly, this Dutch oven bread recipe is one of my favorite ways to make homemade bread without investing in special baking equipment or spending hours kneading dough. The first time I tried baking bread in a Dutch oven, I was amazed at how much the crust resembled the artisan loaves from a local bakery.
The secret is surprisingly simple: a hot Dutch oven traps steam around the dough during the first part of baking. This helps the bread rise beautifully and develop that crisp, golden crust you see in the photos.
I usually mix the dough in the evening, let it rise overnight, and bake it the next day. There’s no complicated kneading, no fancy ingredients, and no bread machine required. Just flour, water, yeast, salt, and a little patience.
Whether you’re a beginner baker or someone who already enjoys making bread from scratch, this easy Dutch oven bread recipe is worth adding to your collection.
Why You’ll Love This Homemade Dutch Oven Bread
- Only 4 basic ingredients: You probably already have most of them in your pantry.
- No kneading required: A simple mixing method makes this recipe beginner-friendly.
- Beautiful bakery-style crust: Baking in a covered Dutch oven creates the steam needed for a crisp exterior.
- Soft and chewy inside: The loaf has a rustic texture with a tender crumb.
- Perfect for beginners: You don’t need a stand mixer or complicated bread-making skills.
- Great for everyday meals: Serve it with soups, pasta, salads, or simply with butter.
Ingredients You’ll Need
One of the best things about this crusty artisan bread is its short ingredient list. Each ingredient plays an important role in the final texture and flavor.
Main Ingredients
- 3 cups (360 g) all-purpose flour or bread flour: Bread flour gives a slightly chewier loaf, while all-purpose flour works beautifully for everyday baking.
- 1½ teaspoons salt: Enhances the flavor and helps control yeast activity.
- ½ teaspoon instant yeast: A small amount is enough for a slow rise that develops flavor over time.
- 1½ cups (360 ml) lukewarm water: Hydrates the flour and creates the sticky dough that helps produce an open crumb.
Note: Flour absorbs water differently depending on the brand, humidity, and measuring method. If the dough seems unusually stiff, add a teaspoon of water at a time. If it is very loose, give the flour time to hydrate before adding extra.
Equipment
- A 4–6-quart Dutch oven with a lid
- A large mixing bowl
- A wooden spoon or sturdy spatula
- Parchment paper suitable for the baking temperature
- A kitchen scale, if available
- A cooling rack
Make sure your Dutch oven and lid are rated for the oven temperature you plan to use.
How to Make Dutch Oven Bread
Step 1: Mix the Dough
In a large mixing bowl, combine the flour, salt, and instant yeast. Stir everything together so the yeast and salt are evenly distributed.
Pour in the lukewarm water and mix with a wooden spoon until no large patches of dry flour remain.
The dough should look sticky, rough, and a little shaggy. It won’t resemble the smooth dough you might expect from traditional kneaded bread, and that’s completely normal.
I usually resist the temptation to add extra flour at this stage. A slightly sticky dough helps create a moist interior and a lovely rustic texture.
Cover the bowl with plastic wrap, a reusable cover, or a clean kitchen towel.
Step 2: Let the Dough Rise
Leave the covered dough at room temperature for approximately 8–12 hours, or until it has expanded noticeably and looks bubbly on the surface.
The exact time depends on your kitchen temperature and the strength of your yeast. A warmer room speeds up fermentation, while a cooler room slows it down.
I usually mix the dough before bed and let it rise overnight. By morning, it should look airy and have a slightly fermented aroma.
Don’t worry if the dough looks uneven or has bubbles on top. Those are good signs that fermentation is working.
If the dough hasn’t risen much, give it more time rather than rushing to the next step.
Step 3: Shape the Dough
Lightly flour a clean work surface and gently scrape the dough out of the bowl.
With floured hands or a dough scraper, fold the edges of the dough toward the center several times to create a loose ball. Turn it seam-side down and gently shape it into a round loaf.
Avoid pressing out all the air. Those bubbles help give the finished bread its characteristic texture.
Place the dough seam-side down on a piece of parchment paper.
Cover loosely and let it rest for another 30–45 minutes while the oven heats. The dough should look slightly puffier when it’s ready to bake.
Step 4: Preheat the Dutch Oven
Place the empty Dutch oven and its lid inside your oven.
Preheat to 450°F (232°C) for approximately 30 minutes.
This step is important because the hot pot helps the bread begin rising immediately when the dough goes in. It also contributes to the crisp crust.
Be careful when handling the Dutch oven. Both the pot and lid will be extremely hot, so use thick, dry oven mitts.
Step 5: Score the Bread
Using a sharp bread lame or a very sharp knife, make one shallow slash across the top of the dough, about ¼ inch deep.
Scoring gives the loaf a controlled place to expand as it bakes. It also creates the attractive split crust often seen on artisan bread.
You can keep it simple with one long slash or make a small decorative pattern if you prefer.
Step 6: Bake With the Lid On
Carefully remove the hot Dutch oven from the oven.
Using the parchment paper as a sling, lower the dough into the pot. Replace the lid and return the pot to the oven.
Bake covered for 30 minutes.
During this stage, the covered pot traps moisture released by the dough. The steam helps the loaf expand before the crust becomes firm.
Honestly, this is the part that makes Dutch oven bread so rewarding. You don’t need to create steam separately or use a professional bread oven.
Step 7: Bake Until Golden and Crispy
Remove the lid carefully and continue baking for another 10–15 minutes, or until the crust is deeply golden brown.
If you prefer a lighter crust, start checking a little earlier. For a darker, crunchier exterior, let it bake toward the longer end of the range.
The bread should feel firm on the outside and sound somewhat hollow when tapped on the bottom. If you use a thermometer, the center of the loaf will generally be around 200–210°F (93–99°C) when fully baked.
Transfer the loaf to a cooling rack.
Step 8: Let the Bread Cool Before Slicing
I know it’s tempting to slice into fresh bread immediately, especially when the kitchen smells amazing. However, let the loaf cool for at least 45–60 minutes before cutting.
The inside continues to set as it cools. Cutting too soon can make the crumb gummy or cause the loaf to lose moisture quickly.
Once cooled, slice it with a serrated bread knife and enjoy the contrast between the crisp crust and soft interior.
Tips for the Best Dutch Oven Bread
Measure the Flour Correctly
A kitchen scale gives the most reliable results. If you use measuring cups, spoon the flour into the cup and level it rather than packing it down.
Too much flour can make the dough dry and the finished loaf dense.
Use Lukewarm, Not Hot, Water
Water should feel mildly warm, not hot. Very hot water can damage the yeast and prevent the dough from rising properly.
Give the Dough Enough Time
Slow fermentation develops flavor and helps create a light texture. If your kitchen is cool, the dough may need longer than 8–12 hours.
Watch the dough rather than relying entirely on the clock.
Don’t Add Too Much Flour While Shaping
Sticky dough can be a little messy, especially for beginners. Lightly flour your hands and work surface, but avoid adding large amounts of extra flour.
A dough scraper makes shaping much easier.
Preheat the Pot Properly
A fully preheated Dutch oven helps create oven spring and a crisp crust. Don’t skip the preheating step unless your particular cookware manufacturer specifies otherwise.
Keep the Lid On During the First Bake
Opening the pot too early releases steam. Leave the lid on for the first 30 minutes so the bread has time to expand.
Let It Cool Completely
Cooling is part of the baking process, not an optional extra. Waiting helps the inside finish setting and makes slicing much easier.
Common Dutch Oven Bread Problems and How to Fix Them
My bread is too dense. The dough may not have risen enough, the flour may have been overmeasured, or the yeast may be inactive. Give the dough sufficient time to become airy before baking.
My dough is too sticky to handle. This is normal for no-knead bread. Use lightly floured hands, a dough scraper, and parchment paper instead of adding lots of extra flour.
The crust is too hard. Try reducing the uncovered baking time slightly, and let the loaf cool on a rack. A very dark crust can also result from an oven that runs hot.
The bottom is too dark. Your Dutch oven may be transferring heat very intensely. Try baking on a rack positioned in the lower-middle part of the oven and check your oven temperature with an oven thermometer.
The bread didn’t rise much in the oven. Possible causes include under-fermentation, over-fermentation, weak yeast, or a pot that wasn’t hot enough. Watch the dough’s appearance and adjust the rising time as needed.
What to Serve With Homemade Dutch Oven Bread
This rustic loaf is delicious on its own, but there are so many ways to enjoy it.
With Butter and Spreads
- Salted butter or homemade garlic butter
- Olive oil with herbs and black pepper
- Cream cheese or whipped herb butter
- Honey or your favorite fruit jam
I usually enjoy the first slice with a little salted butter while the bread is still slightly warm. Sometimes, the simplest way really is the best.
With Soups and Stews
Serve thick slices alongside tomato soup, creamy mushroom soup, chicken soup, lentil soup, or hearty beef stew. The crust is sturdy enough for dipping, while the soft inside soaks up flavorful broth.
With Pasta and Salads
Pair the loaf with spaghetti, baked pasta, roasted vegetables, or a fresh green salad. It also makes a lovely addition to a weekend family dinner.
For Sandwiches and Toast
Once completely cool, slice the bread for grilled cheese, tomato sandwiches, turkey sandwiches, or avocado toast.
For extra flavor, toast the slices and drizzle them with olive oil before adding your toppings.
How to Store Homemade Dutch Oven Bread
At Room Temperature
Allow the loaf to cool completely before storing it. Keep it in a paper bread bag or a bread box for about 2–3 days, depending on the humidity in your kitchen.
Avoid sealing warm bread in an airtight container because trapped moisture can soften the crust and encourage mold.
Can You Freeze Dutch Oven Bread?
Yes! This bread freezes well.
Once completely cool, slice the loaf or leave it whole. Wrap it tightly and place it in a freezer-safe bag or container. For the best quality, use it within about 2–3 months.
Freezing individual slices makes it easy to take out only what you need.
How to Reheat It
To refresh a whole loaf, heat it in a 350°F (175°C) oven for about 8–12 minutes. For individual slices, use a toaster or toaster oven.
If the bread has become slightly stale, it is also excellent for French toast, croutons, or homemade breadcrumbs.
Nutrition Information
The following nutrition information is an estimate based on the full recipe made with 360 g of all-purpose flour and divided into 10 servings. Actual values depend on your ingredients and slice size.
| Nutrient | Approx. per Serving |
|---|---|
| Calories | 130 kcal |
| Carbohydrates | 27 g |
| Protein | 4 g |
| Fat | 0.5 g |
| Saturated Fat | 0.1 g |
| Fiber | 1 g |
| Sugar | 0.2 g |
| Sodium | 350 mg |
These estimates are for the bread alone and do not include butter, olive oil, or other toppings.
Frequently Asked Questions
1. Can I Make Dutch Oven Bread With All-Purpose Flour?
Absolutely! All-purpose flour works very well in this recipe. Bread flour can give the loaf a slightly chewier texture because it generally contains more protein, but you don’t need it to make a delicious homemade loaf.
2. Do I Need to Knead the Dough?
No. This is a no-knead bread recipe. The long resting period allows the flour to hydrate and gluten to develop naturally, so you can achieve a lovely texture without kneading by hand.
3. Can I Make This Bread Without a Dutch Oven?
Yes, although the crust may turn out a little differently. You can bake the loaf on a preheated baking sheet or baking stone and use a suitable oven-safe cover or a separate steam tray to help create a humid baking environment.
Never pour cold water into a hot glass dish or onto an oven’s heating element, and only use cookware rated for the oven temperature.
4. Why Does My Bread Have a Thick, Hard Crust?
A thick crust can develop if the loaf bakes too long, the oven runs hot, or the dough loses too much moisture during baking. Try shortening the uncovered baking time slightly and checking your oven temperature.
Keep in mind that a crunchy crust is one of the best features of artisan bread, so a little firmness is completely normal.
5. Can I Prepare the Dough the Night Before?
Yes! That’s actually my favorite way to make it. Mix the ingredients in the evening, cover the bowl, and let the dough rise at room temperature overnight, provided your kitchen temperature is suitable for the amount of yeast used.
If your kitchen is particularly warm, the dough may ferment too quickly. In that case, use a cooler spot or refrigerate the dough to slow fermentation, allowing extra time for it to warm and become ready to shape.
Final Thoughts
Making homemade Dutch oven bread is one of those kitchen projects that feels much more impressive than the effort it requires. With four basic ingredients, a little patience, and a hot Dutch oven, you can bake a beautiful loaf with a golden crust and a soft, chewy center.
I usually keep this recipe simple because the flavor and texture speak for themselves. There is no need for complicated techniques or expensive equipment, and once you get comfortable recognizing when the dough is ready, the whole process becomes much easier.
Serve it warm with butter, pair it with your favorite soup, or save a few slices for sandwiches the next day. Honestly, once you smell fresh bread baking in your own kitchen, it’s hard not to want to make another loaf.