
Easy Homemade Raisin Scones Recipe

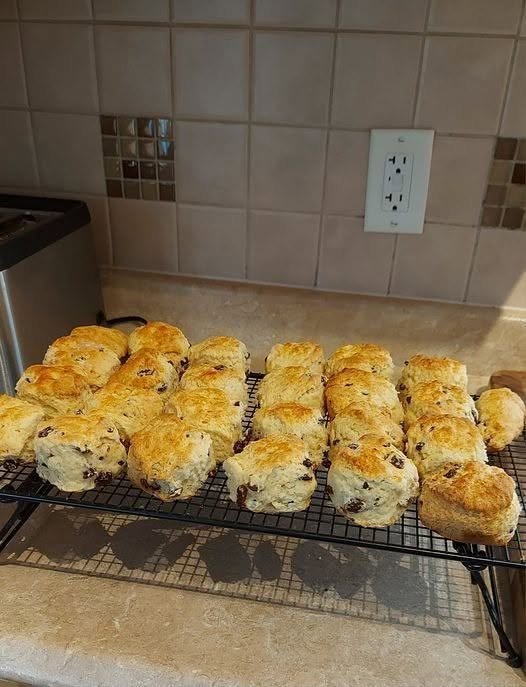
There’s something so comforting about a batch of freshly baked homemade scones sitting on the kitchen counter. The golden tops, buttery aroma, and little bites of sweet raisins make them hard to resist. These Easy Homemade Raisin Scones are one of my favorite treats to bake when I’m craving something simple, delicious, and a little special.
I love how quickly these scones come together using basic pantry ingredients. You don’t need fancy baking equipment or complicated techniques. Just a mixing bowl, a few simple ingredients, and an oven!
The outside bakes up beautifully golden, while the inside stays soft, tender, and slightly crumbly. The raisins add just the right amount of sweetness, making every bite delicious.
Honestly, I usually make an extra batch because they disappear surprisingly fast in my house!
Whether you’re serving them for breakfast, enjoying them with your afternoon coffee, or putting together a lovely weekend brunch, these raisin scones are always a wonderful choice.
Let’s get baking!
Why You’ll Love These Homemade Raisin Scones
- Easy to make: Simple ingredients and straightforward instructions make this recipe beginner-friendly.
- Buttery and tender: Each scone has a soft, delicate crumb with a lightly crisp golden exterior.
- Naturally sweet: Raisins add little bursts of sweetness without making the scones overly sugary.
- Perfect for any occasion: Enjoy them for breakfast, brunch, afternoon tea, or an afternoon snack.
- Great for making ahead: You can prepare the dough in advance and bake fresh scones whenever you like.
Ingredients You’ll Need
One of the best things about this raisin scones recipe is that most of the ingredients are probably already in your kitchen.
Main Ingredients
- 3 cups all-purpose flour: Provides structure and gives the scones their tender texture.
- ⅓ cup granulated sugar: Adds a gentle sweetness.
- 1 tablespoon baking powder: Helps the scones rise and become light and fluffy.
- ½ teaspoon salt: Balances the sweetness and enhances the buttery flavor.
- ½ cup cold unsalted butter: Cut into small cubes. Cold butter is essential for flaky scones.
- ¾ cup raisins: Adds sweetness and chewy texture throughout the scones.
- ¾ cup whole milk or buttermilk: Brings the dough together and keeps the scones tender.
- 1 large egg: Adds richness and helps bind the ingredients.
- 1 teaspoon vanilla extract: Gives the scones a lovely aroma and flavor.
For the Topping
- 1 tablespoon milk or heavy cream for brushing.
- 1 tablespoon coarse sugar (optional) for sprinkling.
How to Make Homemade Raisin Scones
These scones are surprisingly easy to prepare. Follow these simple steps for delicious golden-brown results.
Step 1: Preheat the Oven
Preheat your oven to 400°F (200°C).
Line a large baking sheet with parchment paper.
I usually prepare my baking tray before mixing the dough so everything is ready when it’s time to bake.
Step 2: Combine the Dry Ingredients
In a large mixing bowl, whisk together the flour, granulated sugar, baking powder, and salt.
Make sure everything is evenly combined.
This step helps distribute the baking powder throughout the flour, allowing the scones to rise evenly.
Step 3: Cut in the Cold Butter
Add the cold butter cubes to the flour mixture.
Using a pastry cutter, fork, or your fingertips, work the butter into the flour until the mixture resembles coarse crumbs.
You should still see some small pieces of butter throughout the mixture.
Honestly, this is one of the most important steps for getting tender, flaky scones. Try not to overwork the butter or let it become too warm.
Step 4: Add the Raisins
Stir the raisins into the flour and butter mixture.
Make sure they’re distributed evenly so every scone gets plenty of sweet raisins.
If your raisins seem particularly dry, you can soak them in warm water for about 10 minutes. Drain and pat them completely dry before adding them to the dough.
Step 5: Mix the Wet Ingredients
In a separate bowl, whisk together the egg, milk, and vanilla extract.
Pour the wet ingredients into the dry ingredients.
Gently stir with a wooden spoon or spatula until a soft dough begins to form.
Don’t worry if the dough looks slightly shaggy. That’s perfectly fine!
Avoid overmixing because too much handling can make your scones tough.
Step 6: Shape and Cut the Dough
Transfer the dough onto a lightly floured surface.
Gently bring it together with your hands and pat it into a rectangle about ¾ to 1 inch thick.
Using a sharp knife or bench scraper, cut the dough into squares or rectangles.
You can also use a round biscuit cutter if you prefer traditional round scones.
Place the pieces onto your prepared baking sheet, leaving a little space between each one.
Step 7: Brush the Tops
Lightly brush the tops of the scones with milk or heavy cream.
For a slightly sweeter, crunchy topping, sprinkle a little coarse sugar over each one.
This gives the scones that beautiful golden finish once baked.
Step 8: Bake Until Golden
Place the baking sheet in the preheated oven.
Bake for approximately 15–20 minutes, or until the scones are risen and golden brown on top.
Keep an eye on them during the final few minutes because oven temperatures can vary.
Once baked, remove the tray from the oven and transfer the scones to a wire cooling rack.
Let them cool slightly before serving.
Step 9: Enjoy!
Serve your homemade raisin scones warm with butter, jam, honey, or your favorite spread.
The smell of freshly baked buttery scones is honestly one of the best things about making them at home!
Tips for Making the Best Raisin Scones
A few simple tricks can make a big difference in the texture and flavor of your homemade scones.
1. Always use cold butter.
Cold butter creates little pockets in the dough that help produce a tender, flaky texture as the scones bake.
2. Don’t overwork the dough.
Mix just until the ingredients come together. Overmixing develops gluten and can make the scones dense and chewy.
3. Measure your flour correctly.
Too much flour can make your scones dry. Spoon the flour into your measuring cup and level it off rather than scooping directly from the bag.
4. Don’t skip the baking powder.
Fresh baking powder helps the scones rise properly. If yours has been sitting in the pantry for a long time, check that it’s still active.
5. Keep the dough slightly cool.
If your kitchen is warm or the butter starts softening, refrigerate the shaped scones for 10–15 minutes before baking.
6. Avoid adding too much liquid.
Scone dough should be soft but not overly sticky. Add a little extra flour if necessary, but avoid making the dough too dry.
7. Let them cool slightly before serving.
The centers continue to set as the scones cool, making them easier to handle and slice.
What to Serve with Raisin Scones
These homemade raisin scones are delicious on their own, but they’re even better with a few simple toppings.
Here are some of my favorite ways to serve them:
- Butter: A little salted butter melting over a warm scone is always delicious.
- Strawberry jam: The fruity sweetness pairs beautifully with the raisins.
- Honey: Drizzle a little honey over the top for extra sweetness.
- Clotted cream: Perfect for a traditional afternoon tea experience.
- Cream cheese: Adds a slightly tangy, creamy contrast.
- Fresh fruit: Serve with strawberries, blueberries, or sliced peaches.
- Coffee or tea: A warm cup of coffee or black tea makes these scones a lovely breakfast or afternoon snack.
How to Store Homemade Raisin Scones
If you happen to have leftovers, don’t worry! These scones are easy to store.
At Room Temperature:
Allow the scones to cool completely. Store them in an airtight container at room temperature for up to 2 days.
In the Refrigerator:
You can refrigerate them in an airtight container for up to 5 days, although refrigeration may make them slightly firmer.
In the Freezer:
These scones freeze beautifully. Place completely cooled scones in a freezer-safe bag or airtight container and freeze for up to 3 months.
Thaw at room temperature before reheating.
How to Reheat:
Warm the scones in a 300°F (150°C) oven for approximately 5–8 minutes.
You can also microwave an individual scone for about 10–15 seconds, although the oven gives a better texture.
Can You Make Raisin Scones Ahead of Time?
Absolutely!
If you want freshly baked scones in the morning without doing all the preparation, you can prepare the dough ahead of time.
Shape and cut the scones, arrange them on a parchment-lined baking tray, cover, and refrigerate overnight.
The next morning, brush with milk or cream and bake as directed. You may need to add a minute or two to the baking time if they’re very cold.
You can also freeze unbaked scones. Freeze them individually on a baking tray before transferring them to a freezer-safe container.
Bake directly from frozen, adding a few extra minutes to the baking time.
Easy Variations to Try
Once you’ve made this basic raisin scones recipe, there are several delicious ways to change it up.
Cinnamon Raisin Scones: Add 1 teaspoon of ground cinnamon to the dry ingredients for a warm, cozy flavor.
Orange Raisin Scones: Add 1 tablespoon of fresh orange zest to the dough. Orange and raisins make a wonderful combination.
Vanilla Glazed Raisin Scones: Mix ½ cup powdered sugar with 1–2 tablespoons milk and a little vanilla extract. Drizzle over completely cooled scones.
Lemon Raisin Scones: Add a teaspoon of lemon zest for a fresh, bright flavor.
Chocolate Chip Scones: Replace some of the raisins with chocolate chips for a sweeter treat.
Nutrition Information
Here is an approximate nutritional breakdown for one scone, assuming the recipe makes 12 servings.
| Nutrient | Amount |
|---|---|
| Calories | 265 kcal |
| Carbohydrates | 40 g |
| Protein | 5 g |
| Fat | 9 g |
| Saturated Fat | 5 g |
| Fiber | 2 g |
| Sugar | 12 g |
| Sodium | 250 mg |
Nutrition values are estimates and may vary depending on the ingredients, portion sizes, and toppings used.
Frequently Asked Questions
1. Why are my raisin scones dry?
Dry scones are usually caused by adding too much flour, overmixing the dough, or baking them for too long. Measure your flour carefully and mix just until the dough comes together. Also, avoid overbaking, as this can quickly dry out the centers.
2. Can I use buttermilk instead of regular milk?
Yes! Buttermilk works wonderfully in homemade raisin scones. It adds a slight tanginess and helps create a soft, tender texture. You can substitute it for the milk in the same amount.
3. Do I need to soak the raisins before adding them?
Not necessarily. If your raisins are soft and plump, you can add them directly to the dough. However, if they’re dry or hard, soaking them in warm water for about 10 minutes can help. Just remember to drain and dry them thoroughly before using.
4. Why didn’t my scones rise properly?
There are several possible reasons. Your baking powder may be old, the dough may have been overworked, or the butter may have become too warm. Make sure your baking powder is fresh and handle the dough gently.
5. Can I freeze homemade raisin scones?
Yes! Baked raisin scones freeze very well for up to 3 months when stored in an airtight freezer-safe container. You can also freeze unbaked, shaped scones and bake them straight from frozen whenever you want a fresh batch.