
Japanese Cotton Cheesecake Loaf Recipe

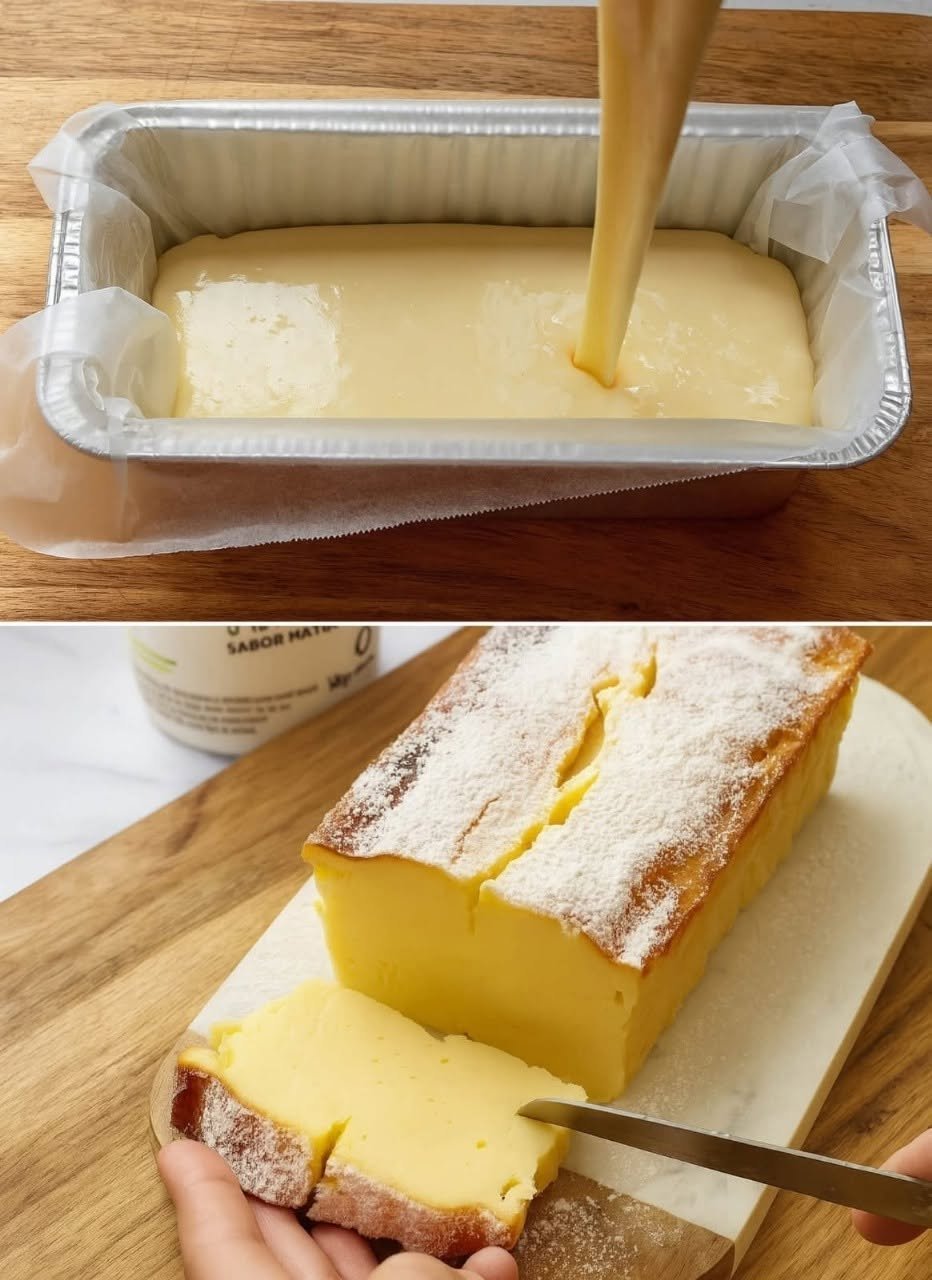
If you love light, creamy desserts that practically melt in your mouth, this Japanese Cotton Cheesecake Loaf is definitely worth trying!
Honestly, I have always loved cheesecakes, but sometimes traditional cheesecakes feel a little too rich and heavy. That’s why I enjoy making this Japanese-inspired version. It has a lovely creamy texture, a delicate sweetness, and a soft, fluffy centre that makes every bite feel special.
What I particularly love about this recipe is how beautiful it looks once baked. The top develops a light golden colour with natural little cracks, while the inside stays soft, smooth, and creamy. A little dusting of powdered sugar makes it look even more tempting.
I usually make this cheesecake when I want something homemade for afternoon tea or when guests are coming over. It looks impressive, but the ingredients are simple and the preparation is quite straightforward.
The best part? You don’t need complicated decorating or fancy equipment. Just a loaf pan, a few basic ingredients, and a little patience while it bakes.
Let’s make this delicious Japanese Cotton Cheesecake Loaf!
Why You’ll Love This Japanese Cotton Cheesecake
- Soft and creamy: The inside has a delicate, smooth cheesecake texture.
- Beautiful appearance: A golden top and a light dusting of powdered sugar make it look bakery-worthy.
- Simple ingredients: You can make it with everyday baking ingredients.
- Perfect sweetness: It has a gentle sweetness that doesn’t overpower the cream cheese flavour.
- Great for sharing: Slice it into generous pieces and serve with tea or coffee.
- Make-ahead friendly: It tastes wonderful after chilling in the refrigerator.
Preparation and Cooking Time
- Preparation time: 25 minutes
- Baking time: 60–70 minutes
- Cooling time: 1–2 hours
- Chilling time: 3–4 hours
- Total time: Approximately 5–6 hours
- Servings: 8–10 slices
Ingredients for Japanese Cotton Cheesecake Loaf
Here is everything you’ll need to prepare this soft and creamy cheesecake.
Main Ingredients
- 200 g cream cheese, softened
- 40 g unsalted butter
- 100 ml whole milk
- 4 large eggs, separated
- 90 g granulated sugar, divided
- 60 g cake flour
- 20 g cornstarch
- 1 teaspoon vanilla extract
- 1 tablespoon lemon juice
- ¼ teaspoon salt
For Decoration
- 1–2 tablespoons powdered sugar
Step-by-Step Instructions
Step 1: Prepare the Loaf Pan
Start by preparing your loaf pan. I usually use a loaf pan approximately 9 x 5 inches.
Line the pan with parchment paper, making sure the paper extends slightly over the sides. This will make removing the cheesecake much easier later.
Preheat your oven to 150°C (300°F).
Prepare a larger baking tray for the water bath. The water bath helps the cheesecake bake gently and keeps its texture soft.
Step 2: Melt the Cream Cheese Mixture
Add the cream cheese, butter, and milk to a heatproof bowl.
Place the bowl over a saucepan of gently simmering water. Stir slowly until everything melts together into a smooth, creamy mixture.
Remove the bowl from the heat and allow it to cool slightly.
Honestly, I find this step makes a big difference because a smooth cream cheese mixture helps prevent lumps in the finished cheesecake.
Step 3: Add the Egg Yolks
Add the egg yolks to the slightly cooled cream cheese mixture.
Whisk until everything is well combined.
Next, add the vanilla extract, lemon juice, and salt. Mix gently.
Sift the cake flour and cornstarch into the mixture. Whisk until you have a smooth batter without visible lumps.
Set this mixture aside.
Step 4: Prepare the Egg Whites
In a separate clean, dry mixing bowl, add the egg whites.
Using an electric mixer, beat the egg whites until they become foamy.
Gradually add the remaining sugar while continuing to beat.
Keep mixing until soft to medium peaks form. The meringue should look glossy and hold its shape, but it shouldn’t become overly stiff or dry.
This step is especially important because the whipped egg whites help give the cheesecake its light texture.
Step 5: Combine the Mixtures
Take about one-third of the whipped egg whites and gently fold them into the cream cheese mixture.
This helps loosen the batter.
Now add the remaining egg whites in two batches. Use a spatula and fold gently from the bottom upwards.
Try not to overmix because you want to keep as much air in the mixture as possible.
The finished batter should look smooth, light, and airy.
Step 6: Pour the Batter Into the Pan
Pour the cheesecake batter into your prepared loaf pan.
Gently tap the pan on the counter once or twice to release any large air bubbles.
Place the loaf pan inside the larger baking tray.
Carefully pour hot water into the larger tray until it reaches approximately halfway up the sides of the loaf pan.
Be careful not to get any water inside the cheesecake batter.
Step 7: Bake the Cheesecake
Place the baking tray in the preheated oven.
Bake at 150°C (300°F) for approximately 60–70 minutes.
The top should become lightly golden, and the centre should be set but still have a gentle wobble.
Avoid opening the oven door too frequently, as sudden temperature changes can cause the cheesecake to collapse or crack.
Once baked, turn off the oven and leave the cheesecake inside with the oven door slightly open for about 15–20 minutes.
This gradual cooling helps reduce sudden temperature changes.
Step 8: Cool and Chill
Remove the loaf pan from the water bath and let the cheesecake cool completely.
Once cooled, carefully lift it out using the parchment paper.
For the best texture and cleaner slices, refrigerate the cheesecake for at least 3–4 hours.
I personally prefer chilling it overnight because the texture becomes wonderfully smooth and the flavour develops even more.
Step 9: Decorate and Serve
Once the cheesecake is chilled, transfer it to a serving plate.
Dust the top generously with powdered sugar.
Use a sharp knife to cut it into slices. For neat cuts, wipe the knife clean between each slice.
Your beautiful Japanese Cotton Cheesecake Loaf is ready to enjoy!
Helpful Tips for the Best Japanese Cotton Cheesecake
1. Use Room-Temperature Ingredients
Allow the cream cheese and eggs to come to room temperature before starting. This makes mixing easier and helps create a smoother batter.
2. Don’t Overbeat the Egg Whites
The egg whites should form soft to medium peaks. If you beat them too stiff, they can become difficult to fold into the batter.
3. Fold Gently
This is one of the most important steps. Use a spatula and fold gently rather than stirring quickly. Keeping the air inside the mixture helps create a light cheesecake.
4. Always Use a Water Bath
A water bath provides gentle, even heat and helps prevent the cheesecake from drying out.
5. Avoid Sudden Temperature Changes
Don’t immediately remove the cheesecake from a hot oven. Allowing it to cool gradually helps reduce shrinkage and cracking.
6. Chill Before Slicing
I know it’s tempting to cut into it immediately, but give it enough time in the refrigerator. Chilling helps the cheesecake set properly.
7. Protect Your Loaf Pan
If your loaf pan has a removable base or seams, make sure it is properly protected against water. A solid pan is ideal for a water bath.
Serving Suggestions
This cheesecake is delicious on its own, but there are plenty of ways to serve it.
Here are some of my favourite ideas:
- With fresh strawberries: Their slightly tart flavour pairs beautifully with the creamy cheesecake.
- With fresh blueberries: Add a handful of blueberries for a refreshing touch.
- With whipped cream: A small spoonful of lightly sweetened whipped cream makes it extra indulgent.
- With fruit sauce: Strawberry or raspberry sauce adds a lovely fruity flavour.
- With tea or coffee: A slice alongside a cup of hot tea or coffee makes a wonderful afternoon treat.
- With fresh mango: Mango slices add natural sweetness and a tropical twist.
How to Store Japanese Cotton Cheesecake
In the refrigerator: Store leftover cheesecake in an airtight container in the refrigerator for up to 3–4 days.
In the freezer: You can freeze individual slices by wrapping them tightly in plastic wrap and placing them in a freezer-safe container. Freeze for up to 1 month for the best quality.
To serve again: Thaw frozen slices overnight in the refrigerator. Serve chilled or allow them to sit at room temperature briefly before enjoying.
Approximate Nutrition Information
The following nutrition information is estimated per serving, assuming the cheesecake is divided into 10 slices.
- Calories: 190 kcal
- Carbohydrates: 19 g
- Protein: 5 g
- Fat: 11 g
- Saturated fat: 6 g
- Sugar: 13 g
- Sodium: 120 mg
Nutrition values are approximate and may vary depending on the brands of ingredients used and the final serving size.
Frequently Asked Questions (FAQs)
1. Why did my Japanese Cotton Cheesecake crack on top?
Cracking can happen because of excessive oven temperature, overbeaten egg whites, or sudden temperature changes. Make sure to bake at a gentle temperature and allow the cheesecake to cool gradually inside the oven.
A few small cracks are completely normal and won’t affect the delicious taste!
2. Why did my cheesecake shrink after baking?
Some shrinkage is normal as the cheesecake cools. However, excessive shrinking can happen when the egg whites are overbeaten, the batter is overmixed, or the cheesecake cools too quickly.
Folding the meringue gently and cooling the cake gradually can help.
3. Can I make this cheesecake without a water bath?
A water bath is strongly recommended because it creates a gentle baking environment. Without one, the cheesecake may bake unevenly, become dry, or develop more cracks.
For the best soft and creamy texture, I recommend using a water bath.
4. How do I know when the cheesecake is fully baked?
The top should be lightly golden, and the centre should have a slight wobble rather than looking liquid. The cheesecake will continue to settle as it cools and chills.
Avoid baking it until the centre becomes completely firm.
5. Can I make Japanese Cotton Cheesecake a day ahead?
Absolutely! In fact, I often recommend making it a day ahead. Allow it to cool completely, cover it, and refrigerate overnight.
The next day, it will be nicely set and much easier to slice