
Bacon-Wrapped Stuffed Onions with Cheesy Ground Beef

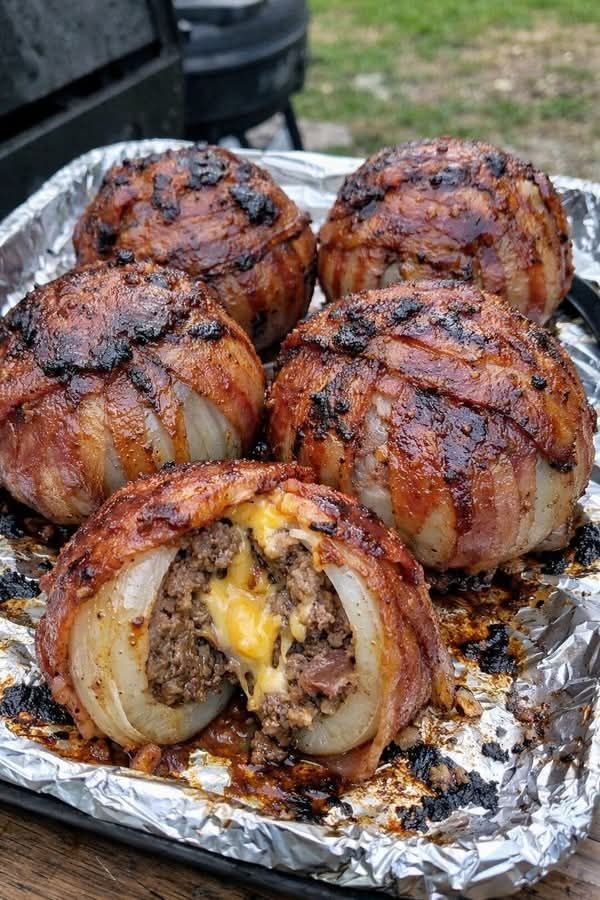
I first made these on a weekend when I wanted something a little more fun than regular burgers. Honestly, I wasn’t sure how they would turn out. Stuffing an onion with meat, wrapping the whole thing in bacon, and putting it on the grill sounds a little over-the-top—and that’s exactly why I had to try it.
The result? Absolutely worth it.
The onion becomes tender and slightly sweet, the seasoned beef stays juicy, the cheese melts right into the center, and the bacon gets beautifully browned and smoky around the outside.
I usually serve these when we’re grilling for family or friends because they’re definitely a conversation starter. They’re hearty enough to be the main dish, but they also feel like one of those fun BBQ recipes you don’t make every day.
And that cheesy center when you cut one open? That’s my favorite part.
Ingredients
For the Onion Bombs
-
4 large yellow or sweet onions
-
1½ pounds ground beef, preferably 80/20
-
1 cup shredded cheddar cheese
-
8–12 slices bacon, depending on the size of your onions
-
1 teaspoon garlic powder
-
1 teaspoon onion powder
-
1 teaspoon smoked paprika
-
1 teaspoon Worcestershire sauce
-
½ teaspoon salt
-
½ teaspoon black pepper
-
½ teaspoon chili powder, optional
-
¼ cup BBQ sauce, plus extra for brushing
Optional Add-Ins
You can easily customize the filling with:
-
Diced jalapeños
-
Cooked chopped bacon
-
Pepper Jack cheese
-
Monterey Jack cheese
-
Finely diced mushrooms
-
Chopped green onions
-
A little hot sauce
How to Make Onion Bombs
1. Prepare the onions
Start by cutting off the top and bottom of each onion.
Carefully peel away the outer skin. Then gently separate the onion into layers.
The goal is to keep the larger onion layers intact because these will become the “shell” around the meat mixture.
I usually keep several of the biggest layers for each onion and save the smaller pieces for the filling.
Don’t worry if they’re not perfectly shaped. These are rustic BBQ food, not a science experiment!
2. Make the beef filling
Add the ground beef to a large bowl.
Add:
-
Garlic powder
-
Onion powder
-
Smoked paprika
-
Worcestershire sauce
-
Salt
-
Black pepper
-
Chili powder, if using
Mix everything together gently until just combined.
Try not to overwork the meat. I find that a light touch keeps the filling much more tender.
3. Add the cheese
Take a portion of the seasoned beef mixture and flatten it slightly in your hand.
Place a generous pinch of shredded cheddar in the center, then fold the beef around the cheese.
Make sure the cheese is completely enclosed.
This is the little surprise inside the Onion Bomb. When you cut into it later, you should get that wonderful melted-cheese moment.
4. Stuff the onions
Take the larger onion layers and gently wrap them around each meat-and-cheese ball.
You want the onion to completely surround the filling as much as possible.
If you have a particularly large onion, you may need two or three layers.
Don’t worry if the onion doesn’t fit perfectly. Once everything cooks, the layers soften and settle around the filling.
5. Wrap with bacon
Now comes the fun part.
Wrap each stuffed onion with bacon, overlapping the slices slightly so the bacon stays in place.
If necessary, secure the bacon with a couple of toothpicks.
I usually tuck extra-crispy bacon, you can briefly place them under the broiler at the end. Just watch them closely because the! You can assemble them several hours ahead, cover them, and keep them refrigerated until you’re ready to cook. I actually prefer doing this when we’re The bacon adds smoky flavor and helps keep the outside moist, but the recipe will still work without it. You can brush the onions with BBQ sauce and cook the ends underneath the Onion Bomb rather than putting toothpicks through the top.
6. Prepare the grill
Heat your grill to about 350–375°F (175–190°C).
I prefer using indirect heat so the bacon has time to cook and the onion can become tender without the outside burning.
If you’re making these in the oven, preheat it to 375°F (190°C) and place the Onion Bombs on a foil-lined baking sheet or rack.
7. Cook the Onion Bombs
Place the Onion Bombs on the grill over indirect heat.
Cook for approximately 45–60 minutes, turning or rotating them as needed for even cooking.
During the last 10–15 minutes, brush them generously with BBQ sauce.
Keep an eye on the bacon. You want it deeply browned and crisp around the edges without letting it burn.
Most importantly, cook the ground beef to a safe internal temperature of 160°F (71°C).
8. Let them rest
Once they’re cooked, remove the Onion Bombs from the grill and let them rest for about 5–10 minutes.
Honestly, this is the hardest part because they smell incredible.
But letting them rest gives the juices a chance to settle and helps keep all that cheesy filling inside.
Then slice one open and enjoy!
Cooking Tips for the Best Onion Bombs
Choose large onions
Big yellow, white, or sweet onions are easiest to work with because they give you larger layers for wrapping the filling.
Don’t overmix the beef
Mix the seasonings into the ground beef just until everything is combined. Overmixing can make the meat dense.
Use good melting cheese
Cheddar is my go-to, but Pepper Jack is fantastic if you like a little heat. Monterey Jack also melts beautifully.
Don’t put the BBQ sauce on too early
I usually brush the sauce on near the end of cooking. Putting it on too early can cause the sugars in the sauce to burn before the bacon and onion are fully cooked.
Use indirect heat on the grill
This is especially important if you’re cooking over charcoal. You want smoky flavor without putting the Onion Bombs directly over intense flames the entire time.
Check the internal temperature
Don’t rely only on appearance. Since the filling contains ground beef, use a meat thermometer and make sure the center reaches 160°F (71°C).
Let them rest
Give them a few minutes before cutting. The cheese will be extremely hot right out of the oven or off the grill!
Oven-Baked Onion Bombs
Don’t have a grill? No problem.
Place the prepared Onion Bombs on a foil-lined baking sheet or, even better, on a wire rack set over a baking sheet.
Bake at 375°F (190°C) for about 45–60 minutes, or until the beef reaches 160°F internally and the bacon is nicely browned.
Brush with BBQ sauce during the final 10–15 minutes.
For extra-crispy bacon, you can briefly place them under the broiler at the end. Just watch them closely because the BBQ sauce can caramelize very quickly.
What to Serve with Onion Bombs
These are pretty filling on their own, but I love putting a few easy sides on the table.
Try serving them with:
-
Creamy coleslaw
-
Potato salad
-
Grilled corn on the cob
-
Baked beans
-
Crispy French fries
-
Loaded potato wedges
-
Mac and cheese
-
Grilled vegetables
-
Simple green salad
-
Garlic bread
For a backyard BBQ, I’d go with Onion Bombs + baked beans + coleslaw + grilled corn. It’s an easy combination that always disappears quickly.
Approximate Nutrition Information
Nutrition will vary depending on the size of the onions, ground beef, bacon, cheese, and BBQ sauce used.
Approximate nutrition per Onion Bomb, assuming 4 servings:
-
Calories: 650–750
-
Protein: 40–45 g
-
Carbohydrates: 20–25 g
-
Fat: 45–55 g
-
Saturated Fat: 18–22 g
-
Fiber: 3–4 g
-
Sugar: 10–14 g
-
Sodium: 1,200–1,500 mg
For the most accurate nutritional information, calculate the recipe using the exact brands and quantities you use.
Frequently Asked Questions
Can I make Onion Bombs ahead of time?
Yes! You can assemble them several hours ahead, cover them, and keep them refrigerated until you’re ready to cook. I actually prefer doing this when we’re having people over because it makes grilling day much easier.
Can I use ground turkey instead of beef?
Absolutely. Ground turkey works, although it will have a slightly different flavor and texture. Make sure the turkey reaches 165°F (74°C) internally.
What type of onion is best for Onion Bombs?
Large yellow or sweet onions are my favorites. Yellow onions have a wonderful savory flavor, while sweet onions become especially delicious and caramelized as they cook.
Can I make these without bacon?
Yes. The bacon adds smoky flavor and helps keep the outside moist, but the recipe will still work without it. You can brush the onions with BBQ sauce and cook them over indirect heat.
Can I freeze Onion Bombs?
You can freeze the assembled, uncooked Onion Bombs, although the texture of the onion may soften after thawing. For best results, I recommend making them fresh or preparing them a few hours before cooking.
Final Thoughts
These Onion Bombs are definitely not an everyday dinner, and honestly, that’s part of the fun.
You’ve got a juicy seasoned beef center, gooey melted cheese, tender sweet onion, smoky bacon, and BBQ sauce all packed into one ridiculous little package.
I usually make these when we’re firing up the grill and want something that feels a little more special than ordinary burgers. They’re messy, hearty, cheesy, and completely satisfying.