
Homemade Golden Crust Bread Recipe

There is something special about baking a fresh loaf of bread at home. The smell of yeast, the feel of soft dough under your hands, and that beautiful golden crust coming out of the oven make the whole process worthwhile. Honestly, homemade bread is one of those simple pleasures that never gets old.
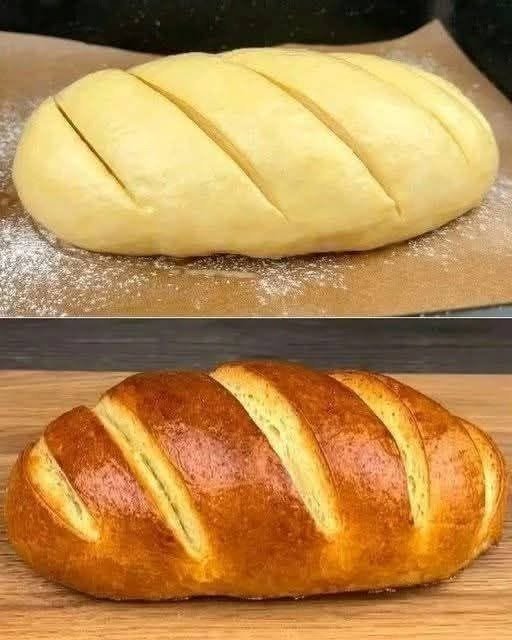
This homemade golden crust bread has everything I love in a good loaf: a tender, fluffy interior, a lightly crisp crust, and a rich golden color that makes every slice look irresistible. As you can see in the photo, the loaf has beautiful diagonal cuts across the top that open up during baking, giving it that classic bakery-style appearance.
I usually make this bread when I want something fresh to serve with breakfast, soup, or a simple homemade dinner. The ingredients are basic pantry staples, and you do not need a bread machine or any special equipment. A mixing bowl, a baking tray, and a little patience are all you really need.
The best part? You can enjoy a warm slice with butter straight from the oven, turn it into delicious sandwiches, or serve it alongside your favorite meals. Once you try baking bread from scratch, you may find yourself making it regularly.
Why You’ll Love This Homemade Bread Recipe
- Soft and fluffy inside: The dough produces a tender crumb that is perfect for slicing.
- Beautiful golden crust: An egg wash gives the loaf an attractive, glossy finish.
- Simple ingredients: Everything you need is easy to find at the grocery store.
- Beginner-friendly: The instructions are straightforward, even if this is your first homemade loaf.
- Versatile: Enjoy it with butter, jam, cheese, soups, or your favorite sandwich fillings.
- Bakery-style appearance: Diagonal slashes across the top create the lovely pattern shown in the photo.
Ingredients You’ll Need
This recipe makes one medium-sized loaf, approximately 8–10 slices.
For the Bread Dough
- 3 cups (375 g) all-purpose flour or bread flour
- 2 1/4 teaspoons (7 g) instant yeast
- 2 tablespoons granulated sugar
- 1 teaspoon salt
- 3/4 cup (180 ml) warm milk
- 1 large egg, at room temperature
- 3 tablespoons (42 g) softened unsalted butter
For the Golden Egg Wash
- 1 egg yolk
- 1 tablespoon milk
You can use one whole beaten egg instead if you prefer a slightly lighter wash.
Optional Toppings
- Sesame seeds
- Poppy seeds
- A little melted butter for brushing after baking
Ingredient Notes
Flour: Bread flour gives the loaf a slightly chewier texture, while all-purpose flour creates a soft, tender bread. Both work well.
Yeast: Instant yeast can be mixed directly into the dry ingredients. If you use active dry yeast, dissolve it in the warm milk with a little sugar first and allow it to become foamy before continuing.
Warm milk: Use milk that feels comfortably warm, not hot. Excessively hot liquid can damage the yeast.
Butter: Softened butter adds richness and helps create a tender crumb.
Egg wash: This is the secret to achieving that beautiful shiny, deep golden-brown finish.
How to Make Homemade Golden Crust Bread
Step 1: Mix the Dry Ingredients
In a large mixing bowl, combine the flour, instant yeast, sugar, and salt. Stir everything together so the ingredients are evenly distributed.
I usually mix the dry ingredients first because it makes the dough easier to bring together later.
Step 2: Add the Milk and Egg
Add the warm milk and one egg to the flour mixture. Mix with a wooden spoon or spatula until a rough dough forms.
Add the softened butter and continue mixing until the butter is incorporated.
At this stage, the dough may look a little sticky. That is perfectly normal, so avoid adding too much extra flour right away.
Step 3: Knead the Dough
Transfer the dough to a lightly floured surface and knead for about 8–12 minutes, or until it becomes smooth, elastic, and slightly springy.
If you are using a stand mixer, knead with a dough hook on low to medium-low speed for approximately 6–8 minutes, checking the texture as you go.
I usually judge the dough by how it feels rather than relying only on the clock. It should be soft and stretchy without sticking excessively to your hands.
If the dough is extremely sticky, add flour one tablespoon at a time. Too much flour can make the finished loaf dense.
Step 4: Let the Dough Rise
Place the dough in a lightly greased bowl and turn it once so the surface is lightly coated.
Cover the bowl with a clean kitchen towel or plastic wrap and leave it in a warm, draft-free place for about 60–90 minutes, or until it has roughly doubled in size.
The exact time depends on your room temperature and the activity of your yeast.
I usually let the dough rise somewhere comfortably warm and check it by appearance rather than opening the oven or moving it around unnecessarily.
Step 5: Shape the Loaf
Once the dough has risen, gently press it to release the larger air bubbles.
Transfer it to a lightly floured work surface. Shape it into a rectangle, then roll it up tightly from one long edge, pinching the seam closed.
Tuck the ends underneath and gently roll the dough into a smooth oval loaf.
Place it seam-side down on a baking tray lined with parchment paper.
For the shape shown in the photo, aim for a plump oval loaf with an even surface. This helps the bread bake uniformly.
Step 6: Let It Rise Again
Cover the shaped loaf loosely and allow it to rise for another 30–45 minutes, or until it looks noticeably puffy.
This second rise is important because it helps create a light, fluffy texture.
Try not to let the dough overproof. If it becomes excessively inflated and fragile, it may collapse or spread when scored.
Meanwhile, preheat your oven to 375°F (190°C).
Step 7: Score the Top
Using a very sharp knife or bread lame, make 3–5 diagonal cuts across the top of the loaf.
Aim for cuts approximately 1/4–1/2 inch (6–12 mm) deep, spacing them evenly along the length of the bread.
This gives the loaf its classic bakery-style look and allows the dough to expand in a controlled way during baking.
I usually make the cuts confidently in one smooth motion instead of dragging the knife across the dough.
Step 8: Brush With Egg Wash
Whisk the egg yolk with one tablespoon of milk until smooth.
Gently brush a thin, even layer over the top of the loaf, taking care not to deflate the dough.
The egg wash helps create the rich golden color and glossy finish you see on the baked loaf in the photo.
If you like, sprinkle a few sesame seeds over the top before baking.
Step 9: Bake Until Golden Brown
Place the loaf in the preheated oven and bake for approximately 25–35 minutes.
The bread should rise beautifully, and the top should become a deep golden brown.
Because ovens vary, start checking the loaf around the 25-minute mark. If the top browns too quickly, loosely cover it with foil for the remaining baking time.
For a reliable doneness check, the center of the bread should reach approximately 190–200°F (88–93°C).
Step 10: Cool Before Slicing
Remove the loaf from the oven and let it rest on the baking tray for about 5 minutes. Transfer it to a wire rack to cool.
You can brush the warm crust with a little melted butter if you want a softer, more buttery finish.
I know it is tempting to slice into freshly baked bread immediately, but allowing it to cool for at least 20–30 minutes helps the crumb set properly.
Once it has cooled slightly, slice and enjoy!
Tips for the Best Homemade Golden Crust Bread
1. Measure Your Flour Correctly
Too much flour is one of the most common reasons homemade bread turns out dry or dense. For the best results, use a kitchen scale. If measuring by cups, spoon the flour into the measuring cup and level it without packing it down.
2. Keep the Milk Warm, Not Hot
Hot milk can damage the yeast and prevent the dough from rising properly. Aim for a temperature around 100–110°F (38–43°C), especially if you are activating active dry yeast.
3. Knead Until the Dough Is Elastic
Proper kneading develops gluten, which helps the bread hold its shape and gives it a soft, stretchy texture.
A small piece of dough should stretch into a thin membrane before tearing, although you do not need a perfect windowpane for a good homemade loaf.
4. Give the Dough Enough Time to Rise
Bread dough rises according to temperature and yeast activity. If your kitchen is cool, it may need longer than the recipe suggests.
Look for visible expansion and a soft, puffy appearance instead of following the clock blindly.
5. Do Not Skip the Second Rise
The second rise helps create a lighter loaf. Baking too early can result in dense bread, while overproofing can make the loaf lose its shape.
6. Score the Dough Before Baking
Scoring gives the loaf a decorative pattern and helps control how the surface opens in the oven. Use a sharp blade and make deliberate, shallow cuts.
7. Use Egg Wash for a Shiny Crust
For the glossy, rich golden color shown in the picture, egg wash is an excellent choice. For a softer, more matte crust, brush the loaf with milk instead.
8. Let the Bread Cool Properly
Cooling allows moisture to redistribute and the interior to finish setting. Slicing too soon can make the crumb appear gummy or compressed.
What to Serve With Homemade Golden Crust Bread
One of my favorite things about this loaf is how many ways you can enjoy it.
With butter and jam: A warm slice with butter and strawberry jam makes a lovely breakfast or afternoon snack.
With eggs: Serve it alongside scrambled eggs, omelets, or fried eggs for a simple, satisfying morning meal.
For sandwiches: The soft interior makes this bread ideal for chicken sandwiches, cheese sandwiches, egg salad, or fresh vegetable fillings.
With soup: Pair it with tomato soup, creamy mushroom soup, lentil soup, or homemade chicken soup. The slices are perfect for dipping.
With pasta: Serve it with pasta and tomato sauce or a creamy garlic dish to soak up the extra sauce.
With cheese: Toast a slice and serve it with cheddar, mozzarella, cream cheese, or your favorite spread.
As garlic bread: Brush slices with melted butter, minced garlic, and parsley, then toast them until fragrant.
For an easy family breakfast, I usually serve this bread with butter, honey, and a cup of tea or coffee.
Recipe Variations
Soft Milk Bread
For an even softer texture, replace some of the milk with additional milk and use a slightly richer dough. Keep the total liquid balanced so the dough remains easy to handle.
Honey Bread
Replace the granulated sugar with 2 tablespoons of honey. The flavor will be a little more delicate and lightly sweet.
Garlic and Herb Bread
Add 1 teaspoon of dried Italian herbs and 1/2 teaspoon of garlic powder to the dry ingredients. This version is delicious alongside soups, pasta, and roasted vegetables.
Seeded Golden Bread
Sprinkle sesame seeds, poppy seeds, or a mixed seed topping over the egg wash before baking.
Whole Wheat Bread
Replace up to one-third of the all-purpose flour with whole wheat flour. You may need a little extra milk because whole wheat flour absorbs more liquid.
The loaf will have a slightly heartier texture and a more pronounced wheat flavor.
How to Store Homemade Bread
At room temperature: Once completely cool, store the loaf in an airtight container or bread bag for about 2–3 days. Keep it in a cool, dry place away from direct sunlight.
In the refrigerator: Refrigeration can make bread go stale faster, so I generally avoid it unless the weather or storage conditions make it necessary.
In the freezer: Slice the cooled loaf and freeze the slices in a freezer-safe bag for up to 2–3 months for best quality. Separate slices with parchment paper if you want to remove only a few at a time.
To reheat: Warm slices in a toaster or heat the whole loaf in a 300°F (150°C) oven for several minutes until warmed through.
If the crust has softened during storage, a short stint in the oven can help refresh it.
Common Bread-Baking Problems and How to Fix Them
Why Didn’t My Dough Rise?
Your yeast may be inactive, the milk may have been too hot, or the room may have been too cold. Check the yeast’s expiration date and allow the dough more time in a comfortably warm place.
Why Is My Bread Dense?
Dense bread can result from too much flour, insufficient kneading, inadequate rising time, or inactive yeast. Measuring flour by weight and allowing the dough to become properly puffy can make a big difference.
Why Did My Bread Split Unevenly?
The dough may not have been scored deeply enough, or the cuts may have been uneven. Make a few clean diagonal cuts before baking to help the loaf expand more consistently.
Why Is the Crust Too Dark?
The oven may run hot, or the egg wash may brown faster than expected. Check the loaf early and loosely cover it with foil if the top becomes dark before the center is fully baked.
Why Is the Inside Gummy?
The bread may have been underbaked or sliced while still too hot. Check the internal temperature and allow the loaf to cool before cutting.
Nutrition Information
The following values are approximate and based on one loaf divided into 10 slices.
- Calories: 190–220
- Protein: 5–7 g
- Carbohydrates: 29–33 g
- Fat: 5–7 g
- Saturated fat: 2–3 g
- Fiber: 1–2 g
- Sugar: 3–5 g
- Sodium: 230–300 mg
Actual nutrition values will vary depending on the flour, milk, butter, egg wash, slice thickness, and any additional toppings. Serving the bread with butter, jam, or cheese will increase the nutritional totals.
Frequently Asked Questions
1. Can I make this homemade bread without a stand mixer?
Absolutely! You can mix the ingredients in a large bowl and knead the dough by hand on a lightly floured surface. It may take 8–12 minutes of kneading, but you can achieve a lovely soft loaf without any special equipment.
2. Can I use all-purpose flour instead of bread flour?
Yes. All-purpose flour works very well in this recipe and produces a soft, tender loaf. Bread flour contains more protein and may give the bread a slightly chewier texture, but you do not need it to make delicious homemade bread.
3. How do I get the shiny golden crust shown in the photo?
The easiest method is to brush the risen loaf with an egg wash made from egg yolk and milk before baking. Bake at 375°F (190°C) until the top is a deep golden brown. Keep an eye on the loaf toward the end of baking to prevent excessive browning.
4. Can I prepare the dough ahead of time?
Yes. You can prepare the dough and allow it to rise slowly in the refrigerator overnight, provided it is covered well. The next day, let it warm slightly if necessary, shape it, allow it to complete its final rise, and bake as directed. Cold dough may take longer to become puffy.
5. How do I keep homemade bread soft for several days?
Allow the loaf to cool completely before storing it in an airtight bag or container. Avoid leaving it exposed to air, which can dry it out. For longer storage, slice and freeze the loaf, then toast individual slices whenever you want fresh-tasting bread.
Final Thoughts
Homemade golden crust bread is one of those recipes that proves you do not need fancy ingredients to make something wonderful. With a little flour, yeast, milk, butter, and patience, you can create a loaf with a soft, fluffy center and a beautiful golden crust.
I especially love the diagonal scoring because it gives the bread a classic bakery-style appearance without requiring any complicated shaping techniques.
Whether you serve it warm with butter, turn it into sandwiches, or enjoy it alongside a comforting bowl of soup, this homemade loaf is a delicious addition to almost any meal.
If you are new to bread baking, do not worry if your first loaf is not perfectly shaped. Honestly, the most important thing is learning how the dough should feel and giving it enough time to rise.
Once you pull that beautiful golden loaf out of the oven and smell freshly baked bread filling your kitchen, you will understand why homemade bread is always worth the effort. Happy baking!