
Creamy Baked Cheesecake Recipe

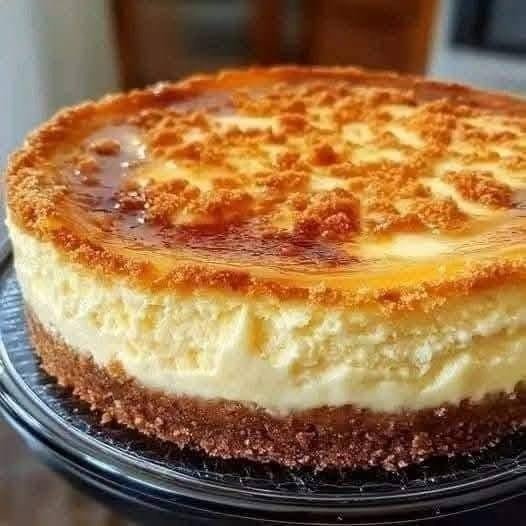
There is something incredibly special about a homemade cheesecake. That first slice, with its buttery crumb crust, thick and creamy filling, and lightly golden top, is honestly hard to resist. If you love classic baked cheesecake with a rich texture and a beautiful bakery-style finish, this recipe is one you will want to keep.
I usually think of cheesecake as the perfect dessert for birthdays, family gatherings, holidays, or those weekends when I feel like baking something a little extra special. Although it looks impressive, making cheesecake at home is easier than you might expect. The secret is using room-temperature ingredients, mixing the filling gently, and giving the cheesecake enough time to cool and chill.
This baked cheesecake recipe features a crunchy biscuit base, a smooth cream cheese filling, and a golden top that adds a lovely homemade touch. You do not need fancy ingredients or complicated techniques to get a delicious result.
Whether you are making cheesecake for the first time or already love baking desserts, this recipe will help you create a rich, creamy cheesecake that looks beautiful and tastes even better.
Why You Will Love This Homemade Cheesecake
- Rich and creamy: The cream cheese filling has a smooth, luxurious texture.
- Buttery biscuit crust: A crisp, slightly crunchy base balances the soft filling.
- Beautiful golden top: A lightly browned surface gives the cheesecake an appealing bakery-style appearance.
- Simple ingredients: You can make it with everyday baking ingredients.
- Perfect for special occasions: It looks elegant enough for celebrations but is easy enough to make at home.
- Make-ahead friendly: Cheesecake tastes even better after resting in the refrigerator overnight.
Recipe Overview
- Preparation time: 25 minutes
- Baking time: 55–70 minutes
- Cooling time: 2 hours
- Chilling time: At least 6 hours, preferably overnight
- Total time: Approximately 9–10 hours, including chilling
- Servings: 10–12 slices
- Course: Dessert
- Cuisine: American-inspired
- Difficulty: Easy to intermediate
Ingredients for Creamy Baked Cheesecake
These ingredients make one cheesecake in a 9-inch (23 cm) springform pan.
For the Biscuit Crust
- 2 cups (200 g) digestive biscuit crumbs or graham cracker crumbs
- 6 tablespoons (85 g) unsalted butter, melted
- 2 tablespoons (25 g) granulated sugar
- A small pinch of salt
For the Creamy Cheesecake Filling
- 24 oz (680 g) full-fat cream cheese, softened to room temperature
- 1 cup (200 g) granulated sugar
- 3 large eggs, at room temperature
- 1 cup (240 g) sour cream, at room temperature
- 2 tablespoons (16 g) all-purpose flour
- 2 teaspoons vanilla extract
- 1 tablespoon lemon juice
- 1 teaspoon finely grated lemon zest, optional
Optional Topping
- 2 tablespoons sour cream for a thin topping
- Fresh berries for serving
- A little powdered sugar for decoration
- Caramel sauce or fruit sauce, if desired
A quick ingredient note: Full-fat block cream cheese usually gives the best texture. I recommend avoiding whipped cream cheese or low-fat varieties because they can make the filling softer than expected.
Step-by-Step Instructions
Step 1: Prepare the Oven and Pan
Preheat your oven to 325°F (160°C). Lightly grease a 9-inch springform pan and line the bottom with parchment paper if desired.
I usually place the pan on a baking tray to make it easier to handle and to catch any small butter leaks from the crust.
Make sure your cream cheese, eggs, and sour cream have had enough time to reach room temperature. This small step makes a noticeable difference because room-temperature ingredients blend more smoothly.
Step 2: Make the Buttery Biscuit Crust
Place the digestive biscuits or graham crackers in a food processor and pulse until they become fine crumbs. If you do not have a food processor, put the biscuits in a sealed bag and crush them with a rolling pin.
Transfer the crumbs to a bowl and add the melted butter, sugar, and salt. Mix until the crumbs look like damp sand and hold together when pressed.
Pour the mixture into the prepared springform pan. Press it firmly and evenly across the bottom using the back of a spoon or the bottom of a measuring cup.
Bake the crust for 8–10 minutes, then remove it from the oven and let it cool slightly.
Honestly, pressing the crumbs firmly is one of the most important parts of getting a crust that stays together when you cut the cheesecake.
Step 3: Beat the Cream Cheese
Place the softened cream cheese in a large mixing bowl. Beat it on medium-low speed until smooth and creamy, scraping down the sides of the bowl as needed.
Add the sugar and continue mixing until fully incorporated.
Try not to whip too much air into the mixture. Excessive air can expand during baking and contribute to cracks as the cheesecake cools.
If the cream cheese is still cold and lumpy, allow it to soften a little longer before continuing.
Step 4: Add the Remaining Filling Ingredients
Add the eggs one at a time, mixing on low speed after each addition. Stop mixing as soon as each egg is incorporated.
Next, add the sour cream, flour, vanilla extract, lemon juice, and optional lemon zest. Mix gently until the filling is smooth.
Scrape the bottom and sides of the bowl to make sure there are no hidden lumps of cream cheese.
The filling should look thick, creamy, and pourable. Avoid overmixing at this stage because a gentle mixing technique helps create a more even texture.
Step 5: Pour the Filling Over the Crust
Pour the cheesecake mixture over the cooled biscuit crust. Smooth the surface with a spatula.
Tap the pan gently on the countertop once or twice to release any large air bubbles.
If you like a slightly more golden top, you can allow the cheesecake to brown naturally during baking. However, do not increase the oven temperature just to achieve more color, as this can cause the edges to overbake before the center is ready.
Step 6: Bake the Cheesecake
Place the cheesecake in the preheated oven and bake for approximately 55–70 minutes.
The edges should look set, while the center should still have a gentle wobble when you carefully move the pan. It should not look liquid or slosh around.
Ovens vary, so begin checking around the 50-minute mark rather than relying entirely on the clock.
For a more delicate texture, you can bake the cheesecake in a water bath. Wrap the outside of the springform pan securely in heavy-duty foil, place it inside a larger roasting pan, and pour hot water into the roasting pan until it reaches about halfway up the sides of the cheesecake pan.
A water bath helps the cheesecake bake more evenly, although it is optional for this recipe.
Step 7: Cool the Cheesecake Slowly
When the cheesecake is done, turn off the oven and leave the door slightly open. Allow the cheesecake to rest inside for about 30 minutes.
Remove it from the oven and let it cool at room temperature for another 1–2 hours, away from direct heat.
Some small cracks can happen even with careful baking, so do not worry if the surface is not perfectly smooth. A homemade cheesecake can still taste wonderful and look beautiful.
Avoid placing a hot cheesecake straight into the refrigerator because the sudden temperature change may encourage cracking.
Step 8: Chill Until Firm
Once the cheesecake has cooled, cover it and refrigerate for at least 6 hours. For the best flavor and texture, I usually recommend chilling it overnight.
This resting time allows the filling to firm up and the flavors to develop. It also makes slicing much easier.
Do not remove the springform ring until the cheesecake is thoroughly chilled.
Step 9: Slice and Serve
Run a thin knife around the inside edge of the pan before releasing the springform ring.
For clean slices, dip a sharp knife in hot water, wipe it dry, and cut through the cheesecake. Repeat between slices.
Serve the cheesecake plain to enjoy its creamy flavor, or add fresh berries, a drizzle of caramel sauce, or a spoonful of fruit compote.
The golden top and thick, creamy center make this cheesecake a lovely centerpiece for any dessert table.
Tips for the Best Homemade Cheesecake
1. Always Use Room-Temperature Ingredients
Cold cream cheese can create lumps, while cold eggs and sour cream may prevent the filling from blending evenly. Allow the ingredients to sit out briefly before mixing, while following safe food-handling practices.
2. Do Not Overmix the Batter
Mixing too much air into the batter can cause the cheesecake to rise excessively and then sink or crack as it cools. Use medium-low or low speed once you start adding the eggs.
3. Avoid Overbaking
A cheesecake should not be completely firm in the center when it comes out of the oven. A slight wobble is normal, and the filling will continue to set as it cools and chills.
4. Use Full-Fat Cream Cheese
Full-fat cream cheese creates a richer, denser, and creamier filling. Spreadable cream cheese sold in tubs may contain more moisture and can produce a softer result.
5. Let It Chill Properly
It can be tempting to cut into the cheesecake early, but patience really pays off. Chilling overnight gives you firmer slices and a more developed flavor.
6. Prevent Water Bath Leaks
If you decide to use a water bath, wrap the springform pan carefully with heavy-duty foil. Better still, place the springform pan inside a larger oven-safe cake pan before setting it in the water bath.
7. Want a More Golden Top?
Bake the cheesecake until the top develops a light golden color. The amount of browning will depend on your oven and baking pan. If you prefer a very deeply browned top, remember that additional browning can change the flavor and texture.
8. Do Not Rush the Cooling Process
Slow cooling helps reduce sudden temperature changes, which can contribute to cracks. Even if a crack appears, you can cover it with sour cream, berries, or fruit sauce.
Serving Suggestions
One of my favorite things about baked cheesecake is how easily it pairs with different toppings. You can keep it simple or dress it up for a celebration.
Fresh berries: Strawberries, raspberries, blueberries, and blackberries add freshness and a little tartness that balances the rich filling.
Strawberry sauce: Spoon homemade strawberry sauce over each slice for a fruity, colorful finish.
Chocolate drizzle: Melted chocolate or chocolate ganache works beautifully if you prefer a richer dessert.
Caramel sauce: A light drizzle of caramel adds sweetness and a lovely contrast to the slightly tangy cream cheese.
Coffee or tea: Serve a slice with freshly brewed coffee, black tea, or a cappuccino for a relaxing afternoon treat.
Holiday dessert platter: Add cheesecake slices to a dessert table with cookies, fresh fruit, and small pastries.
If you are serving guests, I recommend slicing the cheesecake shortly before bringing it to the table and adding toppings just before serving.
Storage and Make-Ahead Instructions
How to Store Cheesecake in the Refrigerator
Keep the cheesecake covered in an airtight container or tightly wrapped in the refrigerator. It is best enjoyed within 3–5 days.
Because cheesecake contains dairy and eggs, do not leave it at room temperature for more than 2 hours, or more than 1 hour when temperatures exceed 90°F (32°C).
Can You Freeze Homemade Cheesecake?
Yes! Cheesecake freezes well when properly wrapped.
For best results, chill the cheesecake completely, then freeze it whole or in individual slices. Wrap each portion tightly in plastic wrap and place it in a freezer-safe container or bag.
For best quality, use frozen cheesecake within about 2 months. Thaw it overnight in the refrigerator before serving.
Can You Make Cheesecake a Day Ahead?
Absolutely. In fact, making it a day ahead is one of my favorite ways to prepare for guests. The cheesecake has plenty of time to set, the flavor develops, and you have one less thing to worry about on the day of your gathering.
Nutrition Information
The following nutrition values are approximate and based on 12 servings, using the ingredients listed above without optional toppings.
| Nutrient | Approximate amount per serving |
|---|---|
| Calories | 390 kcal |
| Protein | 6 g |
| Total carbohydrates | 29 g |
| Total fat | 28 g |
| Saturated fat | 16 g |
| Sugar | 22 g |
| Fiber | 0.5 g |
| Sodium | 300 mg |
Actual nutrition values will vary depending on the cream cheese, biscuits, butter, and other ingredients you use. Larger slices and additional toppings will increase the values.
Frequently Asked Questions
1. Why did my cheesecake crack on top?
Cheesecake can crack if it is overbaked, mixed too vigorously, or cooled too quickly. To reduce the risk, mix gently, remove the cheesecake while the center still has a slight wobble, and allow it to cool gradually. A water bath can also help maintain an even baking temperature.
2. How do I know when baked cheesecake is ready?
The edges should be set, but the center should still jiggle slightly when you gently move the pan. The middle should not appear liquid. If you use a food thermometer, many cheesecake recipes target approximately 150–155°F (66–68°C) in the center, although the ideal endpoint can vary with the recipe and desired texture.
3. Can I make this cheesecake without sour cream?
Yes. You can substitute an equal amount of full-fat Greek yogurt, although the flavor and texture may change slightly. You can also use crème fraîche. Sour cream contributes moisture and a pleasant tang that balances the sweetness.
4. Can I use digestive biscuits instead of graham crackers?
Definitely! Digestive biscuits work very well for cheesecake crusts and are a great option when graham crackers are difficult to find. Crush them into fine crumbs and combine them with melted butter and sugar as directed.
5. How long does cheesecake need to chill before serving?
Allow at least 6 hours in the refrigerator after cooling, but overnight chilling is even better. This gives the filling enough time to become firm and makes it easier to cut neat slices.