
Homemade Crusty Bread Recipe

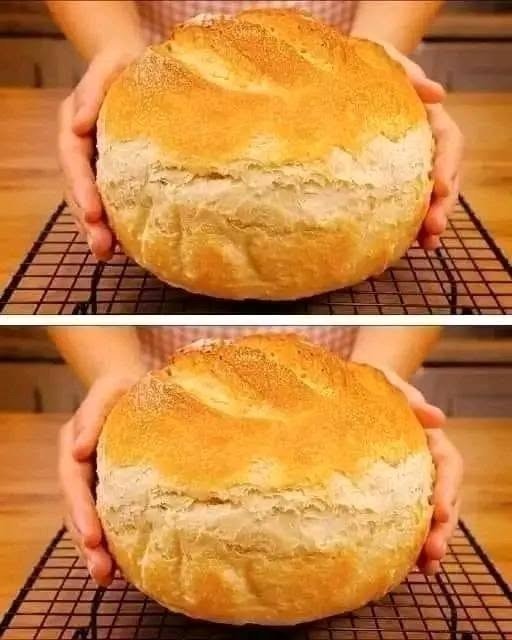
There is something so satisfying about pulling a beautiful loaf of homemade bread out of the oven. The golden crust, the warm aroma filling the kitchen, and that first slice with a soft, fluffy center—honestly, homemade bread is hard to beat!
This rustic round bread is one of those recipes that looks like it came straight from a little neighborhood bakery, but you can make it right in your own kitchen with a handful of simple ingredients. It has a beautifully browned crust, a tender interior, and that classic homemade appearance with a lovely split across the top.
I usually make this bread when I want something fresh to serve with dinner or when we’re craving warm bread with butter. The best part is that you don’t need a bread machine or any special baking experience. A mixing bowl, a little patience, and a hot oven are all you need.
The secret to getting that golden crust and soft inside is giving the dough enough time to rise, handling it gently, and creating steam during the early part of baking.
If you’ve always wanted to bake your own bakery-style rustic bread, this is a wonderful recipe to start with!
Why You’ll Love This Homemade Rustic Bread
- Simple ingredients: You only need flour, water, yeast, salt, and a little sugar.
- Beautiful bakery-style crust: The outside becomes golden and crisp while the inside stays soft.
- Perfect for beginners: No complicated techniques or expensive equipment are required.
- Versatile: Serve it with soups, salads, pasta, eggs, or your favorite spreads.
- Great for sharing: One large round loaf is perfect for family meals and gatherings.
Ingredients You’ll Need
Here’s what I use to make one large round loaf of homemade crusty bread.
Main ingredients
- 4 cups (500 g) bread flour or all-purpose flour, plus extra for dusting
- 1½ cups (360 ml) lukewarm water
- 2¼ teaspoons (7 g) instant yeast or active dry yeast
- 1½ teaspoons salt
- 1 teaspoon sugar or honey
- 1 tablespoon olive oil, optional
A quick note about the ingredients
Flour: Bread flour gives the loaf a slightly chewier texture, while all-purpose flour works perfectly well for everyday homemade bread.
Water: Use lukewarm water, not hot water. Very hot water can damage the yeast and prevent the dough from rising properly.
Yeast: Instant yeast can be mixed directly with the flour. If you’re using active dry yeast, dissolve it in the lukewarm water with the sugar and let it stand for about 5–10 minutes, until foamy.
Salt: Salt adds flavor and helps regulate fermentation. Measure it carefully rather than leaving it out.
Sugar: A small amount helps get the yeast started, especially when using active dry yeast. You don’t need enough to make the bread taste sweet.
Step-by-Step Instructions
Step 1: Activate the yeast
If you’re using active dry yeast, combine the lukewarm water, sugar, and yeast in a large bowl. Stir gently and leave it for 5–10 minutes.
The mixture should look slightly foamy on top, which is a good sign that the yeast is active.
If you’re using instant yeast, you can simply mix it with the flour and proceed to the next step.
I usually check the water temperature before adding the yeast because this small detail can make a big difference in how well the dough rises.
Step 2: Mix the dough
Add the flour and salt to the yeast mixture. Stir with a wooden spoon until a rough, shaggy dough forms.
Add the optional olive oil if you’d like a slightly softer crumb.
The dough should feel soft and a little tacky, but it shouldn’t be so wet that it resembles batter. If it’s extremely sticky, add flour a tablespoon at a time. If it feels too dry, add a teaspoon of water at a time.
Honestly, it’s better to start with a slightly sticky dough than to add too much flour. Too much extra flour can make the finished bread dense.
Step 3: Knead until smooth
Transfer the dough to a lightly floured surface.
Knead by pushing the dough away from you with the heel of your hand, folding it back over itself, and turning it slightly. Continue for about 8–10 minutes, until the dough becomes smoother and more elastic.
You can also use a stand mixer fitted with a dough hook for approximately 5–7 minutes on low to medium-low speed.
The dough doesn’t need to look perfectly smooth, but it should feel stretchy and hold together well.
Step 4: Let the dough rise
Place the dough in a lightly greased bowl and turn it once so the surface is lightly coated. Cover with a clean kitchen towel or plastic wrap.
Leave it in a warm, draft-free place for about 1–2 hours, or until it has roughly doubled in size.
The exact time depends on the temperature of your kitchen. On a warm day, the dough may rise faster. In a cooler kitchen, it can take longer.
I usually look at the dough rather than the clock. If it has expanded noticeably and looks airy, it’s ready for the next step.
Step 5: Shape the round loaf
Gently turn the risen dough onto a lightly floured surface. Press it just enough to release the largest air pockets.
Fold the edges toward the center, then turn the dough seam-side down. Cup your hands around the dough and gently rotate it against the work surface to create a tight, round shape.
Place the shaped loaf on a piece of parchment paper or a lightly floured baking tray.
Cover loosely and let it rise again for about 30–45 minutes, until slightly puffy.
Avoid letting the loaf overproof. It should feel airy but still have enough structure to hold its shape.
Step 6: Preheat the oven
Preheat your oven to 450°F (230°C).
For the best crust, place a heavy Dutch oven with its lid inside the oven while it heats, if you’re using one. Allow about 30 minutes for the pot to become thoroughly hot.
If you don’t have a Dutch oven, you can bake the loaf on a preheated baking tray or baking stone and use a separate oven-safe metal pan to create steam.
Safety note: Never pour water into a hot glass dish or directly onto an oven light or heating element. Steam can cause severe burns, so handle hot pans carefully.
Step 7: Score the bread
Using a sharp bread lame or a very sharp knife, make one long slash across the top of the loaf, approximately ½ inch (1 cm) deep.
This allows the bread to expand in a controlled way as it bakes. It’s also what creates that attractive split across the top of a rustic loaf.
I usually make one confident slash rather than several shallow cuts. A clean score helps the loaf open beautifully in the oven.
Step 8: Bake until golden
Using a Dutch oven: Carefully transfer the dough on its parchment paper into the hot pot. Cover with the lid and bake for 25 minutes. Remove the lid and continue baking for another 15–20 minutes, until the crust is deeply golden brown.
Using a baking tray: Place the loaf on a preheated tray. Put a sturdy, oven-safe metal pan on the lower rack and carefully add a small amount of boiling water to create steam. Bake for approximately 35–45 minutes, depending on your oven and loaf size.
The bread should sound hollow when tapped on the bottom. For a more reliable check, the center should reach approximately 200–210°F (93–99°C).
If the crust is browning too quickly, reduce the oven temperature slightly and continue baking until the center is done.
Step 9: Cool before slicing
Transfer the finished loaf to a wire rack and let it cool for at least 45–60 minutes before slicing.
I know it’s tempting to cut into warm bread immediately, but allowing it to cool helps the inside finish setting. Cutting too soon can make the crumb gummy or compressed.
Once cooled, slice it with a serrated bread knife and enjoy!
My Best Tips for Perfect Crusty Bread
1. Measure your flour carefully
Too much flour is one of the most common reasons homemade bread turns out heavy. If possible, use a kitchen scale. If you’re measuring by cups, spoon the flour into the cup and level it instead of packing it down.
2. Give the dough enough time to rise
Yeast needs time to create the air pockets that make bread light. Don’t rush the rising stages, especially if your kitchen is cool.
3. Create steam during baking
Steam keeps the surface of the dough flexible during the early stages of baking, allowing the loaf to expand before the crust hardens.
A covered Dutch oven is one of the easiest ways to achieve this at home.
4. Preheat thoroughly
A hot oven helps the loaf rise quickly and develop a beautiful crust. If you’re using a Dutch oven or baking stone, make sure it has enough time to heat fully.
5. Don’t add too much extra flour
The dough should be slightly tacky. Adding too much flour while kneading can lead to a tight, dry crumb.
6. Let the loaf cool completely
Cooling is part of the baking process, not just an optional final step. Be patient for the best texture.
7. Adjust for your kitchen temperature
Bread dough rises faster in warm conditions and more slowly in cool conditions. During hot weather, check the dough early to prevent overproofing.
What to Serve with Homemade Crusty Bread
One of my favorite things about this bread is how easily it fits into almost any meal.
Butter and jam
A thick slice with softened butter and your favorite jam makes a simple breakfast or afternoon snack.
Soup and stew
Serve it with tomato soup, creamy mushroom soup, chicken soup, lentil soup, or a hearty beef stew. The crust is perfect for dipping into the broth.
Olive oil and herbs
Pour olive oil into a small dish, add a little black pepper and dried herbs, and use the bread for dipping.
Eggs and breakfast dishes
Serve toasted slices alongside scrambled eggs, omelets, fried eggs, or a vegetable breakfast skillet.
Sandwiches
Slice the loaf horizontally or use individual slices to make sandwiches with cheese, chicken, roasted vegetables, or deli fillings.
Cheese boards
Cut the loaf into slices or chunks and serve with cheese, olives, nuts, and your favorite spreads.
Garlic bread
Mix softened butter with minced garlic and chopped parsley. Spread it over sliced bread and toast until fragrant and lightly crisp.
Variations to Try
Once you’ve mastered the basic loaf, it’s easy to experiment.
Garlic and herb bread: Add finely chopped rosemary, thyme, or a little garlic powder to the flour.
Whole-wheat rustic bread: Replace up to 1 cup of the white flour with whole-wheat flour. You may need a little extra water.
Olive bread: Fold chopped, well-drained olives into the dough during the final stage of mixing.
Cheese bread: Add grated cheddar or Parmesan for a savory loaf. Keep the added cheese moderate so the dough retains its structure.
Seeded crusty bread: Sprinkle sesame, sunflower, or pumpkin seeds over the loaf before baking.
How to Store Homemade Bread
At room temperature
Once completely cool, store the loaf in a paper bag or bread box for about 2–3 days. The crust will gradually soften, which is normal for homemade bread.
Avoid sealing the loaf while it’s still warm because trapped moisture can make the crust soggy.
Can you freeze homemade bread?
Yes! Let the bread cool completely, then slice it and place the slices in a freezer-safe bag. Freeze for up to 3 months for best quality.
Freezing the bread in slices makes it easy to take out just what you need.
How to reheat it
For a crisp crust, warm the whole loaf in a 350°F (175°C) oven for approximately 8–10 minutes.
Individual slices can be toasted directly from frozen.
Approximate Nutrition Information
The following values are estimates for one of 12 servings of this loaf, assuming the optional olive oil is included.
- Calories: 165
- Protein: 5 g
- Carbohydrates: 33 g
- Fat: 2 g
- Saturated fat: 0.3 g
- Fiber: 1.5 g
- Sugar: 1 g
- Sodium: 300 mg
Actual values will vary depending on the flour brand, loaf size, and amount of salt used.
Frequently Asked Questions
1. Why didn’t my homemade bread rise?
The yeast may be inactive, the water may have been too hot, or the kitchen may be too cold. Check the expiration date on your yeast and make sure the dough is kept in a warm, draft-free place. Also, remember that cooler dough takes longer to rise.
2. How do I get a really crispy bread crust?
Bake in a fully preheated oven, use steam during the early part of baking, and uncover the loaf toward the end so the crust can brown. A Dutch oven is especially helpful because it traps moisture around the loaf.
3. Can I make this bread without a Dutch oven?
Absolutely. Use a preheated baking tray or baking stone and a separate sturdy metal pan to generate steam. The results may be slightly different, but you can still get a lovely crusty loaf.
4. Can I prepare the dough the night before?
Yes. After mixing and kneading, place the covered dough in the refrigerator for a slow overnight rise. The next day, let it sit at room temperature until it’s easier to shape, shape the loaf, allow it to become puffy, and bake as directed. Cold dough may need additional rising time.
5. Why is my bread dense inside?
Dense bread can result from adding too much flour, insufficient kneading, underproofing, or cutting the loaf before it has cooled. Measure ingredients carefully, allow enough rising time, and let the bread cool before slicing.
Conclusion
Making homemade rustic crusty bread is easier than it looks, and the results are so rewarding. With a golden, crackly crust and a soft, fluffy interior, this simple round loaf is perfect for everyday meals, weekend baking, and sharing with family.
I usually keep the ingredients simple and let the texture do the talking. Honestly, a warm slice with a little butter is sometimes all you need!
Remember to give the dough time to rise, bake it in a properly heated oven, and let it cool before slicing. Once you’ve made this loaf a couple of times, you’ll start getting a feel for the dough and may find yourself baking it regularly.
Give this homemade crusty bread recipe a try, and enjoy the wonderful smell of freshly baked bread right in your own kitchen.