
Garlic Butter Hasselback Potatoes Recipe

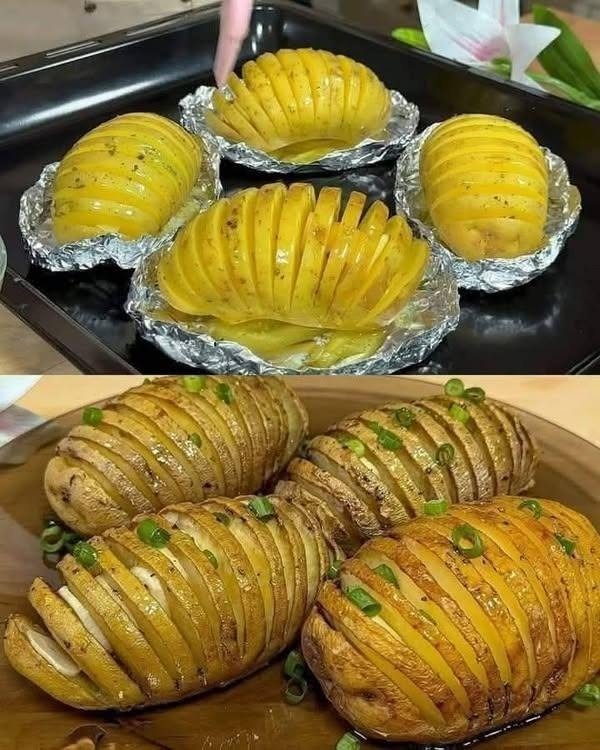
Honestly, potatoes are one of those ingredients that never disappoint. You can boil them, mash them, fry them, or roast them, and they somehow always turn into something comforting and delicious. But when I want to make an ordinary potato look a little more special, I usually go for these garlic butter Hasselback potatoes.
The first time I made them, I was surprised by how impressive they looked. Those thin, fan-like slices turn beautifully golden in the oven, while the inside stays soft and fluffy. Add melted butter, fresh garlic, and a few herbs, and the whole kitchen smells absolutely amazing.
What I love most is that you don’t need complicated ingredients or fancy cooking skills. A sharp knife, a baking tray, and a handful of pantry staples are all you need.
The secret is cutting the potatoes into thin slices without cutting all the way through. As the potatoes bake, the slices gently open up, allowing the garlic butter to seep between the layers. The edges become crispy, the centers remain tender, and every bite is packed with flavor.
I usually serve these potatoes with grilled chicken, roasted vegetables, or even a simple salad. They work just as well for a casual weeknight dinner as they do for a holiday meal.
If you’re looking for an easy potato side dish that tastes wonderful and looks beautiful on the table, this recipe is definitely worth trying!
Recipe Overview
- Prep Time: 15 minutes
- Cook Time: 50–65 minutes
- Total Time: Approximately 1 hour 15 minutes
- Servings: 4
- Course: Side dish
- Cuisine: European-inspired
- Cooking Method: Oven-baked
- Difficulty: Easy
Ingredients for Garlic Butter Hasselback Potatoes
You only need a few basic ingredients to make these crispy, flavorful potatoes.
Main Ingredients
- 4 medium-to-large potatoes, preferably Yukon Gold, russet, or another suitable baking potato
- 3 tablespoons unsalted butter, melted
- 2 tablespoons olive oil
- 4 cloves garlic, finely minced
- 1 teaspoon salt, or to taste
- ½ teaspoon freshly ground black pepper
- 1 teaspoon paprika
- 1 teaspoon dried rosemary or thyme
- 2 tablespoons chopped fresh parsley or sliced green onions, for garnish
Optional Ingredients
- ¼ cup grated Parmesan cheese
- ½ teaspoon onion powder
- A pinch of red chili flakes
- 2 tablespoons sour cream for serving
- Extra melted butter for brushing during baking
My personal tip: I usually mix butter with a little olive oil because the butter adds rich flavor while the oil helps the potatoes brown nicely.
How to Make Garlic Butter Hasselback Potatoes
Step 1: Preheat the Oven and Prepare the Potatoes
Preheat your oven to 400°F (200°C).
Wash the potatoes thoroughly under running water, especially if you’re planning to leave the skins on. Pat them dry with a clean kitchen towel.
I usually keep the skins on because they add texture and help the potatoes hold their shape. Plus, the skin becomes wonderfully crisp around the edges.
Choose potatoes that are reasonably uniform in size so they cook at approximately the same rate.
Step 2: Slice the Potatoes Hasselback-Style
Place one potato on a cutting board.
Position two wooden chopsticks, wooden spoons, or thin-handled utensils along the sides of the potato. These act as guides and help prevent your knife from cutting all the way through.
Using a sharp knife, make thin slices across the potato, about ⅛ inch (3 mm) apart. Stop cutting when the knife reaches the chopsticks, leaving the bottom of the potato intact.
Repeat with the remaining potatoes.
The slices should look like a little fan while the potato remains connected at the base.
Honestly, this is the only part that requires a little patience, but it gets easier after the first potato!
Step 3: Prepare the Garlic Butter
In a small bowl, combine the melted butter, olive oil, minced garlic, salt, black pepper, paprika, and dried rosemary or thyme.
Stir everything together until well combined.
If you enjoy a slightly spicy flavor, add a pinch of chili flakes. For a cheesy version, you can save the Parmesan for the final part of baking.
The garlic butter should smell fragrant and rich. It’s a simple mixture, but it makes a huge difference to the finished potatoes.
Step 4: Brush the Potatoes Generously
Arrange the sliced potatoes in a baking dish or on a rimmed baking tray. Leave a little space between them so hot air can circulate.
Brush the garlic butter mixture over the potatoes, making sure to coat the tops and sides.
Gently separate the slices with your fingers or a pastry brush, then work a little of the butter mixture between the layers where possible.
Don’t worry if the slices aren’t perfectly even. Once baked, they’ll open up and develop those lovely golden edges.
Step 5: Bake Until Tender
Place the potatoes in the preheated oven and bake for approximately 40 minutes.
Remove the tray and brush the potatoes again with the melted butter and oil that have collected in the dish. If the slices have started opening up, carefully brush a little mixture between them.
Return the potatoes to the oven for another 15–25 minutes, depending on their size.
They’re ready when the centers are tender, the edges are crispy, and the tops are beautifully golden brown.
To check, insert a thin knife into the thickest part of a potato. It should slide in easily.
If the potatoes are tender but not as crispy as you’d like, increase the oven temperature slightly for the final few minutes, keeping a close eye on them.
Step 6: Add Cheese and Fresh Herbs
If you’re using Parmesan cheese, sprinkle it over the potatoes during the final 5–10 minutes of baking. This gives it time to melt and develop a lightly golden finish.
Once the potatoes are cooked, remove them from the oven and let them rest for a couple of minutes.
Sprinkle with freshly chopped parsley or sliced green onions.
I love adding green onions because they bring a little freshness and color to the golden potatoes. A final brush of melted garlic butter is also delicious if you want an extra-rich finish.
Step 7: Serve While Hot
Transfer the potatoes to a serving platter and serve immediately while the edges are crisp and the centers are soft.
You can finish them with extra black pepper, a little Parmesan, or a spoonful of sour cream.
The contrast between the crispy outer slices and the fluffy inside is what makes these potatoes so satisfying!
My Best Tips for Crispy Hasselback Potatoes
1. Choose the right potatoes
Russet potatoes are great if you want fluffy centers and crisp edges. Yukon Gold potatoes have a naturally buttery flavor and a creamy texture. Medium-sized potatoes also tend to cook more evenly than very large ones.
2. Keep the slices thin and even
Thin slices create more edges, which means more opportunities for crispiness. Aim for slices around ⅛ inch apart, but don’t worry if they’re not perfectly uniform.
3. Don’t cut all the way through
Leaving the bottom intact is essential. The potato needs to hold together while baking so the slices can fan out beautifully.
4. Brush the potatoes more than once
I usually brush them before baking and again partway through cooking. This helps the butter and seasonings coat the newly exposed surfaces as the slices open up.
5. Give the potatoes enough space
If the potatoes are crowded in the baking dish, they may steam instead of roasting properly. Use a larger tray or divide them between two trays if necessary.
6. Add garlic carefully
Minced garlic can burn during a long roasting time. If your oven runs hot or the garlic is browning too quickly, use garlic-infused butter or add some of the minced garlic partway through baking.
7. Don’t rush the cooking time
The potatoes need enough time to become tender in the middle. Larger potatoes may take longer, so check the center with a knife rather than relying on the clock alone.
8. Finish with fresh herbs
Fresh parsley, chives, or green onions add color and balance the richness of the butter.
Delicious Variations to Try
One of the best things about Hasselback potatoes is how easy they are to customize.
Cheesy Garlic Hasselback Potatoes: Add grated cheddar or Parmesan during the final 5–10 minutes of baking. For sliced cheese, tuck small pieces between the potato layers near the end so they melt without burning.
Spicy Paprika Potatoes: Add smoked paprika, cayenne pepper, and a pinch of chili flakes to the butter mixture.
Rosemary Butter Potatoes: Use fresh rosemary and a little extra black pepper for a fragrant, savory side dish.
Lemon Herb Potatoes: Add a little lemon zest to the butter mixture and finish with a squeeze of lemon juice after baking.
Loaded Hasselback Potatoes: Once baked, top with sour cream, shredded cheese, sliced green onions, and your favorite additional toppings.
Vegan Hasselback Potatoes: Replace the butter with plant-based butter or use olive oil with garlic, rosemary, paprika, and black pepper.
Parmesan Herb Potatoes: Mix finely grated Parmesan with dried herbs and sprinkle it over the potatoes during the final minutes of baking.
What to Serve with Garlic Butter Hasselback Potatoes
These potatoes pair beautifully with all kinds of main dishes. Because they’re rich and flavorful, I like to serve them with something fresh or lightly seasoned.
- Grilled chicken: A simple grilled chicken breast or garlic chicken makes an easy, satisfying dinner.
- Roast chicken: Perfect for a comforting family meal or Sunday lunch.
- Grilled fish: Salmon or white fish pairs nicely with the buttery potatoes.
- Steak: Serve them alongside a juicy steak for a restaurant-style dinner at home.
- Roasted vegetables: Broccoli, carrots, green beans, and bell peppers make excellent additions.
- Fresh garden salad: A crisp salad with a light vinaigrette balances the richness of the butter.
- Creamy garlic dip: Sour cream, yogurt, or a garlic-herb dip works wonderfully for dipping the crispy edges.
For a simple dinner, I usually serve two potatoes per person if they’re medium-sized, alongside a protein and a fresh vegetable. For a bigger gathering, arrange them on a large platter with herbs sprinkled over the top.
How to Store and Reheat Leftovers
Refrigerator: Allow leftover potatoes to cool, then place them in an airtight container and refrigerate within 2 hours. Use within 3–4 days.
Reheating in the oven: Place the potatoes on a baking tray and heat at 375°F (190°C) until warmed through and crisp again, usually around 10–20 minutes depending on their size.
Reheating in an air fryer: Heat at approximately 350°F (175°C) for 5–10 minutes, checking regularly.
Microwave: You can microwave them for convenience, but the slices will usually become softer rather than crispy.
Freezing: Freezing is possible, but the texture may change after thawing. For the best results, I recommend making these potatoes fresh or refrigerating leftovers for a few days.
Nutrition Information (Approximate Per Serving)
The following estimates assume four servings, with each serving containing one potato and a share of the garlic butter mixture, without optional cheese or sour cream.
- Calories: 280–330 kcal
- Protein: 4–6 g
- Carbohydrates: 35–45 g
- Fat: 14–18 g
- Saturated Fat: 5–7 g
- Fiber: 4–5 g
- Sugar: 2–3 g
- Sodium: 350–550 mg
These are approximate values. Actual nutrition will vary depending on potato size, the amount of butter and oil used, and any optional toppings.
Frequently Asked Questions
1. What are Hasselback potatoes?
Hasselback potatoes are potatoes sliced into thin, closely spaced cuts that stop just short of the bottom. This creates a fan-like appearance. When baked, the slices open up, allowing the edges to become crisp while the inside remains tender. They’re often seasoned with butter, oil, garlic, and herbs.
2. Why are my Hasselback potatoes not crispy?
The potatoes may need more baking time, or they may be crowded in the baking dish. Too much moisture can also prevent browning. Make sure the potatoes are dry before seasoning, leave space between them, and brush them with butter or oil during baking. If they’re tender but still pale, give them a few additional minutes in a hotter oven while watching carefully.
3. Can I prepare Hasselback potatoes ahead of time?
Yes. You can wash and slice the potatoes a few hours ahead. Keep them submerged in cold water in the refrigerator to prevent browning, then drain and dry them thoroughly before seasoning. For the best texture, bake them shortly before serving. You can also bake them ahead and reheat them in the oven to restore some crispiness.
4. Can I make Hasselback potatoes in an air fryer?
Yes! Brush the sliced potatoes with the garlic butter mixture and arrange them in a single layer in the air fryer basket. Cook at approximately 360°F (180°C) for 25–40 minutes, depending on their size and your air fryer. Brush with additional butter partway through and check the centers with a knife. Larger potatoes may require extra time.
5. Which potatoes work best for this recipe?
Russet potatoes are ideal for a fluffy interior and crisp edges. Yukon Gold potatoes are another excellent choice because they have a naturally creamy texture and buttery flavor. Choose potatoes of similar size so they cook evenly, and avoid potatoes that are too small or irregularly shaped to slice safely.
Conclusion: A Simple Potato Recipe That Looks Impressive
These garlic butter Hasselback potatoes are proof that a few everyday ingredients can turn into something truly special. With crispy golden edges, soft centers, fragrant garlic butter, and fresh herbs, they’re a delicious side dish that’s easy enough for a weeknight but impressive enough for guests.
I usually keep the seasoning simple with butter, garlic, paprika, and herbs, then finish everything with fresh green onions. But honestly, that’s the beauty of this recipe: you can make it cheesy, spicy, herby, or completely dairy-free depending on what you have at home.
Serve them with grilled chicken, fish, steak, or a fresh salad, and you’ve got a meal that feels both comforting and a little fancy.
If you’re a potato lover, give these crispy Hasselback potatoes a try. Just remember to slice carefully, brush generously, and give them enough time in the oven. Those golden, crispy edges are absolutely worth the wait!