
Homemade Cheddar Cheese Biscuits

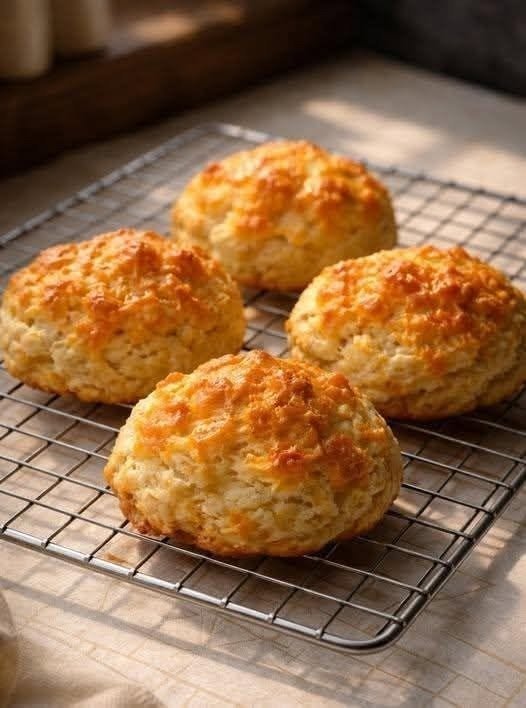
There’s something special about pulling a tray of freshly baked cheese biscuits out of the oven. The kitchen smells like warm butter and melted cheddar, and honestly, it’s hard to wait for them to cool before grabbing one!
These homemade cheddar cheese biscuits are one of my favorite things to bake when I want something comforting without spending hours in the kitchen. They have a golden, slightly crisp exterior, a soft and fluffy center, and plenty of cheesy flavor in every bite.
I usually make them for weekend breakfasts, afternoon snacks, or as a side dish for soups and hearty dinners. They’re also perfect when you want homemade bread but don’t have the time or patience to wait for yeast dough to rise.
The best part? You only need simple pantry ingredients, one mixing bowl, and about 30 minutes from start to finish. Whether you’re an experienced baker or trying homemade biscuits for the first time, this easy cheese biscuit recipe is a wonderful place to start.
Why You’ll Love This Easy Cheese Biscuit Recipe
- Quick and easy: No yeast, proofing, or complicated techniques required.
- Fluffy and tender: Cold butter helps create a soft, delicate crumb.
- Packed with cheese: Sharp cheddar gives every biscuit a rich, savory flavor.
- Perfectly golden: A little extra cheese on top creates that irresistible baked finish.
- Versatile: Serve them for breakfast, brunch, snacks, or dinner.
Ingredients for Homemade Cheddar Cheese Biscuits
This recipe makes approximately 8 medium-sized biscuits.
Dry Ingredients
- 2 cups (250 g) all-purpose flour
- 1 tablespoon baking powder
- 1/2 teaspoon salt
- 1/2 teaspoon garlic powder (optional)
- 1/4 teaspoon black pepper (optional)
Wet Ingredients
- 6 tablespoons (85 g) cold unsalted butter, cubed
- 3/4 cup (180 ml) cold buttermilk
- 1 large egg (optional, for brushing the tops)
Cheese
- 1 cup (100–115 g) freshly grated sharp cheddar cheese
- 2–3 tablespoons extra grated cheddar cheese for topping
Optional Finishing Touches
- 1 tablespoon melted butter
- 1 teaspoon chopped fresh parsley
- A pinch of paprika for extra color
Ingredient note: I usually recommend sharp cheddar because it adds plenty of flavor without requiring lots of extra cheese. If you don’t have buttermilk, you can mix 3/4 cup milk with 2 teaspoons lemon juice or white vinegar. Let it stand for 5–10 minutes before using.
Step-by-Step Instructions
Step 1: Preheat the Oven
Preheat your oven to 425°F (220°C). Line a baking sheet with parchment paper.
I like to get the oven ready before mixing the dough because these biscuits bake best when they go into a properly heated oven.
Step 2: Mix the Dry Ingredients
In a large mixing bowl, whisk together the flour, baking powder, salt, garlic powder, and black pepper.
Make sure the baking powder is evenly distributed throughout the flour. This helps the biscuits rise nicely and develop a light, fluffy texture.
Step 3: Cut in the Cold Butter
Add the cold, cubed butter to the flour mixture.
Using your fingertips, a pastry cutter, or a fork, work the butter into the flour until the mixture resembles coarse crumbs. A few pea-sized pieces of butter are perfectly fine.
Honestly, I don’t worry about making the mixture completely uniform. Those little bits of butter help create tender biscuits with a lovely texture.
Step 4: Add the Cheddar Cheese
Stir the grated cheddar cheese into the flour and butter mixture until it’s evenly distributed.
Freshly grated cheese is usually my first choice because it melts beautifully and blends more easily into the dough. Pre-shredded cheese also works if that’s what you have on hand.
Step 5: Add the Buttermilk
Pour in the cold buttermilk and gently stir with a fork or spatula until a shaggy dough forms.
The dough should look slightly rough and a little sticky, but it shouldn’t be soupy. If it seems too dry, add another tablespoon of buttermilk at a time.
Be careful not to overmix. Too much mixing can develop the gluten in the flour and make your biscuits tough instead of tender.
Step 6: Shape the Biscuits
Lightly flour your work surface and turn the dough out onto it.
Gently bring the dough together with your hands. Pat it into a thick round about 1 to 1 1/4 inches high.
For rustic, round biscuits like the ones in the photo, divide the dough into 8 equal portions and shape each portion into a thick, slightly rounded mound. You don’t need perfectly smooth edges; a little unevenness gives homemade biscuits their charm.
Place the biscuits on the prepared baking sheet, leaving a little space between them.
Step 7: Add the Cheesy Topping
Sprinkle the reserved cheddar cheese over the tops of the biscuits.
If you like a deeper golden color, lightly brush the tops with beaten egg before adding the cheese. You can also skip the egg and brush the biscuits with melted butter after baking.
Step 8: Bake Until Golden
Bake for 15–20 minutes, or until the biscuits have risen and the tops are golden brown.
The exact baking time will depend on the size of your biscuits and your oven. Larger biscuits may need a few extra minutes.
I usually start checking around the 15-minute mark. Look for lightly crisp edges, melted cheese on top, and a golden surface. The centers should be cooked through rather than doughy.
Step 9: Brush With Butter and Serve
Remove the biscuits from the oven and let them rest on the baking sheet for about 5 minutes.
If you want extra buttery flavor, brush the tops with melted butter while they’re still warm. Sprinkle with chopped parsley if desired.
Serve warm for the best texture and flavor. The outside will be lightly crisp, while the inside stays soft, fluffy, and cheesy.
My Best Tips for Perfect Cheese Biscuits
1. Keep the Butter Cold
Cold butter is one of the biggest secrets to tender biscuits. If the butter gets too warm before baking, the biscuits may turn out heavier and less flaky.
If your kitchen is warm, you can chill the shaped biscuits in the refrigerator for 10 minutes before baking.
2. Don’t Overwork the Dough
This is probably the most important tip. Mix only until the dough comes together. A slightly rough-looking dough is much better than a smooth, heavily kneaded one.
3. Grate Your Own Cheese
Freshly grated cheddar generally melts more smoothly than many packaged shredded cheeses. Sharp cheddar is especially good because it gives the biscuits a strong cheesy flavor.
4. Measure the Flour Correctly
Too much flour can make biscuits dry and dense. For the most consistent results, weigh the flour if possible. If using measuring cups, spoon the flour into the cup and level it off rather than scooping directly from the bag.
5. Don’t Skip the Hot Oven
A properly preheated oven helps the butter release steam and allows the biscuits to rise quickly. For this recipe, 425°F (220°C) works well.
6. Use Fresh Baking Powder
Old baking powder may not provide enough lift. If your biscuits regularly turn out flat, check the expiration date on your baking powder.
Delicious Ways to Serve Cheese Biscuits
These homemade cheddar biscuits are delicious on their own, but there are plenty of ways to enjoy them.
- For breakfast: Serve with scrambled eggs, an omelet, or fried eggs.
- With soup: Pair them with tomato soup, creamy mushroom soup, or chicken soup.
- Alongside dinner: They’re excellent with roasted chicken, grilled vegetables, or a hearty stew.
- For brunch: Add butter, cream cheese, or a little garlic herb spread.
- As a snack: Enjoy one warm with a cup of tea or coffee.
- For a savory sandwich: Slice a biscuit in half and fill it with scrambled eggs, leftover chicken, or sliced turkey.
I especially love serving these biscuits alongside a bowl of homemade soup on a chilly evening. They’re perfect for soaking up every last bit of broth.
Variations to Try
Once you’ve made the basic recipe, it’s easy to change the flavor.
Garlic Cheddar Biscuits
Add 1/2 teaspoon garlic powder to the dry ingredients and brush the baked biscuits with melted butter mixed with a little minced garlic.
Cheddar and Herb Biscuits
Mix in 1–2 tablespoons of chopped fresh parsley, chives, or thyme for a fresh, savory flavor.
Spicy Cheese Biscuits
Add a pinch of cayenne pepper or a finely chopped jalapeño for a little heat.
Parmesan Cheddar Biscuits
Replace about 1/4 cup of the cheddar with grated Parmesan for a saltier, more savory finish.
Extra-Cheesy Biscuits
Add another 1/4 cup of cheddar to the dough, keeping in mind that too much extra cheese can make the biscuits heavier.
How to Store and Reheat Cheese Biscuits
At Room Temperature
Once completely cooled, store the biscuits in an airtight container for up to 2 days.
In the Refrigerator
You can refrigerate them in an airtight container for up to 4–5 days, although they may lose some of their original softness.
In the Freezer
Freeze the cooled biscuits in a freezer-safe bag or container for up to 2–3 months. Separate layers with parchment paper to prevent sticking.
How to Reheat
For the best texture, reheat the biscuits in a 325°F (165°C) oven for about 5–10 minutes, or until warmed through. You can also microwave one for 15–25 seconds, though the outside won’t be as crisp.
For freshly baked biscuits on a busy morning, you can prepare and shape the dough ahead of time, refrigerate it briefly, and bake when needed. For longer storage, freeze the unbaked biscuits and bake from frozen, allowing a few extra minutes in the oven.
Nutrition Information
The following nutrition information is an estimate for one biscuit, assuming the recipe makes 8 biscuits and includes the main ingredients but not optional toppings.
- Calories: 250–280 kcal
- Carbohydrates: 27–30 g
- Protein: 6–8 g
- Fat: 13–15 g
- Saturated Fat: 8–9 g
- Fiber: 1 g
- Sugar: 1–2 g
- Sodium: 350–450 mg
Actual values will vary depending on the type of cheese, butter, buttermilk, and the size of each biscuit.
Frequently Asked Questions
1. Why Did My Cheese Biscuits Turn Out Dense?
Dense biscuits are often caused by overmixing the dough, using too much flour, or working with baking powder that has lost its effectiveness. Use cold butter, measure the flour carefully, and mix only until the dough comes together.
2. Can I Make Cheese Biscuits Without Buttermilk?
Yes! Mix 3/4 cup of regular milk with 2 teaspoons of lemon juice or white vinegar. Let the mixture stand for 5–10 minutes before adding it to the dough. Plain milk can also work, although the flavor and texture may be slightly different.
3. Can I Use Different Types of Cheese?
Absolutely. Cheddar is my favorite for this recipe, but Monterey Jack, Colby, Gouda, or a cheddar-Parmesan combination can work well. Choose a cheese that melts nicely and adjust the salt if your cheese is particularly salty.
4. Can I Prepare the Biscuit Dough Ahead of Time?
Yes. Shape the biscuits and refrigerate them briefly before baking. For longer preparation, freeze the shaped, unbaked biscuits on a tray, then transfer them to a freezer-safe container. Bake from frozen, adding a few minutes to the baking time and checking that the centers are fully cooked.
5. How Do I Keep Cheese Biscuits Soft After Baking?
Let the biscuits cool slightly, then store them in an airtight container once they are no longer steaming. Avoid leaving them uncovered for long periods because they can dry out. Reheating them briefly in the oven with a light brush of butter helps restore their fresh-baked texture.
Final Thoughts
These homemade cheddar cheese biscuits are proof that simple ingredients can make something truly delicious. With their fluffy centers, buttery flavor, and golden cheese topping, they’re the kind of homemade treat that fits almost any occasion.
I usually make a batch when I want something quick to serve with breakfast or dinner, and I love how easy it is to change the flavor with different cheeses and herbs. Once you get comfortable with the basic method, you can make these biscuits your own.
Give this easy cheese biscuit recipe a try, serve them warm from the oven, and don’t be surprised if everyone reaches for a second one!