
Creamy Baked Custard Pudding

I still remember the kind of homemade desserts my Nana and aunties used to make when I was young. They never needed fancy ingredients or complicated instructions. Somehow, they always knew exactly how much of everything to add, usually without measuring a single thing!
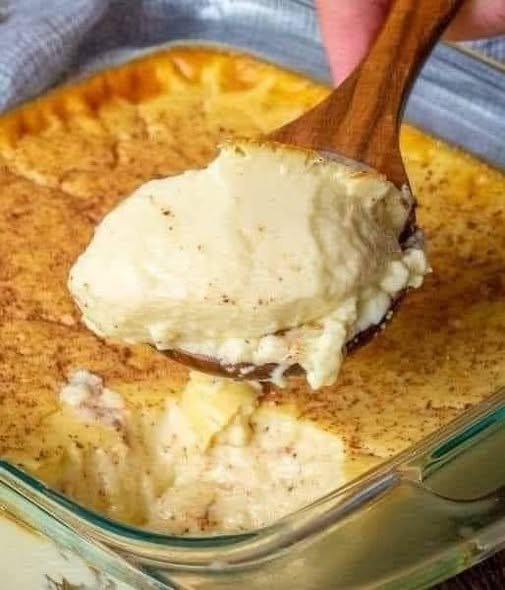
One of those comforting desserts was a creamy, old-fashioned baked custard. It had a soft, silky texture, a beautiful golden top, and just the right amount of sweetness. A little cinnamon sprinkled over the top made it even more irresistible.
The funny thing is, when I finally asked my family for the recipe, they remembered all the ingredients but couldn’t quite remember the measurements. You know how it goes with those old family recipes!
I was so happy to find a version that brought back those familiar flavors. Honestly, it tasted just as I remembered, maybe even better.
This homemade baked custard is simple, delicious, and wonderfully comforting. It’s made with everyday ingredients like milk, eggs, sugar, vanilla, and a touch of cinnamon. There’s nothing complicated about it, but the result feels like something truly special.
Whether you’re making it for your family, preparing a dessert for Sunday dinner, or simply craving an old-fashioned treat, this creamy baked custard is worth saving.
Why You’ll Love This Old-Fashioned Baked Custard
- Simple ingredients: You probably already have most of them in your kitchen.
- Creamy and comforting: The custard sets beautifully while staying soft and delicate.
- Easy to prepare: A little mixing and some gentle baking are all it takes.
- Perfect for making ahead: Chill it for a refreshing dessert or enjoy it slightly warm.
- A nostalgic family favorite: Its old-fashioned flavor brings back memories of homemade desserts and family kitchens.
Ingredients for Creamy Baked Custard
This recipe makes approximately 6 servings.
- 4 large eggs
- 3 cups whole milk
- 1/2 cup granulated sugar
- 2 teaspoons vanilla extract
- 1/4 teaspoon ground cinnamon, plus a little extra for the topping
- 1/8 teaspoon salt
- A little butter for greasing the baking dish
Optional ingredients:
- A small pinch of freshly grated nutmeg for a warmer flavor
- 1 tablespoon brown sugar sprinkled lightly over the top for extra caramel-like notes
I usually stick with the basic ingredients because that’s what gives this dessert its traditional homemade taste. The cinnamon and vanilla are enough to make the whole kitchen smell wonderful.
How to Make Old-Fashioned Baked Custard
Step 1: Preheat the Oven
Preheat your oven to 325°F (160°C).
Lightly grease a medium-sized, oven-safe baking dish with butter. A glass baking dish works nicely because you can see the custard setting around the edges.
Set the dish aside while you prepare the mixture.
Step 2: Warm the Milk
Pour the milk into a saucepan and warm it over medium-low heat.
You don’t want the milk to boil. It should feel hot but not bubbling, with a little steam rising from the surface.
Remove it from the heat and allow it to cool for a minute or two.
This small step helps the eggs blend smoothly into the milk without scrambling.
Step 3: Whisk the Eggs and Sugar
In a large mixing bowl, whisk the eggs and sugar until they’re well combined.
Add the vanilla extract, salt, and cinnamon. Mix everything together until smooth.
There’s no need to beat the mixture until it’s fluffy. You’re making custard, not cake, so gentle mixing is best.
Step 4: Slowly Add the Warm Milk
Pour the warm milk into the egg mixture a little at a time, whisking continuously.
Honestly, this is the step where I take my time. Adding the milk gradually helps prevent the eggs from cooking too quickly and gives you a smoother custard.
If you notice a little foam on the surface, skim it off with a spoon. For an extra-silky texture, you can strain the mixture through a fine-mesh sieve.
Step 5: Pour Into the Baking Dish
Carefully pour the custard mixture into your prepared baking dish.
Sprinkle a little extra cinnamon over the top. This gives the custard that familiar golden, speckled appearance and adds a lovely aroma.
If you prefer individual portions, you can divide the mixture among six small oven-safe ramekins instead.
Step 6: Prepare a Water Bath
Place the baking dish inside a larger roasting pan.
Carefully pour hot water into the roasting pan until it reaches about halfway up the sides of the custard dish. Keep the water below the rim so it doesn’t splash into the custard.
This water bath helps the custard cook gently and evenly. It’s one of the best tricks for achieving a tender texture instead of a rubbery one.
Step 7: Bake Until Just Set
Carefully transfer the roasting pan to the preheated oven.
Bake for approximately 45–60 minutes, depending on the depth and size of your dish. Individual ramekins may take less time.
Start checking around the 40-minute mark. The edges should look set, while the center should still have a slight wobble when you gently move the dish.
For food safety, the center of an egg-based custard should reach 160°F (71°C) when checked with a food thermometer.
Avoid baking it until the center becomes completely firm in the oven, as the custard will continue to set slightly as it cools.
Step 8: Cool and Serve
Carefully remove the baking dish from the water bath and place it on a heat-safe surface.
Let the custard cool for about 20–30 minutes before serving warm, or allow it to cool completely and refrigerate it for a chilled dessert.
I love the way the cinnamon settles into the top as the custard cools. It’s such a simple little detail, but it makes the dessert look and smell wonderful.
Serve it in generous spoonfuls and enjoy every creamy bite!
Tips for the Best Homemade Baked Custard
1. Use Whole Milk for a Creamier Texture
Whole milk gives the custard a richer, smoother consistency. Lower-fat milk can work, but the finished dessert may be a little less creamy.
2. Don’t Skip the Water Bath
This is probably my most important tip. Custard is delicate, and direct heat can make it cook too quickly. The water bath helps keep the temperature gentle and reduces the risk of curdling.
3. Avoid Overmixing
Whisk the eggs and sugar until combined, but don’t incorporate too much air. Excessive bubbles can leave tiny holes in the finished custard.
4. Temper the Eggs Slowly
Always add the warm milk gradually while whisking. If the milk is too hot or you pour it in all at once, the eggs may begin to scramble.
5. Watch for the Gentle Wobble
A slight jiggle in the middle is what you’re looking for. If the entire custard looks liquid, it needs more time. If it puffs up, cracks, or looks watery around the edges, it may be overbaked.
6. Adjust the Sweetness to Your Taste
This recipe has a moderate level of sweetness. If you prefer a sweeter dessert, you can increase the sugar slightly, but I find that 1/2 cup allows the vanilla and cinnamon to shine.
7. Give It Time to Cool
The custard becomes firmer as it cools. Letting it rest also makes serving easier, especially if you plan to portion it into bowls.
What to Serve With Baked Custard
One of the things I love about this old-fashioned dessert is how easily it fits into any occasion. You don’t need anything fancy to make it feel special.
Here are a few delicious ways to serve it:
- Fresh berries: Strawberries, blueberries, or raspberries add a little freshness and color.
- Sliced bananas: Their natural sweetness pairs beautifully with vanilla custard.
- Caramel sauce: Drizzle a little over the top for a richer dessert.
- Crushed biscuits: Add a light sprinkle for a little crunch.
- Shortbread cookies: Serve one or two on the side for a simple afternoon treat.
- A cup of tea or coffee: Perfect for a relaxed family dessert after dinner.
- Extra cinnamon or nutmeg: A light dusting adds warmth without overpowering the custard.
You can serve it warm for a soft, comforting pudding or chilled for a firmer, refreshing dessert. Both are delicious, so it really comes down to personal preference.
How to Store Leftover Baked Custard
If you’re lucky enough to have leftovers, storing them properly is easy.
Refrigerator: Allow the custard to cool, cover it, and refrigerate within two hours of baking. Keep it refrigerated at 40°F (4°C) or below and enjoy within 3–4 days.
Freezer: Freezing isn’t ideal because the custard can become grainy or watery after thawing. For the best texture, I recommend enjoying it fresh or refrigerated.
Reheating: If you prefer it warm, gently reheat an individual portion in the microwave in short intervals. Avoid overheating, as this can cause the custard to become rubbery.
I usually enjoy leftover custard straight from the refrigerator. It’s one of those desserts that tastes just as lovely the next day.
Approximate Nutrition Information
The following estimates are per serving, assuming the recipe makes 6 servings and uses whole milk.
- Calories: 190
- Protein: 8 g
- Total fat: 8 g
- Saturated fat: 3.5 g
- Carbohydrates: 21 g
- Sugars: 20 g
- Fiber: 0 g
- Sodium: 100 mg
Nutrition values are estimates and will vary depending on the size of the eggs, the milk you use, and the exact serving size.
Frequently Asked Questions
1. Why Is My Baked Custard Watery?
Watery custard can result from underbaking, overbaking, or cooking at too high a temperature. Overcooking can cause the eggs to tighten and release liquid, a process called syneresis.
Use a water bath, keep the oven temperature moderate, and check for a gentle wobble in the center. For safety, confirm that the center reaches 160°F (71°C).
2. Can I Make Baked Custard Without a Water Bath?
You can, but I wouldn’t recommend skipping it if you want a particularly smooth texture. Without a water bath, the edges may cook much faster than the center, increasing the risk of a rubbery or curdled custard.
If you must bake without one, use a suitably sized oven-safe dish and monitor the custard carefully.
3. Can I Make This Custard Ahead of Time?
Absolutely! This is a lovely make-ahead dessert.
Bake the custard, let it cool, and refrigerate it in a covered container. It will keep for 3–4 days in the refrigerator when stored properly. The texture becomes firmer as it chills, making it easy to serve in neat portions.
4. How Do I Know When Baked Custard Is Done?
The edges should be set, and the center should have a slight wobble rather than looking completely liquid. For an egg-based custard, use a food thermometer to ensure the center reaches 160°F (71°C).
Remember that the custard will continue to firm up a little as it cools, so avoid leaving it in the oven longer than necessary.
5. Can I Change the Flavor of This Old-Fashioned Custard?
Of course! You can add a pinch of nutmeg, use a little lemon or orange zest, or replace some of the vanilla with another suitable flavoring.
For a classic family-style dessert, though, I usually keep things simple with vanilla and cinnamon. Those familiar flavors are what make this recipe so comforting.
Final Thoughts: A Simple Dessert That Feels Like Home
There’s something special about recipes that remind us of the people who cooked for us when we were young. They don’t have to be complicated or expensive to mean something.
This old-fashioned baked custard is proof of that. With just a handful of everyday ingredients, you can make a creamy, gently sweet dessert that feels like a little piece of home.
I love how the soft custard, warm vanilla, and cinnamon topping come together in every spoonful. It’s the kind of dessert you can serve after a family meal, enjoy with an afternoon cup of tea, or make simply because you’re craving something comforting.
And if you’ve ever tried to recreate a recipe your Nana or aunties made from memory, you’ll understand why finding the right version feels so wonderful.