
Easy Old-Fashioned Fruit Cake Recipe

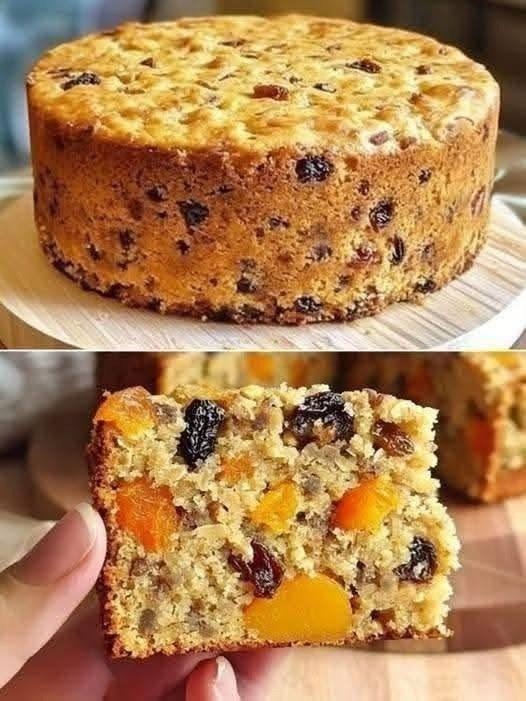
If you love traditional homemade cakes filled with sweet dried fruits and a buttery, tender crumb, this Old-Fashioned Fruit Cake is a recipe you’ll want to save!
Honestly, there’s something special about a homemade fruit cake. The combination of soft cake, chewy raisins, sweet apricots, crunchy nuts, and a hint of warm spices makes every slice feel comforting and nostalgic. It’s the kind of cake that looks beautiful on a serving plate and tastes even better with a cup of tea or coffee.
I usually love recipes that bring together simple baking ingredients and pantry staples, and this fruit cake does exactly that. Unlike some traditional fruit cakes that are very dark and dense, this version has a golden exterior and a soft, light-colored crumb filled with colorful dried fruits, just like the cake in the picture.
It’s perfect for Christmas, holidays, birthdays, afternoon tea, or whenever you’re craving a homemade treat. The best part is that you can customize the fruits and nuts according to what you already have in your kitchen.
Let’s make this delicious, moist fruit cake from scratch!
Ingredients
Servings: 10–12 slices
Prep Time: 20 minutes
Bake Time: 55–70 minutes
Total Time: Approximately 1 hour 30 minutes
For the Fruit Cake
- 2 cups (250 g) all-purpose flour
- ¾ cup (170 g) unsalted butter, softened
- ¾ cup (150 g) granulated sugar
- 3 large eggs, at room temperature
- ½ cup (120 ml) milk
- 1½ teaspoons baking powder
- 1 teaspoon vanilla extract
- ½ teaspoon ground cinnamon
- ¼ teaspoon ground nutmeg, optional
- ¼ teaspoon salt
- Zest of 1 orange, optional
For the Dried Fruits and Nuts
- ¾ cup (110 g) raisins
- ½ cup (80 g) chopped dried apricots
- ¼ cup (40 g) dried cranberries, optional
- ½ cup (60 g) chopped walnuts or almonds
- ¼ cup (40 g) chopped dates, optional
For Preparing the Fruit
- 1 tablespoon flour, for coating the dried fruits
- 2 tablespoons orange juice or warm water, optional, for softening the fruit
Step-by-Step Method
Step 1: Prepare the Dried Fruits
Place the raisins, chopped dried apricots, cranberries, and dates in a bowl.
If your dried fruits are particularly dry, add the orange juice or warm water and let them soak for 10–15 minutes. Drain any excess liquid and pat the fruit dry.
Toss the dried fruits with 1 tablespoon of flour. This helps distribute them throughout the cake batter and reduces the chance of them sinking to the bottom.
Set aside while you prepare the batter.
Step 2: Preheat the Oven and Prepare the Pan
Preheat your oven to 325°F (165°C).
Grease an 8-inch round cake pan and line the bottom and sides with parchment paper.
I usually prefer lining the pan because it makes removing the cake much easier and helps prevent the edges from sticking.
Step 3: Cream the Butter and Sugar
Place the softened butter and sugar in a large mixing bowl.
Using a hand mixer or stand mixer, beat them together for approximately 3–5 minutes until the mixture becomes pale, creamy, and fluffy.
This step helps incorporate air into the batter, giving the finished cake a lighter texture.
Add the eggs one at a time, beating well after each addition. Stir in the vanilla extract and orange zest.
If the mixture looks slightly curdled, don’t worry too much. Adding the dry ingredients gradually should help bring the batter together.
Step 4: Combine the Dry Ingredients
In a separate bowl, whisk together the flour, baking powder, cinnamon, nutmeg, and salt.
Mixing the dry ingredients separately helps distribute the baking powder and spices evenly throughout the cake.
Step 5: Make the Cake Batter
Add about one-third of the dry ingredients to the butter mixture and mix gently.
Pour in half of the milk and stir until combined. Continue alternating the remaining flour mixture and milk, finishing with the flour mixture.
Mix only until the batter is smooth and no dry flour remains. Avoid overmixing, as this can make the cake dense.
Step 6: Fold in the Fruits and Nuts
Add the prepared dried fruits and chopped nuts to the batter.
Using a spatula, gently fold everything together until the fruit and nuts are evenly distributed.
The batter should be thick enough to hold the fruit throughout the cake.
Step 7: Transfer the Batter to the Pan
Spoon the batter into the prepared cake pan and spread it evenly.
Gently tap the pan on the counter to release any large air pockets. Smooth the top with a spatula.
For a decorative finish, you can sprinkle a few extra chopped nuts or dried fruit pieces over the top before baking.
Step 8: Bake Until Golden
Place the pan on the center rack of the preheated oven.
Bake for approximately 55–70 minutes, checking the cake after 50 minutes. Baking time depends on your oven and the moisture content of the fruit.
The cake is ready when the top is golden brown and a toothpick inserted into the center comes out clean or with a few moist crumbs.
If the top starts browning too quickly, loosely cover it with aluminum foil for the remaining baking time.
Step 9: Cool the Cake
Remove the cake from the oven and allow it to rest in the pan for about 15 minutes.
Carefully transfer it to a wire rack and let it cool completely before slicing.
I know it’s tempting to cut into a freshly baked cake, but cooling helps the crumb set properly and makes the slices neater.
Step 10: Slice and Serve
Once cooled, cut the fruit cake into thick slices and arrange them on a serving plate.
Enjoy it plain or with a cup of tea, coffee, or warm milk. For an extra-special treat, add a little butter or serve each slice with whipped cream.
Cooking Tips for the Best Homemade Fruit Cake
1. Use Room-Temperature Ingredients
Butter, eggs, and milk at room temperature combine more easily, helping create a smoother batter and more even texture.
2. Don’t Skip Coating the Fruit
A light coating of flour helps distribute the dried fruits throughout the cake instead of allowing them to collect at the bottom.
3. Avoid Overmixing
Once you add the flour, mix gently. Overmixing can develop excess gluten and make the cake less tender.
4. Choose Soft, Good-Quality Dried Fruits
Raisins, apricots, dates, and cranberries all work beautifully. If the fruit feels very hard or dry, soak it briefly and drain it well before adding it to the batter.
5. Watch the Baking Time
Fruit cakes can take longer to bake because the dried fruit adds moisture. Check the center with a toothpick rather than relying entirely on the clock.
6. Let the Cake Cool Completely
Cutting the cake while it’s still hot can cause it to crumble. Cooling gives the structure time to settle.
7. Customize the Flavor
Add orange zest, lemon zest, cinnamon, nutmeg, or a small pinch of ground cloves for extra warmth and fragrance.
Serving Suggestions
This old-fashioned fruit cake is delicious on its own, but there are plenty of ways to enjoy it.
- With tea or coffee: A classic afternoon snack.
- With warm milk: Perfect for a cozy evening treat.
- With butter: Spread a thin layer over a slice for a richer flavor.
- With whipped cream: Makes the cake feel more like a special dessert.
- With vanilla ice cream: Serve slightly warmed cake with a scoop of ice cream.
- For holiday gatherings: Arrange slices on a dessert platter with cookies and other festive treats.
- As a homemade gift: Wrap a completely cooled cake in parchment paper and place it in a decorative cake box.
Recipe Variations
Tropical Fruit Cake: Add chopped dried pineapple, mango, or coconut for a tropical twist.
Nut-Free Fruit Cake: Leave out the walnuts or almonds and add extra dried fruits instead.
Citrus Fruit Cake: Add orange zest and replace part of the milk with fresh orange juice for a brighter flavor.
Spiced Fruit Cake: Increase the cinnamon slightly and add a pinch of ground ginger or cloves.
Chocolate Chip Fruit Cake: Fold in ¼ cup chocolate chips for a sweeter, dessert-style variation.
Whole Wheat Fruit Cake: Replace up to half of the all-purpose flour with whole wheat flour. The cake may be slightly denser, and you might need a small adjustment to the liquid.
Storage Instructions
Room temperature: Once completely cooled, store the cake in an airtight container in a cool place for up to 3 days.
Refrigerator: Store in an airtight container for up to 1 week. Bring slices to room temperature before serving for the best texture.
Freezer: Wrap individual slices or the whole cooled cake tightly and freeze for up to 3 months for best quality. Thaw overnight in the refrigerator or at room temperature while still wrapped.
Make-ahead tip: This cake can be baked a day before serving. Once cooled and stored properly, the flavors have time to settle, making it a convenient dessert for gatherings.
Nutrition Information
Approximate nutrition per serving, based on 12 slices:
- Calories: 330
- Protein: 5 g
- Carbohydrates: 45 g
- Fat: 15 g
- Saturated Fat: 8 g
- Fiber: 2 g
- Sugar: 25 g
- Sodium: 160 mg
Nutrition values are estimates and vary according to the dried fruits, nuts, and portion sizes used.
Frequently Asked Questions
1. Why did my dried fruits sink to the bottom of the cake?
Dried fruits can sink if they’re very heavy, wet, or unevenly distributed in the batter. Pat soaked fruit dry and toss it with a tablespoon of flour before folding it into the mixture. A moderately thick batter also helps keep the fruit suspended.
2. Can I make this fruit cake without nuts?
Absolutely! Simply leave out the nuts and increase the amount of dried fruit slightly. Raisins, apricots, cranberries, and dates provide plenty of flavor and texture on their own.
3. How do I know when the fruit cake is fully baked?
Insert a toothpick into the center of the cake. It should come out clean or with a few moist crumbs, but without wet batter. If the top is golden but the center is still underbaked, cover loosely with foil and continue baking.
4. Can I use fresh fruit instead of dried fruit?
Dried fruits are recommended because they provide concentrated sweetness without adding too much moisture. Fresh fruit releases water during baking and may change the texture. If you want to experiment, use small amounts of firm, finely chopped fruit and expect the baking time and texture to vary.
5. Can I make this fruit cake ahead of time?
Yes! This cake is excellent for making ahead. Bake it a day before serving, allow it to cool completely, and store it in an airtight container. You can also freeze it for longer storage and thaw it before serving.