
Cheesy Garlic Herb Pull-Apart Bread

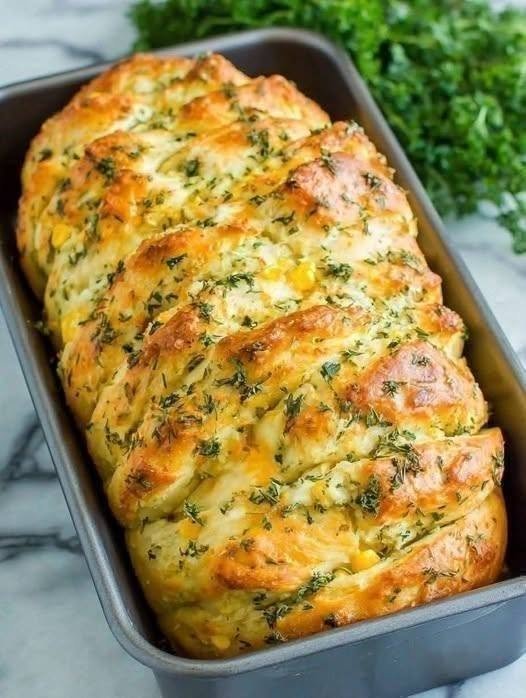
I first made this for a dinner party, and everyone absolutely loved it. The golden, buttery top, melted cheese tucked between soft layers, and delicious garlic-herb flavor made it an instant favorite. Before I knew it, everyone was asking me for the recipe!
Now, I make it at home just for us, especially when we’re craving something warm, cheesy, and comforting.
The best part? It takes only about 10 minutes of hands-on preparation when using ready-made dough. Pop it into the oven, let it turn beautifully golden, and you’ll have a gorgeous homemade bread that tastes like something from a bakery.
Whether you’re serving it at a family dinner, taking it to a potluck, or enjoying it as a weekend treat, this cheesy garlic bread is always a winner!
Why You’ll Love This Recipe
- Quick preparation: Just around 10 minutes of hands-on prep.
- Cheesy and buttery: Every layer is packed with delicious melted cheese.
- Incredible flavor: Garlic, butter, parsley, and herbs make every bite irresistible.
- Perfect for sharing: Its pull-apart layers make it a wonderful party appetizer.
- Easy ingredients: Everything is simple to find at your local grocery store.
- Family favorite: Even picky eaters will have a hard time resisting it!
Ingredients You’ll Need
Here are the simple ingredients I use to make this delicious cheesy garlic herb bread.
For the bread
- 1 pound (450 g) refrigerated pizza dough or prepared bread dough
- 1 cup shredded mozzarella cheese
- ½ cup shredded cheddar cheese
- 3 tablespoons unsalted butter, melted
- 3 cloves garlic, finely minced
- 2 tablespoons fresh parsley, finely chopped
- 1 teaspoon dried Italian seasoning
- ½ teaspoon dried oregano
- ¼ teaspoon black pepper
- ¼ teaspoon salt, or to taste
- 2 tablespoons grated Parmesan cheese
Optional additions
- ¼ teaspoon chili flakes for a little heat
- 2 tablespoons sweet corn kernels for extra texture
- A little extra mozzarella for topping
Step-by-Step Instructions
Step 1: Prepare the garlic butter
Preheat your oven to 375°F (190°C).
Lightly grease a standard loaf pan with butter or nonstick cooking spray.
In a small bowl, combine the melted butter, minced garlic, chopped parsley, Italian seasoning, oregano, black pepper, and salt.
Mix everything together until well combined.
Honestly, this garlic butter is what gives the bread its wonderful homemade flavor!
Step 2: Prepare the dough
Place the prepared dough on a lightly floured surface.
Gently roll it out into a rectangle, approximately 12 x 16 inches.
Brush the surface generously with the prepared garlic butter mixture, making sure to leave a little butter for the top.
Step 3: Add the cheese
Sprinkle the shredded mozzarella and cheddar evenly over the dough.
Add the grated Parmesan and optional sweet corn if you’re using it.
I usually make sure there’s a little cheese in every section because nobody wants a piece without that delicious cheesy goodness!
Step 4: Cut and arrange the dough
Cut the dough into approximately 3-inch-wide strips.
Stack the strips on top of each other, then cut the stack into smaller squares that will fit comfortably inside your prepared loaf pan.
Arrange the pieces upright in the loaf pan, slightly overlapping them to create beautiful layers.
Don’t worry if it looks a little messy at this stage. The bread will puff up beautifully as it bakes.
Step 5: Add the remaining garlic butter
Brush the remaining garlic butter over the top of the dough.
Sprinkle with a little extra Parmesan cheese and chopped parsley.
This creates that gorgeous golden, flavorful crust everyone loves.
Step 6: Bake until golden
Place the loaf pan in the preheated oven.
Bake for approximately 30–40 minutes, or until the bread is puffed, cooked through, and beautifully golden brown.
If the top starts browning too quickly, loosely cover it with aluminum foil.
Let the bread rest in the pan for about 5–10 minutes before serving.
Step 7: Serve and enjoy!
Transfer the bread to a serving plate or serve it straight from the loaf pan.
Pull apart the soft, cheesy layers while they’re still warm and enjoy that delicious combination of garlic, herbs, butter, and melted cheese.
Trust me, it disappears quickly!
My Best Tips for Perfect Cheesy Garlic Bread
1. Use good-quality cheese.
I love using mozzarella because it melts beautifully. Adding cheddar gives the bread an extra-rich flavor.
2. Don’t skip the garlic butter.
Fresh garlic makes a big difference. If possible, use freshly minced garlic rather than garlic powder.
3. Avoid overfilling the loaf pan.
The dough needs a little room to expand while baking. Leave enough space for the layers to puff up.
4. Watch the baking time.
Every oven is different, so start checking around the 30-minute mark. The center should be fully cooked, not doughy.
5. Let it rest before serving.
Giving the bread a few minutes to rest helps the cheese settle slightly while keeping the layers soft and delicious.
6. Add your favorite herbs.
Fresh parsley, basil, rosemary, or thyme can all add lovely flavor.
What to Serve with Cheesy Garlic Herb Pull-Apart Bread
This bread is delicious on its own, but it’s even better when served alongside your favorite meals.
Here are some of my favorite serving ideas:
- Tomato soup: The perfect cozy combination for chilly evenings.
- Creamy pasta: Serve it alongside Alfredo pasta or creamy mushroom pasta.
- Grilled chicken: A delicious side dish for roasted or grilled chicken.
- Fresh salad: Pair it with a simple garden salad for a lighter meal.
- Marinara sauce: Serve warm with a bowl of marinara for dipping.
- Party appetizers: Cut or pull it into smaller pieces and serve on a sharing platter.
It’s also wonderful as a snack when you’re craving something savory!
Storage and Reheating Instructions
Refrigerator: Store leftover bread in an airtight container for up to 3 days.
Reheating: Warm individual pieces in the oven at 325°F (165°C) for about 8–10 minutes. You can also use an air fryer for a few minutes until warmed through.
Freezing: You can freeze fully baked, cooled bread in an airtight freezer-safe container for up to 2 months. Thaw in the refrigerator before reheating.
For the best texture and flavor, I recommend enjoying it fresh from the oven.
Approximate Nutrition Information
The following nutrition information is estimated per serving, assuming 8 servings per loaf.
- Calories: 285 kcal
- Protein: 11 g
- Carbohydrates: 31 g
- Fat: 13 g
- Saturated Fat: 7 g
- Fiber: 1 g
- Sugar: 3 g
- Sodium: 480 mg
Nutrition values are estimates and may vary depending on the dough, cheese, and butter brands used.
Frequently Asked Questions
1. Can I make cheesy garlic pull-apart bread ahead of time?
Yes! You can assemble the bread, cover it, and refrigerate it before baking. Allow it to come closer to room temperature before placing it in the oven. Keep in mind that dough with yeast may continue rising in the refrigerator.
2. Can I use different types of cheese?
Absolutely! Mozzarella, cheddar, Monterey Jack, and Parmesan are all delicious options. I especially love combining mozzarella and cheddar for a rich, cheesy flavor.
3. How do I know when the bread is fully cooked?
The top should be golden brown, and the center should no longer look wet or doughy. If you’re unsure, check the middle with a food thermometer. The internal temperature should reach approximately 190°F (88°C) for this type of enriched bread.
4. Can I make this recipe without fresh parsley?
Of course! Dried parsley works perfectly well. Use approximately 2 teaspoons of dried parsley in place of 2 tablespoons of fresh parsley.
5. Can I serve this bread cold?
You can, but honestly, it’s so much better warm! The cheese is softer, the butter is fragrant, and the bread has that wonderful freshly baked texture. I recommend serving it shortly after baking.
Final Thoughts
This cheesy garlic herb pull-apart bread is proof that you don’t need complicated ingredients or hours in the kitchen to make something truly special.
It’s soft, buttery, cheesy, full of garlic flavor, and has the most beautiful golden crust. I love how impressive it looks when brought to the table, especially considering how little hands-on preparation it requires.