
Easy Homemade Bread Without White Flour or Sugar

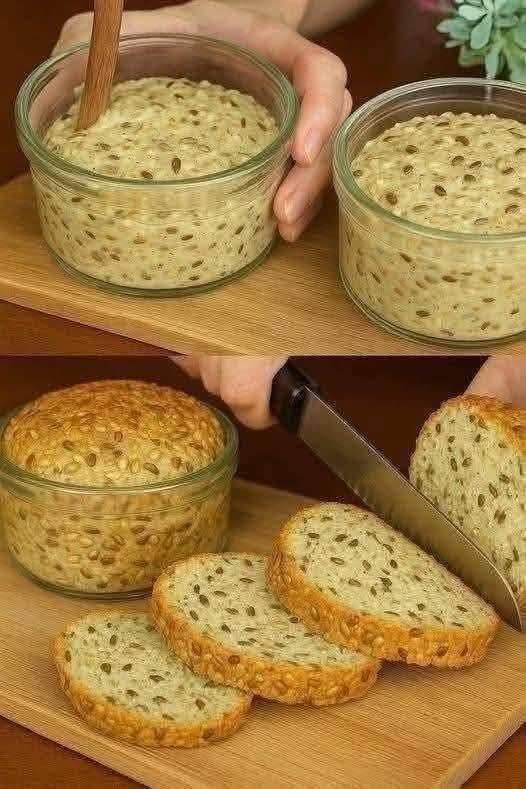
This easy no-yeast bread in a jar is a fun alternative to traditional bread. It uses just a handful of basic ingredients: eggs, milk, flax seeds, and psyllium husk. There’s no white flour, no added sugar, and no yeast needed.
I usually enjoy recipes that keep things simple without sacrificing that homemade feeling. This bread has a soft, slightly moist center, a lovely golden crust when baked, and a texture that works beautifully for breakfast or a light snack. The flax seeds add a subtle nutty flavor, while the psyllium helps hold everything together.
And the best part? You can prepare the mixture in just a few minutes!
One important thing to know: although the recipe is quick to prepare, the bread still needs time to cook thoroughly. It’s not literally ready in one minute, but the hands-on preparation is wonderfully fast.
If you’re looking for a simple alternative to conventional white bread, this little-jar recipe is definitely worth trying.
Why You’ll Love This Homemade Seed Bread
- No white flour: The recipe uses flax seeds and psyllium instead of regular wheat flour.
- No yeast required: There’s no yeast to activate and no rising time to worry about.
- No added sugar: The basic recipe doesn’t require sugar or sweeteners.
- Simple ingredients: You only need four ingredients.
- Easy portioning: Small oven-safe glass jars or ramekins make individual servings convenient.
- Naturally rich in fiber: Flax seeds and psyllium contribute dietary fiber.
- Great for meal prep: You can prepare several portions and save some for later.
Ingredients for No-Yeast Bread in a Jar
This recipe uses four main ingredients, making it an easy option when you want homemade bread without a long shopping list.
Ingredients
- 3 large eggs
- 1 cup (240 ml) milk
- 2 tablespoons flax seeds
- 2 tablespoons psyllium husk
That’s the basic recipe!
A Few Notes About the Ingredients
Eggs: Eggs provide structure and help the bread hold together. I recommend using large eggs for consistent results.
Milk: Regular dairy milk works well. Unsweetened soy milk is another option if you need a dairy-free alternative, although the texture may change slightly.
Flax seeds: Whole flax seeds give the bread a pleasant nutty flavor and a texture similar to the bread shown in the photo. Ground flaxseed can also work, but it absorbs liquid differently.
Psyllium husk: This is the ingredient that helps bind the mixture and gives the bread more structure. Whole psyllium husk and psyllium powder can behave differently, so use the same form consistently and adjust the liquid if needed.
Optional seasoning: A pinch of salt can improve the flavor. You can also add sesame seeds, sunflower seeds, or dried herbs if you want to experiment.
How to Make No-Yeast Bread in a Jar
This recipe is easy to prepare, even if you’re new to homemade bread.
Step 1: Prepare Your Jars
Choose small, oven-safe glass jars or ramekins. Make sure they are specifically suitable for oven use; ordinary storage jars may crack under high heat.
Lightly grease the inside of each container with a little oil or butter to help the bread release easily.
Preheat your oven to 350°F (175°C).
Step 2: Mix the Eggs and Milk
Crack the three eggs into a mixing bowl.
Add the milk and whisk everything together until the mixture is smooth and evenly combined.
I usually whisk the eggs first to break up the yolks before adding the milk. It makes the mixture easier to combine without leaving streaks of egg white.
Step 3: Add the Flax Seeds and Psyllium
Stir in the flax seeds and psyllium husk.
Mix thoroughly so the psyllium is evenly distributed and doesn’t form large clumps.
At first, the mixture may look quite liquid. That’s normal. Let it rest for about 5–10 minutes so the psyllium and flax can absorb some of the liquid and thicken the mixture.
The consistency should become thicker, almost like a loose batter.
Step 4: Fill the Jars
Divide the mixture evenly among your prepared jars.
Avoid filling them to the very top. Leave enough room for the mixture to expand slightly as it cooks.
If you like, sprinkle a few extra flax seeds or sesame seeds on top for a rustic finish.
Step 5: Bake Until Set
Place the jars on a baking tray and carefully transfer them to the preheated oven.
Bake for approximately 25–35 minutes, depending on the size and depth of your containers.
The bread should look set and lightly golden on top. Because the mixture contains eggs and milk, check that the center is fully cooked rather than relying only on the color of the crust. A food thermometer should read at least 160°F (71°C) in the center.
If the tops brown too quickly, loosely cover them with foil while the centers finish cooking.
Step 6: Cool and Serve
Remove the jars carefully using oven mitts and allow them to cool for several minutes.
Run a small spatula around the edges if necessary, then gently remove the bread from the jars.
Slice it once it has cooled enough to hold its shape.
You’ll have a simple homemade seed bread with a soft interior and a lightly golden exterior. Serve it warm or allow it to cool completely before storing.
Cooking Tips for the Best Results
Let the Mixture Rest
Psyllium absorbs liquid quickly, so giving the mixture a few minutes to rest helps create a more consistent texture. Skipping this step may leave the batter too loose.
Use Oven-Safe Containers
This is especially important for glass jars. Only use containers labeled as oven-safe, avoid sudden temperature changes, and never place cold glass directly into a hot oven unless the manufacturer specifically permits it.
Don’t Expect Traditional Wheat Bread Texture
Because this recipe contains no wheat flour or yeast, the finished bread will be different from a conventional loaf. It is usually more compact, moist, and egg-based.
Adjust the Texture if Needed
If the mixture is too thick after resting, stir in a small splash of milk. If it’s very thin, allow it to rest a little longer before filling the jars.
Remember that psyllium powder often absorbs liquid more quickly than whole husk.
Let the Bread Cool Before Slicing
I know it’s tempting to cut into freshly baked bread right away, but a short cooling period helps it firm up and makes slicing easier.
Season It to Your Taste
The basic recipe is fairly mild. A little salt, black pepper, dried rosemary, garlic powder, or mixed herbs can make it more flavorful if you’re serving it with savory foods.
Serving Suggestions
One of my favorite things about simple seed bread is how easily it fits into different meals.
For Breakfast
Serve a warm slice with scrambled eggs, sliced tomatoes, cucumber, or avocado. A little cream cheese also works nicely if you enjoy a creamy topping.
With Soup
This bread pairs well with vegetable soup, chicken soup, or a bowl of homemade lentil soup. Its mild flavor complements warm, savory dishes.
As an Open-Faced Sandwich
Top a slice with mashed avocado, cottage cheese, sliced boiled eggs, or smoked salmon.
With Nut Butter
For a quick snack, spread a little peanut butter or almond butter over a cooled slice. If you want to keep the recipe free from added sugar, choose an unsweetened nut butter.
With Cheese and Vegetables
Serve it with your favorite cheese, fresh cucumber, cherry tomatoes, and herbs for a simple light lunch.
Variations You Can Try
Once you’ve made the basic recipe, there are several ways to change it up.
Herb seed bread: Add dried oregano, rosemary, or thyme for a savory flavor.
Garlic bread-style version: Mix in a small amount of garlic powder and dried parsley.
Extra-seedy bread: Add a teaspoon or two of sunflower or sesame seeds.
Dairy-free version: Try unsweetened soy milk or another suitable unsweetened plant milk. You may need to adjust the amount to achieve the right consistency.
Mini breakfast rolls: Divide the mixture among several small oven-safe ramekins. Smaller portions may cook more quickly, so check them early.
Storage and Reheating
Because this bread contains eggs and milk, it should be handled like other perishable cooked foods.
Refrigerator: Allow the bread to cool, then store it in an airtight container in the refrigerator for up to 3–4 days.
Freezer: For longer storage, wrap individual portions well and freeze for up to 2 months for best quality. Thaw in the refrigerator before reheating.
Reheating: Warm a slice in the toaster oven or microwave until heated through. If reheating in the microwave, use short intervals to avoid making the texture too rubbery.
Avoid leaving the cooked bread at room temperature for more than two hours.
Approximate Nutrition Information
The nutrition values below are estimates for the entire recipe, divided into 4 equal servings. Actual values depend on the size of the eggs, the type of milk, and whether whole or ground flaxseed is used.
| Nutrient | Approx. per serving |
|---|---|
| Calories | 105–125 |
| Protein | 6–8 g |
| Carbohydrates | 5–8 g |
| Fat | 6–8 g |
| Fiber | 3–5 g |
| Sugar | 1–2 g |
These estimates assume the recipe is made with whole milk, eggs, flax seeds, and plain psyllium husk, without added toppings.
A nutrition note: This recipe contains no added sugar and no white flour, but it is not necessarily carbohydrate-free. Milk contains naturally occurring lactose, and flaxseed contributes some carbohydrates. For medically necessary dietary restrictions, check your ingredient labels and calculate the nutrition using your exact products.
Frequently Asked Questions
1. Can I really make bread without flour or yeast?
Yes! This recipe uses eggs for structure and a combination of flax seeds and psyllium husk to help bind the ingredients. It doesn’t require conventional wheat flour or yeast, although the texture is different from traditional bread.
2. Can I cook this bread in the microwave?
The mixture may be adaptable to microwave cooking, but the cooking time and texture will differ from oven baking. Use a microwave-safe container, cook in short intervals, and make sure the center reaches at least 160°F (71°C). For the golden crust shown in the photo, oven baking is the better option.
3. Can I use ground flaxseed instead of whole flax seeds?
Yes, but ground flaxseed absorbs liquid differently and produces a more uniform, less visibly seedy texture. You may need to adjust the liquid slightly. Allow the mixture to rest before deciding whether it needs any changes.
4. Why did my bread turn out too wet or dense?
This can happen if the bread is undercooked, the containers are too deep, or the mixture hasn’t had enough time to set. Psyllium type and quantity can also affect the texture. Try using shallower ramekins, allowing the mixture to rest, and checking the center for doneness before removing it from the oven.
5. Is this bread suitable for a gluten-free diet?
The listed ingredients are naturally gluten-free, but cross-contamination can occur during processing. If you need to avoid gluten for medical reasons, choose certified gluten-free psyllium, flaxseed, and other ingredients, and check the milk or plant milk label as appropriate.
Also, this recipe is not automatically suitable for every low-carbohydrate or medical diet. Check the nutritional information against your individual needs.
Final Thoughts
If you enjoy experimenting with easy homemade bread, this no-yeast bread in a jar is a fun recipe to add to your kitchen routine.
With just eggs, milk, flax seeds, and psyllium, you can prepare a simple, flour-free bread alternative without kneading dough or waiting for yeast to rise. I especially like the idea of making individual portions because they’re convenient for breakfast, quick lunches, or snacks throughout the week.