
Easy No-Knead Homemade Bread

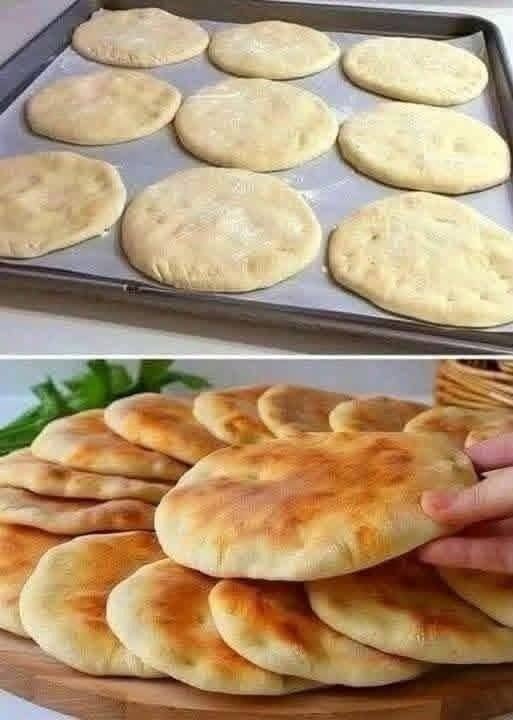
I honestly wish I had discovered this homemade bread recipe years ago! Once I started making these soft, fluffy little bread rounds at home, buying bread from the store became much less tempting.
The best part? No kneading, no eggs, and no butter! You only need a handful of inexpensive ingredients that you probably already have in your kitchen.
I usually make a batch when I want something fresh and homemade for breakfast or dinner. The dough comes together with very little effort, and after a little resting time, it’s ready to shape and bake.
Look at that beautiful golden color! These little breads are soft on the inside, lightly golden on the outside, and absolutely delicious served warm.
Honestly, they’re perfect for busy mornings, lunchboxes, sandwiches, or simply enjoying with a little olive oil or your favorite homemade spread.
If you’ve never made homemade bread before, don’t worry. This recipe is beginner-friendly, affordable, and practically foolproof when you follow the steps.
Why You’ll Love This Easy Homemade Bread Recipe
- No kneading required: Simply mix the ingredients until a soft dough forms.
- No eggs or butter: Made with simple everyday pantry ingredients.
- Budget-friendly: Much cheaper than buying individual bread rolls.
- Soft and fluffy: Beautifully tender inside with a lightly golden exterior.
- Beginner-friendly: No special bread-making skills needed.
- Versatile: Enjoy it with breakfast, lunch, dinner, or snacks.
Ingredients You’ll Need
One of my favorite things about this recipe is how simple the ingredients are.
Ingredients
- 4 cups (500 g) all-purpose flour
- 1½ cups (360 ml) warm water
- 2 teaspoons instant yeast (about 7 g)
- 2 tablespoons sugar
- 1 teaspoon salt
- 3 tablespoons vegetable oil
Optional Topping
- 1 tablespoon olive oil or vegetable oil for brushing
- Sesame seeds, optional
- A little melted butter for serving, optional
Important: The bread itself contains no eggs or butter. The optional butter is only for serving, so skip it if you want to keep the recipe completely butter-free.
Step-by-Step Instructions
Step 1: Activate the Yeast
Pour the warm water into a large mixing bowl.
Add the sugar and instant yeast, then stir gently.
Let it sit for approximately 5–10 minutes. If using active dry yeast, wait until the mixture becomes foamy.
Make sure the water is warm, not hot. Very hot water can damage the yeast.
Step 2: Add the Dry Ingredients
Add the flour and salt to the yeast mixture.
Pour in the vegetable oil.
Mix everything with a wooden spoon or spatula until a soft, slightly sticky dough forms.
You don’t need to knead it! Just make sure there are no large patches of dry flour remaining.
If the dough feels extremely wet, add a little flour, one tablespoon at a time. If it seems too dry, add a teaspoon of water.
Step 3: Let the Dough Rise
Cover the bowl with a clean kitchen towel or plastic wrap.
Place it somewhere warm and allow the dough to rise for approximately 60–90 minutes, or until doubled in size.
I usually leave mine in a warm corner of the kitchen while I prepare the rest of breakfast or dinner.
This resting time is what gives the bread its lovely soft and airy texture.
Step 4: Divide the Dough
Once the dough has risen, lightly flour your work surface.
Gently transfer the dough onto it.
Divide it into 10–12 equal portions, depending on how large you want your bread rounds.
Shape each portion into a smooth ball.
Don’t worry about making them perfectly identical. Homemade bread is supposed to look homemade!
Step 5: Shape the Bread Rounds
Line a large baking tray with parchment paper.
Place the dough balls on the tray, leaving enough space between each one.
Gently flatten each ball using your fingertips until it forms a round disc approximately ½ inch thick.
Cover the shaped breads with a clean towel and let them rest for another 15–20 minutes.
This short second rise helps make them even softer.
Step 6: Bake Until Golden
Preheat your oven to 400°F (200°C).
Place the tray in the preheated oven and bake for approximately 12–18 minutes, depending on the thickness and size of your bread.
Keep an eye on them toward the end.
The tops should become lightly golden, and the bottoms should be cooked through.
For a little extra color, you can briefly place them under the broiler, watching carefully so they don’t burn.
Step 7: Keep the Bread Soft
Remove the bread from the oven and transfer the rounds to a clean kitchen towel.
Cover them loosely for approximately 5–10 minutes.
This helps retain moisture and keeps the crust soft.
And that’s it!
Your homemade no-knead bread is ready. Soft, fluffy, golden, and made with simple ingredients!
My Best Tips for Perfect Homemade Bread
After making homemade bread several times, I’ve learned a few little tricks that make a big difference.
1. Use warm water, not hot water.
The water should feel comfortably warm to the touch. Excessive heat can prevent the yeast from working properly.
2. Don’t add too much flour.
A slightly sticky dough is usually better than a stiff, dry dough. Adding too much flour can make the bread heavy.
3. Give the dough enough time to rise.
Yeast needs time to work. If your kitchen is cold, the dough may take longer to double in size.
4. Avoid skipping the second rise.
Even a short resting period after shaping helps create softer, fluffier bread.
5. Don’t overbake.
These little breads cook relatively quickly. Overbaking can make them dry.
6. Cover the bread after baking.
I usually wrap mine in a clean kitchen towel while they’re still warm. This helps keep the crust soft.
7. Make evenly sized portions.
Try to keep the dough rounds similar in size and thickness so they bake evenly.
What to Serve with Homemade No-Knead Bread
These little breads are so versatile! You can enjoy them with practically anything.
Here are some of my favorite ways to serve them:
- Breakfast: Serve warm with jam, honey, cheese, or your favorite spread.
- With eggs: Pair with scrambled eggs or an omelet for a satisfying breakfast.
- With soup: Perfect for dipping into creamy tomato soup or vegetable soup.
- With curries: Delicious alongside chicken curry, lentils, or chickpea curry.
- For sandwiches: Slice them open and fill with chicken, cheese, salad, or vegetables.
- With hummus: Serve with hummus, olives, and fresh cucumber.
- As a snack: Brush lightly with olive oil and sprinkle with garlic powder or sesame seeds.
Honestly, sometimes I simply enjoy one warm from the oven with a little homemade jam. So simple, but so good!
How to Store Homemade Bread
At room temperature: Allow the bread to cool completely, then store it in an airtight container or food-safe bag for up to 2–3 days.
In the refrigerator: Refrigeration can make bread stale more quickly, so I generally prefer storing it at room temperature.
In the freezer: Place completely cooled bread in a freezer-safe bag, separating individual pieces with parchment paper. Freeze for up to 2–3 months for best quality.
To reheat: Warm in the oven at 300°F (150°C) for approximately 5 minutes, or microwave a piece for 10–15 seconds.
Approximate Nutrition Information
The following nutrition information is estimated per bread round, assuming the recipe makes 12 portions.
| Nutrient | Amount |
|---|---|
| Calories | 195 kcal |
| Carbohydrates | 34 g |
| Protein | 5 g |
| Fat | 4 g |
| Fiber | 1.2 g |
| Sugar | 2 g |
| Sodium | 200 mg |
Values are approximate and may vary depending on the flour, oil, and portion size.
Frequently Asked Questions
1. Can I really make bread without kneading?
Yes! This recipe uses a simple mixing method. Instead of traditional kneading, you mix the ingredients until a soft dough forms and allow the yeast and resting time to develop the dough.
2. Can I make this bread without eggs and butter?
Absolutely! Neither eggs nor butter is needed in the dough. Vegetable oil provides a little fat and helps keep the bread tender.
3. Why didn’t my bread rise?
There are several possible reasons. Your yeast may be expired, the water may have been too hot, or the room may have been too cold. Always check that your yeast is active and allow enough time for the dough to rise.
4. Can I cook these breads in a frying pan instead of an oven?
Yes! You can cook the shaped dough rounds in a lightly greased, preheated skillet over medium-low heat. Cook for approximately 3–5 minutes per side, adjusting the heat as needed, until golden and cooked through. Covering the pan briefly can help the centers cook.
5. Can I prepare the dough the night before?
Yes! You can mix the dough, cover it, and refrigerate it overnight for a slow rise. The next day, let it sit at room temperature until easier to handle, then divide, shape, rest, and bake.
Final Thoughts
I honestly love recipes like this because they prove that delicious homemade food doesn’t have to be complicated or expensive.
With just flour, yeast, water, sugar, salt, and a little oil, you can make a beautiful batch of soft, fluffy bread that the whole family will enjoy.