
Homemade Chocolate Coconut Bars

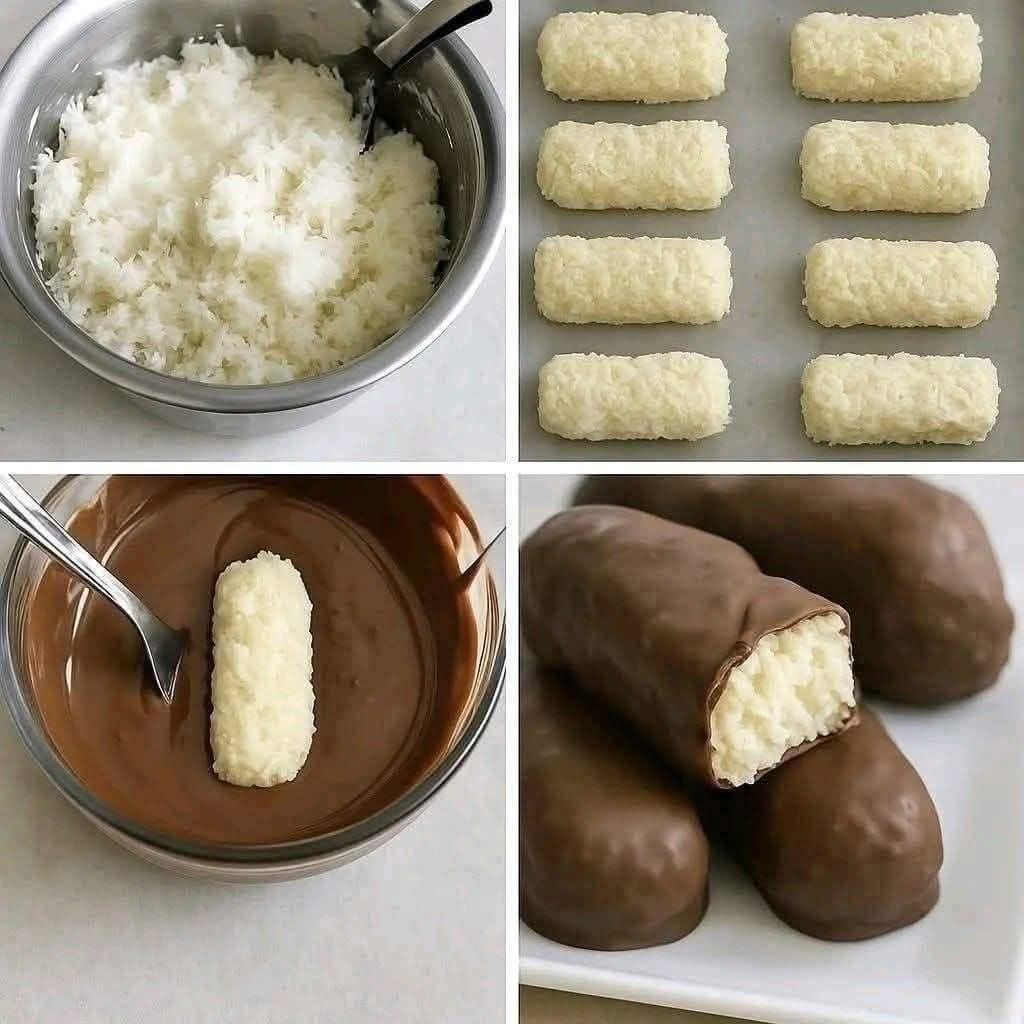
If you love the combination of sweet coconut and rich chocolate, these homemade chocolate coconut bars are going to be one of your favorite little treats. They have a soft, chewy coconut center wrapped in a smooth chocolate coating, making them taste like something you’d pick up from a candy shop.
Honestly, I love recipes like this because they look impressive but don’t require much effort. There’s no baking, no complicated equipment, and no need to spend hours in the kitchen. You simply mix the coconut filling, shape it into little bars, chill until firm, and dip each one in melted chocolate.
I usually make a batch when I’m craving something sweet but don’t want to turn on the oven. They’re also lovely to keep in the refrigerator for an after-dinner treat or to share with family and friends.
The best part is that you can make them with just a handful of everyday ingredients. If you enjoy chocolate-covered coconut candy, this homemade version is definitely worth trying!
Why You’ll Love These Chocolate Coconut Bars
- No baking required: Everything comes together without an oven.
- Simple ingredients: You only need four basic ingredients.
- Perfect coconut texture: The filling is soft, moist, and pleasantly chewy.
- Rich chocolate coating: A crisp chocolate shell complements the sweet coconut center.
- Great for making ahead: Prepare them in advance and keep them chilled until you’re ready to serve.
- Easy to customize: Use dark, milk, or semi-sweet chocolate depending on your taste.
Ingredients You’ll Need
This recipe uses four simple ingredients to create delicious homemade coconut candy bars.
1. Shredded Coconut
You’ll need 2 cups (about 170–180 g) of finely shredded, unsweetened coconut. This gives the bars their signature texture and coconut flavor.
I usually prefer finely shredded coconut because it packs together more easily and creates a smoother filling. If you use sweetened shredded coconut, reduce the amount of condensed milk slightly to prevent the bars from becoming overly sweet.
2. Sweetened Condensed Milk
Use approximately 1/2 cup (150–160 g) of sweetened condensed milk to bind the coconut together.
This ingredient adds sweetness and moisture while helping the bars hold their shape. Add it gradually because different brands and types of coconut absorb liquid differently.
3. Chocolate
You’ll need 300 g (about 10–11 oz) of milk chocolate, semi-sweet chocolate, or dark chocolate for coating.
Milk chocolate gives the bars a sweeter, candy-like flavor, while dark chocolate provides a delicious contrast to the sweet coconut filling.
4. Coconut Oil
Add 1–2 teaspoons of coconut oil to the chocolate if desired. It helps the melted chocolate become smoother and easier to dip.
You can leave it out if you prefer a thicker chocolate coating.
How to Make Homemade Chocolate Coconut Bars
Step 1: Mix the Coconut Filling
Add the shredded coconut to a medium-sized mixing bowl. Pour in the sweetened condensed milk and stir thoroughly until the coconut is evenly coated.
The mixture should be moist enough to hold together when pressed between your fingers, but it shouldn’t feel watery or overly sticky.
If it seems too wet, add a little more shredded coconut. If it’s too dry to hold its shape, add condensed milk a teaspoon at a time.
I usually let the mixture sit for about 5 minutes before shaping it. This gives the coconut a little time to absorb the moisture.
Step 2: Shape the Coconut Bars
Line a baking sheet or flat tray with parchment paper.
Take small portions of the coconut mixture and press them firmly into short rectangular bars. Aim for approximately 2–3 inches long and 1 inch wide, similar to the bars in the photo.
Press the mixture together well, paying special attention to the corners and edges. This helps prevent the bars from crumbling when you dip them in chocolate.
Arrange the shaped bars on the prepared tray, leaving a little space between each one.
Step 3: Chill Until Firm
Place the tray in the refrigerator for at least 1–2 hours, or until the coconut bars feel firm enough to handle.
If you’re short on time, you can place them in the freezer for approximately 20–30 minutes.
Don’t skip this step! Chilled coconut bars are much easier to dip because they hold their shape and are less likely to fall apart in the melted chocolate.
Step 4: Melt the Chocolate
Chop the chocolate into small, even pieces and place it in a heatproof bowl.
Melt it using one of these methods:
Microwave method: Heat the chocolate in 20-second intervals, stirring well between each interval until smooth.
Double-boiler method: Place the bowl over a saucepan of gently simmering water, making sure the bottom of the bowl doesn’t touch the water. Stir until the chocolate melts.
If desired, mix in 1–2 teaspoons of coconut oil to make the chocolate easier to work with.
Be careful not to let water or steam enter the chocolate, as moisture can cause it to seize and become grainy.
Step 5: Dip the Coconut Bars in Chocolate
Remove the chilled bars from the refrigerator.
Using two forks or a dipping tool, lower one bar into the melted chocolate. Turn it gently until all sides are covered, then lift it out and allow the excess chocolate to drip back into the bowl.
Place the coated bar on the parchment-lined tray.
Repeat with the remaining bars. If the chocolate begins to thicken while you’re working, warm it briefly and stir until smooth again.
For the neatest finish, use a fork to lift each bar and gently tap the fork against the side of the bowl to remove excess chocolate.
Step 6: Let the Chocolate Set
Place the chocolate-covered coconut bars in the refrigerator for 20–30 minutes, or until the coating is firm.
Once set, they’re ready to enjoy!
The finished bars should have a smooth chocolate exterior and a soft, chewy coconut center. For the best texture, let them sit at room temperature for about 5 minutes before serving.
Tips for Perfect Chocolate Coconut Bars
Use Finely Shredded Coconut
Fine coconut makes the filling easier to shape and gives the bars a more even texture. If your coconut flakes are large, pulse them briefly in a food processor.
Add the Condensed Milk Gradually
Different coconut products absorb different amounts of moisture. Adding the condensed milk slowly helps you avoid a filling that’s too wet to shape.
Chill the Bars Before Dipping
Cold bars are firmer and easier to handle. If they begin softening while you’re coating them, return the tray to the refrigerator for 10–15 minutes.
Choose Chocolate You Enjoy Eating
Since chocolate is the outer coating, its flavor really matters. I usually recommend semi-sweet chocolate if you want a nice balance between the sweet filling and the slightly bitter chocolate shell.
Keep the Chocolate Dry
Even a small amount of water can cause melted chocolate to seize. Make sure your bowl, utensils, and dipping tools are completely dry.
Use a Little Coconut Oil for a Smooth Finish
A small amount of coconut oil can make the melted chocolate thinner and easier to dip. Avoid adding too much, as it can make the coating softer at room temperature.
Serving Suggestions
These homemade coconut bars are delicious straight from the refrigerator, but there are plenty of ways to enjoy them.
- With coffee: Serve one alongside your morning or afternoon coffee for a sweet treat.
- With tea: Their rich chocolate coating pairs nicely with black tea or a mild herbal tea.
- As a dessert platter: Arrange them with brownies, cookies, and fresh strawberries.
- For parties: Cut them into smaller pieces for a homemade candy platter.
- As edible gifts: Place the set bars in small paper candy cups inside a food-safe gift box and keep them chilled until gifting.
- After dinner: Serve one or two when you’re craving something sweet without making a full dessert.
For an extra-special presentation, drizzle a little contrasting white chocolate over the finished bars or sprinkle a few coconut flakes on top before the coating sets.
Variations to Try
Dark Chocolate Coconut Bars
Use dark chocolate with around 60–70% cocoa for a richer, less-sweet finish. This is a great option if you enjoy a strong chocolate flavor.
Almond Chocolate Coconut Bars
Press one whole roasted almond into the top of each coconut bar before dipping it in chocolate. The almond adds a lovely crunch and a classic candy-bar feel.
Vanilla Coconut Bars
Add 1/2 teaspoon of vanilla extract to the coconut mixture for a little extra aroma and flavor.
Extra-Coconut Bars
Mix a tablespoon or two of coconut cream into the filling if needed, adjusting the shredded coconut to maintain a firm texture.
White Chocolate Coconut Bars
Replace the milk or dark chocolate coating with melted white chocolate for a sweeter, creamier variation.
Storage Instructions
In the refrigerator: Store the bars in an airtight container for up to 7 days. Separate layers with parchment paper to prevent sticking.
In the freezer: Freeze the bars in a freezer-safe container for up to 2 months for best quality. Separate the layers with parchment paper.
To serve from frozen: Transfer the bars to the refrigerator and let them thaw gradually. You can also let individual bars sit at room temperature for a few minutes before eating.
Because this recipe contains condensed milk, keep the finished bars refrigerated rather than leaving them at room temperature for extended periods.
Approximate Nutrition Information
The following estimates are for one bar, assuming the recipe makes 12 bars using unsweetened shredded coconut, sweetened condensed milk, and milk chocolate. Actual values vary with ingredient brands and the amount of chocolate that adheres to each bar.
| Nutrient | Approximate amount |
|---|---|
| Calories | 220 kcal |
| Protein | 2 g |
| Carbohydrates | 23 g |
| Fat | 14 g |
| Saturated fat | 10 g |
| Sugar | 20 g |
| Fiber | 2 g |
These bars are intended as an occasional sweet treat. Using dark chocolate or unsweetened coconut may change the nutritional values, but the condensed milk will still contribute a substantial amount of sugar.
Frequently Asked Questions
1. Can I make chocolate coconut bars without baking?
Yes! This is a completely no-bake recipe. Simply mix the coconut and condensed milk, shape the filling, chill it until firm, and dip the bars in melted chocolate.
2. Why is my coconut mixture too sticky to shape?
You may have added too much condensed milk, or your coconut may be particularly fine or moist. Mix in additional shredded coconut a tablespoon at a time until the filling becomes firm enough to shape. Chilling the mixture briefly can also help.
3. Can I use sweetened shredded coconut?
Absolutely. Sweetened coconut works well, but the bars will be sweeter. Start with less condensed milk and add only enough to bind the mixture together.
4. How do I keep the chocolate coating smooth?
Melt the chocolate gently, stir frequently, and keep all utensils completely dry. A small amount of coconut oil can help make the chocolate thinner and easier to dip. For a professional, glossy snap, you can temper the chocolate instead of simply melting it.
5. Can I make these coconut bars ahead of time?
Yes, and they’re ideal for making ahead! Prepare them a day or two before serving and store them in an airtight container in the refrigerator. You can also freeze them for longer storage.