
Magic Cookies Recipe

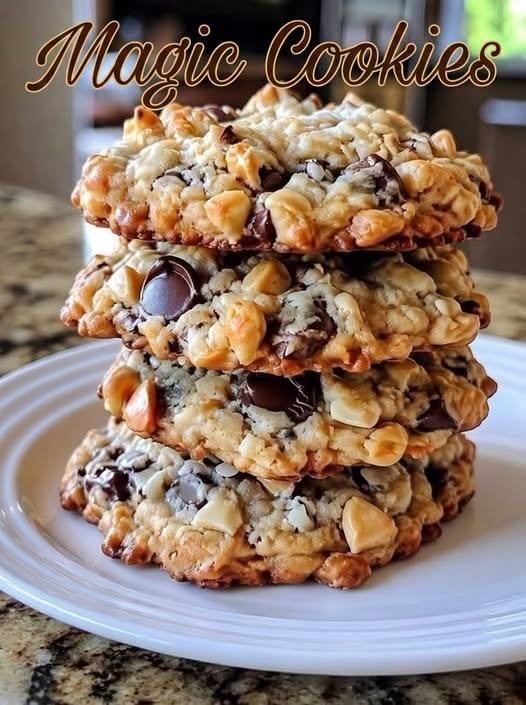
OMG, I have to tell you about these Magic Cookies! You know those recipes you make thinking they’ll last a few days, only to discover that everyone has somehow eaten them before you even get a chance to enjoy a second one? Honestly, that’s exactly what happens whenever I make a batch of these cookies!
The first time I made them, I wanted something sweet, crunchy, and chocolatey without spending the whole afternoon in the kitchen. I looked through my pantry, gathered a few favorite baking ingredients, and decided to combine chocolate chips, white chocolate, coconut, and nuts into one delicious cookie.
And wow, what a decision!
These Magic Cookies are buttery, sweet, wonderfully nutty, and packed with different textures in every bite. The edges bake up beautifully golden, while the centers stay soft and chewy. The combination of rich chocolate, creamy white chocolate, and crunchy nuts makes them feel like something you’d find in a fancy bakery.
I usually make these for family gatherings, weekend treats, or those evenings when a homemade cookie sounds too good to resist. They’re also perfect for bake sales, holiday cookie trays, and edible gifts.
The best part? You don’t need any complicated techniques or special equipment. Just mix, scoop, bake, and try not to eat them all while they’re still warm!
If you’re ready for a cookie recipe that’s a little crunchy, a little chewy, and completely irresistible, let’s get baking.
Why You’ll Love These Magic Cookies
- Loaded with goodies: Every cookie is filled with chocolate chips, white chocolate, coconut, and crunchy nuts.
- A wonderful texture: Golden edges meet soft, chewy centers for the perfect bite.
- Easy to make: You don’t need a mixer or advanced baking skills.
- Great for sharing: These cookies are ideal for parties, family gatherings, and cookie exchanges.
- Easy to customize: Use your favorite nuts, chocolate varieties, or other mix-ins.
- Perfect for make-ahead baking: Prepare the dough in advance and bake fresh cookies whenever you want.
Recipe Details
- Prep time: 15 minutes
- Chilling time: 20–30 minutes, optional but recommended
- Cook time: 10–13 minutes per batch
- Total time: Approximately 45–60 minutes
- Yield: About 18–22 cookies
- Category: Dessert, cookies, baking
- Difficulty: Easy
Ingredients for Homemade Magic Cookies
These cookies use simple baking ingredients combined with plenty of delicious extras.
Dry ingredients
- 1½ cups (190 g) all-purpose flour
- ½ teaspoon baking soda
- ¼ teaspoon salt
Wet ingredients
- ½ cup (113 g) unsalted butter, softened
- ½ cup (100 g) packed brown sugar
- ¼ cup (50 g) granulated sugar
- 1 large egg, at room temperature
- 1 teaspoon vanilla extract
The magic mix-ins
- ¾ cup (130 g) semi-sweet chocolate chips
- ½ cup (85 g) white chocolate chips
- ¾ cup (60 g) sweetened shredded coconut
- ½ cup (60 g) chopped pecans or walnuts
Optional additions:
- ¼ cup chopped almonds
- ¼ teaspoon ground cinnamon
- A small pinch of flaky sea salt for finishing
I usually use pecans or walnuts because they add a lovely crunch without overpowering the chocolate. If you prefer a sweeter cookie, white chocolate is a great addition, while dark chocolate gives the cookies a richer flavor.
Allergy note: These cookies contain wheat, dairy, and eggs, and may contain nuts depending on your ingredients. Check chocolate and other packaged ingredients for potential allergens.
How to Make Magic Cookies Step by Step
Step 1: Preheat the oven
Preheat your oven to 350°F (175°C).
Line a baking sheet with parchment paper. This helps prevent sticking and makes cleanup much easier.
I usually prepare my baking sheet before mixing the dough so everything is ready when it’s time to bake.
Step 2: Mix the dry ingredients
In a medium bowl, whisk together the flour, baking soda, and salt until evenly combined.
Set the bowl aside while you prepare the wet ingredients.
Mixing the dry ingredients separately helps distribute the baking soda evenly throughout the dough, giving you more consistent cookies.
Step 3: Cream the butter and sugars
In a large mixing bowl, combine the softened butter, brown sugar, and granulated sugar.
Mix with a wooden spoon, hand mixer, or stand mixer until the mixture looks smooth and creamy.
This usually takes about 2–3 minutes with a mixer.
The brown sugar helps create a chewy texture, while the granulated sugar contributes to those delicious golden edges.
Honestly, this is one of my favorite parts of making cookies because the buttery, sweet smell already makes the kitchen feel cozy!
Step 4: Add the egg and vanilla
Add the egg and vanilla extract to the butter mixture.
Mix until everything is fully combined and the mixture looks smooth.
Scrape down the sides of the bowl if needed so all the ingredients blend evenly.
Avoid adding extra liquid, as the dough should be thick enough to hold its shape when scooped.
Step 5: Combine the wet and dry ingredients
Gradually add the flour mixture to the wet ingredients.
Stir until a soft cookie dough forms and no large streaks of dry flour remain.
Be careful not to overmix. Once the flour is incorporated, stop stirring.
Overmixing can develop too much gluten and make the cookies tougher than you’d like.
Step 6: Add the chocolate, coconut, and nuts
Now comes the fun part!
Fold in the semi-sweet chocolate chips, white chocolate chips, shredded coconut, and chopped nuts.
Make sure the mix-ins are spread evenly throughout the dough so every cookie gets plenty of chocolate and crunch.
I usually save a few chocolate chips and chopped nuts to press onto the tops of the dough balls before baking. It’s a simple trick that makes the finished cookies look extra tempting.
Step 7: Chill the dough
For the best results, cover the dough and refrigerate it for 20–30 minutes.
Chilling helps the butter firm up, making the cookies less likely to spread too quickly in the oven. It also gives the flour time to absorb moisture, which can improve the texture.
If you’re short on time, you can bake the dough immediately, but the cookies may spread more.
Step 8: Scoop the cookie dough
Scoop the dough into portions about 1½ tablespoons each.
Place the dough balls on the prepared baking sheet, leaving approximately 2 inches between them to allow for spreading.
Gently press a few reserved chocolate chips or nuts onto the tops if desired.
For evenly baked cookies, try to keep the dough portions similar in size.
Step 9: Bake until golden
Bake for 10–13 minutes, or until the edges are lightly golden and the centers still look slightly soft.
Don’t worry if the centers seem a little underdone when you first remove the cookies. They’ll continue setting as they cool on the baking sheet.
This is one of my favorite cookie-baking tricks! Taking them out before the centers become completely firm helps keep them soft and chewy.
Keep an eye on the bottoms because coconut and white chocolate can brown quickly.
Step 10: Cool and enjoy
Allow the cookies to cool on the baking sheet for about 5 minutes.
Then carefully transfer them to a wire rack to cool completely.
Of course, if you’re anything like me, you might sneak one while it’s still warm. The melted chocolate and crunchy nuts make that first bite especially delicious!
Just be careful, as melted chocolate can be very hot.
My Best Tips for Perfect Magic Cookies
1. Use softened butter, not melted butter
Softened butter helps create a creamy dough and gives you better control over how much the cookies spread.
If the butter is melted, the cookies may become flatter and greasier.
2. Measure the flour correctly
Too much flour can make cookies dry or dense.
For the most consistent results, weigh the flour if you have a kitchen scale. Otherwise, fluff it with a spoon, lightly spoon it into your measuring cup, and level off the top.
3. Don’t skip the coconut
Coconut adds a lovely chewy texture and a subtle sweetness that complements the chocolate and nuts.
If you’re not a coconut fan, you can leave it out and replace it with additional chocolate chips or chopped nuts.
4. Chill the dough when possible
A short chilling period helps prevent excessive spreading and makes the dough easier to handle.
If your kitchen is warm, chilling is especially helpful.
5. Don’t overbake the cookies
The cookies should have golden edges but slightly soft centers when you remove them from the oven.
They will firm up as they cool, so resist the temptation to leave them in until they look completely hard.
6. Toast the nuts for extra flavor
For an extra-special batch, lightly toast the chopped pecans or walnuts in a dry skillet or oven before adding them to the dough.
Let them cool completely first.
Toasting enhances their nutty flavor and adds another layer of deliciousness.
7. Make bakery-style cookies
Reserve a few chocolate chips, white chocolate chips, and nuts to place on top of each dough ball before baking.
This gives the cookies a beautiful, generous appearance and makes the mix-ins more visible.
Delicious Variations to Try
One of the reasons I keep coming back to this recipe is how easy it is to change things up.
Double chocolate Magic Cookies: Replace 2 tablespoons of flour with unsweetened cocoa powder and use extra chocolate chips.
Salted chocolate Magic Cookies: Sprinkle a tiny pinch of flaky sea salt over the cookies as soon as they come out of the oven.
Almond coconut cookies: Use chopped almonds instead of pecans and add a little extra coconut for a tropical flavor.
Peanut butter chocolate cookies: Replace some of the chopped nuts with peanut butter chips for a richer, nutty taste.
Holiday Magic Cookies: Add colorful baking candies or seasonal chocolate pieces for festive occasions.
Dark chocolate cookies: Swap the semi-sweet chocolate chips for dark chocolate chunks if you prefer a less sweet flavor.
What to Serve with Magic Cookies
These cookies are delicious on their own, but pairing them with a drink or another dessert makes them even more enjoyable.
- A glass of cold milk: A classic combination that never disappoints.
- Hot coffee: The slight bitterness balances the sweetness of the cookies.
- Tea or hot chocolate: Perfect for a relaxing afternoon snack.
- Vanilla ice cream: Sandwich a scoop between two completely cooled cookies for a fun dessert.
- Fresh berries: Serve alongside strawberries or raspberries for a refreshing contrast.
- A dessert platter: Arrange the cookies with brownies, fruit, and other small treats for parties.
I especially love serving these cookies slightly warm with a cup of coffee. It’s a simple homemade treat that feels special without requiring much effort.
How to Store Magic Cookies
If your cookies somehow survive the first day, here’s how to keep them fresh.
At room temperature
Store completely cooled cookies in an airtight container at room temperature for up to 4–5 days.
For the best texture, keep them away from direct sunlight and heat.
In the refrigerator
Refrigeration is generally unnecessary for these cookies. An airtight container at room temperature is usually the better choice for maintaining their texture.
In the freezer
Baked cookies can be frozen in a freezer-safe container for about 2–3 months for best quality.
Separate layers with parchment paper to help prevent sticking.
You can also freeze portions of unbaked cookie dough. Place the dough balls on a tray until firm, then transfer them to a freezer-safe bag or container.
Bake from frozen, adding a few extra minutes as needed and checking for doneness.
Approximate Nutrition Information
The following estimates are based on a batch of 20 cookies made with the ingredients listed above.
Estimated nutrition per cookie:
- Calories: 190–220
- Protein: 2–3 g
- Carbohydrates: 23–27 g
- Fat: 10–12 g
- Saturated fat: 5–7 g
- Sugar: 14–17 g
- Fiber: 1–2 g
- Sodium: 70–110 mg
Actual nutrition will vary depending on the chocolate brands, type of nuts, coconut, and cookie size. These values are estimates rather than laboratory-tested measurements.
Frequently Asked Questions
1. Why are they called Magic Cookies?
The name is a fun way to describe cookies packed with delicious ingredients and irresistible textures. The combination of chocolate, coconut, nuts, and a buttery cookie base makes every bite feel a little special. Some recipes use the name for layered cookies made with sweetened condensed milk, so ingredients can vary from recipe to recipe.
2. Can I make Magic Cookies without nuts?
Absolutely! Simply leave out the nuts and add extra chocolate chips, shredded coconut, or another favorite mix-in. If you’re baking for someone with a nut allergy, check all ingredient labels and prevent cross-contact with nuts during preparation.
3. How do I keep my Magic Cookies soft and chewy?
Use the correct amount of flour, avoid overmixing the dough, and remove the cookies when the edges are golden but the centers are still slightly soft. Let them finish setting on the baking sheet before transferring them to a rack.
4. Can I make the cookie dough ahead of time?
Yes! You can prepare the dough and refrigerate it in a covered container for up to 48 hours. When you’re ready to bake, scoop the dough and bake according to the recipe, allowing a little extra time if the dough is very cold.
5. Can I use different kinds of chocolate?
Of course! Semi-sweet, milk, dark, and white chocolate all work well. I usually like combining semi-sweet chocolate with white chocolate because the contrast creates a delicious balance of rich and creamy flavors. You can also use chopped chocolate bars instead of chocolate chips.
Final Thoughts: One Batch Is Never Enough!
These Magic Cookies are everything I want in a homemade treat: buttery, chewy, crunchy, chocolatey, and incredibly satisfying. The combination of chocolate chips, white chocolate, coconut, and nuts creates a cookie that feels indulgent without requiring complicated baking techniques.
Honestly, I love recipes like this because they turn ordinary pantry ingredients into something everyone gets excited about. Whether you’re baking for your family, preparing a sweet gift for a friend, or simply treating yourself after a long day, these cookies are always a wonderful choice.