
3-Ingredient Cheesy Baked Bread

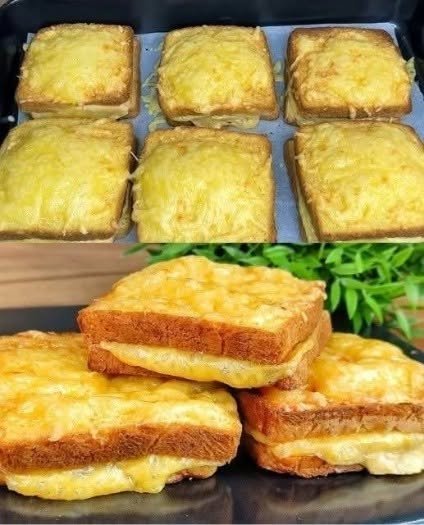
There are some recipes that are so simple you almost feel silly calling them a recipe—and honestly, this is one of those recipes!
My husband loves these little cheesy bread sandwiches so much that he would happily eat them almost every day. I usually make them about four times a week, especially when I need something quick for breakfast, an afternoon snack, or a light meal.
The outside gets beautifully golden and crisp while the cheese melts into that soft, gooey layer in the middle. And the best part? You only need three basic ingredients.
If you have bread, cheese, and eggs in the kitchen, you’re already most of the way there.
So let’s get cooking!
Ingredients
For about 6 cheesy bread sandwiches, you’ll need:
-
12 slices sandwich bread
-
6 slices cheese — cheddar, mozzarella, or your favorite melting cheese
-
2 large eggs
That’s it! No complicated ingredients and no fancy equipment.
Recipe note: I recommend using bread that’s sturdy enough to hold the filling. Regular sandwich bread works beautifully.
How to Make 3-Ingredient Cheesy Baked Bread
1. Preheat the oven
Preheat your oven to 375°F (190°C).
Line a baking tray with parchment paper. This makes cleanup much easier, which I always appreciate on busy days.
2. Make the sandwiches
Place a slice of cheese between two slices of bread.
Gently press the bread together around the edges. I like to press firmly enough to help seal the sandwich without flattening it completely.
Repeat with the remaining bread and cheese.
3. Prepare the egg
Crack the eggs into a shallow bowl and beat them until smooth.
Dip each sandwich lightly into the beaten egg, turning it so both sides are coated.
Don’t leave the bread sitting in the egg mixture too long—it can become soggy.
4. Arrange on the baking tray
Place the egg-coated sandwiches on your prepared baking tray, leaving a little space between each one.
For an extra golden top, you can brush any remaining beaten egg lightly over the surface.
5. Bake until golden
Bake for approximately 15–20 minutes, turning the sandwiches halfway through if needed.
They’re ready when the bread is golden and crisp and the cheese inside is completely melted.
Every oven is a little different, so I usually start checking around the 15-minute mark.
6. Cool slightly and serve
Let them cool for a couple of minutes before serving.
Be careful when you bite into them—the melted cheese in the middle can be very hot!
My Best Tips for Perfect Cheesy Bread
Use good melting cheese.
Mozzarella gives you that wonderful cheese pull, while cheddar adds more flavor. A combination of the two is also delicious.
Don’t oversoak the bread.
A quick dip in the egg is all you need. Too much egg can make the bread heavy and soggy.
Don’t overcrowd the tray.
Leave some room around each sandwich so the hot air can circulate and help the bread crisp.
Watch the last few minutes.
The bread can go from perfectly golden to overly brown surprisingly quickly.
Serve them warm.
Honestly, this is when they’re at their best—the bread is crisp and the cheese is soft and stretchy.
Easy Variations
Once you’ve tried the basic version, it’s fun to change things up.
-
Add a little black pepper to the beaten egg.
-
Try mozzarella for extra stretchiness.
-
Use cheddar for a stronger cheesy flavor.
-
Add a thin slice of tomato for a fresh variation.
-
For a spicy version, add a pinch of chili flakes.
-
Use whole-wheat bread if that’s what you normally keep at home.
Of course, once you start adding extras, it’s no longer the original 3-ingredient version—but that’s half the fun of cooking at home!
What to Serve With Cheesy Baked Bread
These are delicious on their own, but I also like serving them with:
-
Tomato ketchup
-
Hot sauce
-
Garlic or herb dip
-
Fresh fruit
-
A simple green salad
-
Tomato soup
-
Tea or coffee for breakfast
For a quick lunch, two cheesy sandwiches with a salad make a very satisfying meal.
Approximate Nutrition Information
Per sandwich, assuming the recipe makes 6 sandwiches:
-
Calories: 220–270 kcal
-
Protein: 10–13 g
-
Carbohydrates: 20–25 g
-
Fat: 10–14 g
-
Saturated fat: 5–7 g
-
Sodium: 350–500 mg
Nutrition will vary depending on the type and size of bread and cheese you use.
Frequently Asked Questions
1. Can I make these with mozzarella?
Absolutely. Mozzarella is one of my favorite choices because it melts beautifully. Cheddar works too if you prefer a stronger flavor.
2. Can I make these in an air fryer?
Yes. An air fryer works very well for this recipe. Cook them at around 350°F (175°C) until golden and crisp, checking them frequently because air fryers vary in cooking speed.
3. Can I prepare them ahead of time?
You can assemble the sandwiches ahead of time and keep them refrigerated for a short period before dipping and baking. For the best texture, though, I prefer baking them shortly after assembly.
4. Why did my bread turn soggy?
The most common reason is soaking it in the egg for too long. Just give each sandwich a quick coating and allow excess egg to drip off before placing it on the tray.
5. What cheese melts best?
Mozzarella, cheddar, Monterey Jack, and similar melting cheeses all work well. Honestly, I usually just use whatever cheese I already have in the refrigerator.
Final Thoughts
I know this recipe isn’t complicated, but that’s exactly why I keep coming back to it. Three ingredients, minimal preparation, and a warm, crispy, cheesy result—what more could you want on a busy day?
My husband would probably ask me to make these every single day if I let him!