
Crispy Garlic Butter Hasselback Potatoes

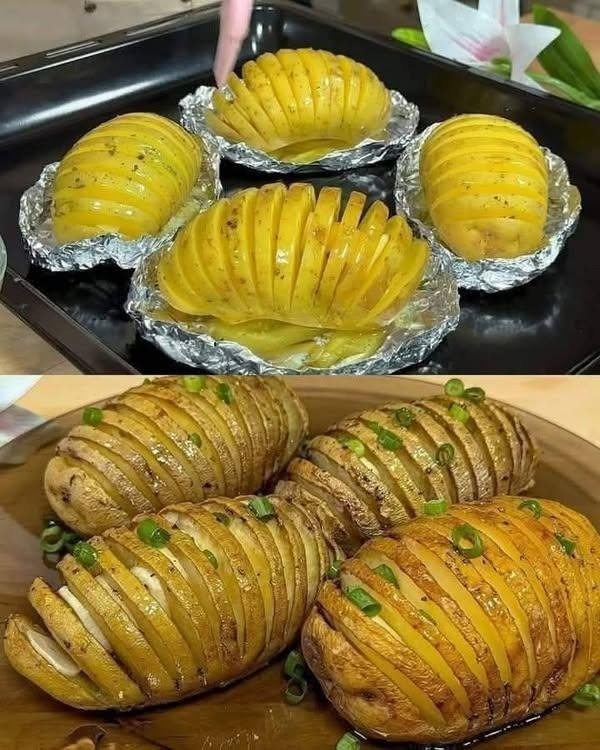
If there’s one potato recipe that can make an ordinary dinner feel a little more special, it’s these crispy garlic butter Hasselback potatoes. They’re golden and crispy around the edges, soft and fluffy in the middle, and coated with delicious garlic butter that seeps into all those beautiful little slices.
I first fell in love with the idea of Hasselback potatoes because they look so impressive on a serving plate, but honestly, they’re much easier to make than they appear. You don’t need fancy ingredients or complicated cooking techniques. Just a few good potatoes, butter, garlic, and your favorite herbs are enough to create something wonderful.
I usually make these when I’m craving a potato side dish that’s a little different from regular roasted potatoes. The thin slices fan out as the potatoes bake, creating crispy edges that soak up all the buttery seasoning. And when I brush the garlic butter over the potatoes halfway through cooking, the aroma is absolutely irresistible!
The best part? These oven-baked Hasselback potatoes pair beautifully with almost anything, from roasted chicken and grilled steak to fish, vegetables, or even a simple bowl of salad.
If you love crispy potatoes with plenty of flavor, this is one recipe you’ll want to make again and again.
What Are Hasselback Potatoes?
Hasselback potatoes are whole potatoes that are sliced thinly across the top without cutting all the way through. This creates a fan-like appearance that allows the edges to become wonderfully crisp while the inside stays soft and tender.
The technique originated in Sweden and has become popular around the world because it’s simple, attractive, and endlessly customizable.
For this version, we’re using garlic butter, olive oil, herbs, and a little black pepper to create a savory coating that makes every bite delicious.
Why You’ll Love These Garlic Butter Hasselback Potatoes
- Crispy edges and fluffy centers: The thin slices create plenty of deliciously crisp edges.
- Simple ingredients: Potatoes, garlic, butter, oil, and seasonings are all you need.
- Beautiful presentation: They look impressive enough for holidays and dinner parties.
- Easy to customize: Add cheese, paprika, fresh herbs, or chili flakes to suit your taste.
- Perfect for any meal: Serve them alongside meat, fish, vegetables, or vegetarian mains.
- Naturally vegetarian: Use vegetable-based seasonings and check your butter or toppings if cooking for specific dietary needs.
Ingredients You’ll Need
This recipe makes 4 servings.
For the Potatoes
- 4 medium-to-large russet potatoes or other starchy baking potatoes
- 3 tablespoons unsalted butter, melted
- 2 tablespoons olive oil
- 4 garlic cloves, finely minced
- 1 teaspoon salt, or to taste
- ½ teaspoon freshly ground black pepper
- 1 teaspoon dried Italian seasoning
- ½ teaspoon paprika, optional
- 2 tablespoons chopped fresh parsley or green onions, for garnish
Optional Toppings
- ¼ cup grated Parmesan cheese
- 2 tablespoons shredded cheddar cheese
- A pinch of red pepper flakes
- Sour cream or Greek yogurt, for serving
- Extra melted garlic butter
Choosing the right potatoes: I usually reach for russet potatoes because their fluffy interiors and relatively starchy texture work beautifully for baking. Yukon Gold potatoes are another great choice if you prefer a creamier center and a naturally buttery flavor.
How to Make Crispy Garlic Butter Hasselback Potatoes
Step 1: Preheat the Oven
Preheat your oven to 400°F (200°C).
Line a baking tray with parchment paper or lightly grease it with olive oil. You can also use small pieces of aluminum foil to hold the potatoes upright if you prefer the presentation shown in the image.
Step 2: Wash and Prepare the Potatoes
Scrub the potatoes thoroughly under running water, especially if you’re keeping the skins on.
Pat them completely dry with a clean kitchen towel.
I usually leave the skins on because they add flavor and help the potatoes hold their shape. They also become deliciously crisp around the outside when baked.
Remove any eyes or blemishes with a small knife.
Step 3: Slice the Potatoes Hasselback Style
Place one potato on a cutting board.
Position a wooden spoon handle, chopsticks, or two wooden skewers along either side of the potato. These act as guides and help prevent your knife from cutting all the way through.
Using a sharp knife, make thin slices about ⅛ inch (3 mm) apart across the potato. Stop cutting when your knife reaches the guides, leaving the bottom intact.
Repeat with the remaining potatoes.
Gently fan the slices apart with your fingers, being careful not to break the potatoes.
My tip: Don’t rush this part. The slices don’t have to be perfectly identical, but keeping them fairly even helps the potatoes cook more consistently.
Step 4: Prepare the Garlic Butter
In a small bowl, combine the melted butter, olive oil, minced garlic, salt, black pepper, Italian seasoning, and paprika if using.
Stir until everything is evenly mixed.
The olive oil helps the potatoes brown, while the butter adds a rich flavor. Garlic and herbs give the finished potatoes that irresistible savory aroma.
If you enjoy a milder garlic flavor, you can use 2–3 cloves instead of four.
Step 5: Brush the Potatoes
Arrange the sliced potatoes on your prepared baking tray, cut sides facing upward.
Brush the garlic butter mixture generously over each potato, making sure some of the seasoned butter reaches between the slices.
Don’t worry if the slices don’t open very much at first. They’ll separate more as the potatoes soften and bake.
Reserve a little garlic butter for brushing later.
Step 6: Bake Until Golden
Place the potatoes in the preheated oven and bake for approximately 50–70 minutes, depending on their size and variety.
After about 25–30 minutes, remove the tray carefully and brush the potatoes with the remaining garlic butter.
As they cook, the slices should begin to fan out, and the edges will gradually turn golden and crisp.
If the potatoes look dry, brush on a little more olive oil or melted butter.
They’re ready when the outside is golden brown and a knife slides easily into the thickest part of the potato.
For extra-crispy edges, you can increase the oven temperature to 425°F (220°C) during the final 5–10 minutes, watching carefully to prevent the garlic from burning.
Step 7: Add Cheese if Desired
If you want cheesy Hasselback potatoes, sprinkle Parmesan over the potatoes during the final 5–10 minutes of baking.
For a more indulgent version, add a little shredded cheddar as well.
Allow the cheese to melt and turn lightly golden before removing the potatoes from the oven.
Honestly, I love the classic garlic butter version, but a little Parmesan makes these potatoes feel extra special.
Step 8: Garnish and Serve
Transfer the baked potatoes to a serving platter.
Sprinkle with chopped parsley or sliced green onions, and finish with a little freshly ground black pepper.
Serve immediately while the edges are crisp and the centers are hot and fluffy.
If you have extra garlic butter, drizzle a small amount over the potatoes just before serving.
Tips for the Best Hasselback Potatoes
1. Use Chopsticks to Prevent Cutting Through
This is the easiest trick for making neat Hasselback slices. Resting the potato between two chopsticks or wooden spoons creates a natural stopping point for your knife.
2. Choose Potatoes of Similar Size
When the potatoes are approximately the same size, they tend to cook at a similar rate. This makes it easier to get crispy edges without overcooking the smaller potatoes.
3. Don’t Slice Too Thickly
Thin, evenly spaced cuts create more surface area for browning. Slices around ⅛ inch apart are a good starting point.
4. Brush Between the Slices
The garlic butter shouldn’t sit only on the surface. Try to work some of it into the cuts so the seasoning reaches more of the potato.
As the slices open during baking, the butter can coat the edges and add flavor throughout.
5. Save Some Butter for Later
Potatoes absorb some of the fat as they bake, so brushing them again halfway through cooking helps improve browning and flavor.
6. Keep an Eye on the Garlic
Fresh garlic can brown quickly at high temperatures. If your garlic is finely minced, avoid placing large clumps on exposed edges. You can also use garlic-infused oil or add some of the fresh garlic during the second half of baking.
7. Let Them Crisp Before Serving
For the best texture, serve the potatoes straight from the oven. Covering them tightly or leaving them in a humid container can soften the crispy edges.
Delicious Variations to Try
One of my favorite things about Hasselback potatoes is how easily you can change the flavor.
Cheesy Hasselback Potatoes: Add Parmesan or cheddar during the last few minutes of baking.
Spicy Paprika Potatoes: Mix smoked paprika and a pinch of chili flakes into the garlic butter.
Rosemary Garlic Potatoes: Use finely chopped fresh rosemary for an earthy, aromatic flavor.
Lemon Herb Potatoes: Add a little lemon zest and fresh parsley after baking for a brighter finish.
Loaded Hasselback Potatoes: Once baked, top with sour cream, green onions, shredded cheese, and crispy cooked bacon if desired.
Vegan Hasselback Potatoes: Replace the butter with vegan butter or use additional olive oil. The potatoes will still develop delicious golden edges.
What to Serve With Garlic Butter Hasselback Potatoes
These crispy potatoes are versatile enough to serve with almost any main dish.
- Roasted chicken: The garlic and herb flavors pair beautifully with juicy roast chicken.
- Grilled steak: A classic combination for a hearty dinner.
- Baked salmon: The buttery potatoes complement the richness of the fish.
- Roast beef: Serve them alongside gravy for a comforting Sunday meal.
- Grilled vegetables: Add zucchini, bell peppers, mushrooms, or asparagus for a colorful vegetarian plate.
- Fresh green salad: A crisp salad with a light dressing balances the richness of the butter.
- Creamy mushroom sauce: Spoon a little sauce beside the potatoes for an extra-special side dish.
For a simple family dinner, I usually serve these potatoes with roasted chicken and green beans. When I’m cooking for guests, I’ll add a fresh salad and a small bowl of garlic dipping sauce.
How to Store and Reheat Hasselback Potatoes
Refrigerator
Allow the potatoes to cool, then store them in an airtight container in the refrigerator for up to 3–4 days.
Freezer
Freezing is possible, but the texture may become softer after thawing. For the best results, I recommend making these fresh or refrigerating leftovers for a few days.
Oven Reheating
Preheat the oven to 375°F (190°C). Place the potatoes on a baking tray and heat for approximately 10–20 minutes, depending on their size, until hot throughout.
For crispier edges, leave them uncovered.
Air Fryer Reheating
Place the leftover potatoes in an air fryer at 350°F (175°C) for approximately 5–10 minutes, checking regularly until heated through and crisp.
Avoid reheating them repeatedly, as this can dry out the centers.
Nutrition Information
The following nutrition values are approximate per serving, assuming the recipe makes four servings and excludes optional cheese and dipping sauces.
- Calories: 300–350
- Protein: 5–7 g
- Carbohydrates: 40–48 g
- Total fat: 14–18 g
- Saturated fat: 6–8 g
- Fiber: 4–6 g
- Sugar: 2–3 g
- Sodium: 350–500 mg
Actual nutrition will vary depending on potato size, the amount of butter and oil used, and any additional toppings.
Frequently Asked Questions
1. Why are my Hasselback potatoes not crispy?
They may need more baking time, or the slices may be too thick. Make sure the oven is fully preheated, brush the potatoes with enough oil or butter, and avoid overcrowding the baking tray. If needed, increase the temperature slightly near the end of cooking.
2. Do I need to boil potatoes before baking Hasselback potatoes?
No. You can bake them directly from raw. Larger potatoes may need up to 70 minutes or longer, depending on their size. The important thing is to check that the centers are tender before serving.
3. Which potatoes are best for Hasselback potatoes?
Russet potatoes are excellent if you prefer a fluffy center and crisp exterior. Yukon Gold potatoes are a good alternative for a creamier texture. Medium-sized potatoes are generally easier to slice and bake evenly.
4. Can I prepare Hasselback potatoes ahead of time?
Yes. You can wash and slice the potatoes a few hours ahead, then keep them submerged in cold water in the refrigerator to help prevent browning. Drain and dry them thoroughly before adding the garlic butter and baking. For the crispiest result, bake them shortly before serving.
5. Can I make Hasselback potatoes in an air fryer?
Yes, provided the potatoes fit comfortably in your air fryer. Brush them with garlic butter and cook at approximately 375°F (190°C) for 30–45 minutes, depending on size and air fryer capacity. Check regularly and brush with additional butter during cooking. Make sure the centers are tender before serving.
Conclusion
These crispy garlic butter Hasselback potatoes are proof that a few simple ingredients can turn an everyday side dish into something memorable.
With their golden, fan-shaped edges, fluffy centers, and rich garlic herb flavor, they’re a wonderful addition to family dinners, holiday meals, and casual gatherings.
I usually keep the seasoning simple with garlic, butter, olive oil, and herbs, but you can easily make them cheesy, spicy, or loaded with your favorite toppings.
The secret is to slice carefully, brush the seasoning between the cuts, and give the potatoes enough time in the oven to become tender inside and crispy outside.
Make a batch, serve them hot, and don’t be surprised if everyone reaches for seconds!