
Homemade Crusty Bread Recipe

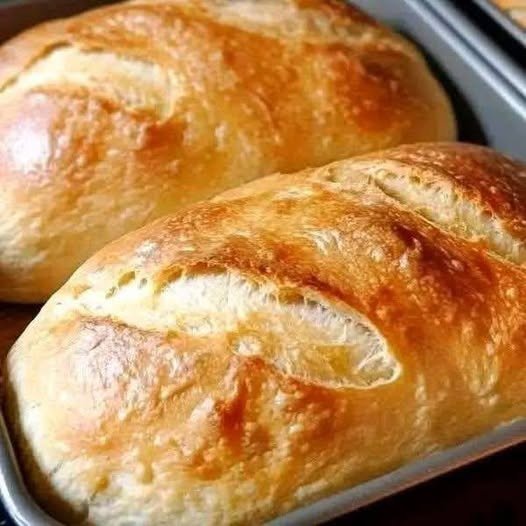
There is something so satisfying about pulling freshly baked bread out of the oven. The golden-brown crust, the wonderful smell filling the kitchen, and that first slice with a soft, fluffy inside are hard to beat. Honestly, homemade bread has a charm that store-bought bread just cannot match!
This homemade crusty bread recipe is one I love because it uses basic pantry ingredients and doesn’t require any fancy equipment. The loaves bake up beautifully golden, with a slightly crunchy exterior and a tender, airy crumb inside.
I usually make this bread when I want something special to serve with soup, pasta, or a simple family dinner. It is also delicious sliced and spread with butter while still slightly warm. The best part? You don’t need to be an expert baker to get great results.
If you have ever wanted to make bakery-style bread at home, this easy homemade bread recipe is a wonderful place to start.
Why You’ll Love This Homemade Bread Recipe
- Simple ingredients: You only need flour, yeast, water, salt, sugar, and a little oil.
- Crispy golden crust: A hot oven and a little steam help create that beautiful crust.
- Soft and fluffy inside: The bread has a tender center that’s perfect for sandwiches or dipping.
- Beginner-friendly: The steps are straightforward, even if you’re new to baking bread.
- Versatile: Serve it with breakfast, lunch, dinner, or as a snack.
Ingredients for Homemade Crusty Bread
This recipe makes 2 medium-sized loaves, similar to the golden loaves shown in the photo.
Ingredients
- 4 cups (500 g) all-purpose flour or bread flour
- 1½ cups (360 ml) lukewarm water
- 2¼ teaspoons (7 g) active dry yeast or instant yeast
- 1 tablespoon granulated sugar
- 1½ teaspoons salt
- 2 tablespoons olive oil or vegetable oil
- 1 tablespoon milk or water, for brushing if desired
A quick ingredient note: The water should feel comfortably warm, not hot. Very hot water can damage the yeast and prevent the bread from rising properly. Bread flour usually gives a slightly chewier texture, while all-purpose flour works perfectly well for everyday homemade bread.
How to Make Homemade Crusty Bread
Follow these easy steps to make golden, delicious loaves with a soft center.
Step 1: Activate the Yeast
Pour the lukewarm water into a large mixing bowl. Add the sugar and active dry yeast, then stir gently.
Let the mixture sit for about 5–10 minutes, until it looks foamy on top.
If you’re using instant yeast, you can mix it directly with the flour, although dissolving it in the water works too.
I usually check that the yeast is foamy before adding the flour. It is a simple way to make sure the yeast is active, especially if the packet has been sitting in the pantry for a while.
Step 2: Mix the Dough
Add the flour, salt, and olive oil to the yeast mixture. Stir with a wooden spoon until everything comes together into a rough dough.
The dough may look a little sticky at first, and that is completely normal. Avoid adding too much extra flour right away because a dough that is too dry can produce dense bread.
Step 3: Knead Until Smooth
Transfer the dough to a lightly floured surface and knead for about 8–10 minutes.
Push the dough away with the heel of your hand, fold it back toward you, and turn it slightly. Repeat until the dough becomes smooth, elastic, and less sticky.
If you’re using a stand mixer with a dough hook, knead on low to medium speed for approximately 5–7 minutes.
Honestly, this is one of my favorite parts of bread-making. It feels wonderfully simple to turn a few basic ingredients into soft, stretchy dough.
Step 4: Let the Dough Rise
Lightly grease a large bowl with oil and place the dough inside. Turn it once to coat the surface lightly.
Cover the bowl with a clean kitchen towel or plastic wrap and leave it in a warm place for about 60–90 minutes, or until the dough has roughly doubled in size.
The rising time depends on your kitchen temperature. On a cool day, it may take a little longer, so watch the dough rather than relying entirely on the clock.
Step 5: Shape the Loaves
Once the dough has risen, gently press it down to release some of the trapped air.
Transfer it to a clean surface and divide it into two equal portions.
Shape each portion into an oval or elongated loaf. Fold the edges toward the center, pinch the seam closed, and roll gently to create a smooth surface.
Place the loaves seam-side down on a lightly greased baking tray or a tray lined with parchment paper, leaving enough space between them.
Step 6: Let the Bread Rise Again
Cover the shaped loaves loosely with a clean towel and let them rise for another 30–45 minutes.
They should look noticeably puffier but still hold their shape.
During this time, preheat your oven to 220°C (425°F). Allow the oven to heat thoroughly before baking, as a properly heated oven helps the bread rise and develop a golden crust.
Step 7: Score the Bread
Using a sharp knife or bread lame, make one shallow lengthwise slash across the top of each loaf.
This step allows the bread to expand as it bakes and gives it that attractive bakery-style appearance.
If you want a softer, shiny finish, brush the tops lightly with milk or a little water. For a more rustic crust, leave them unbrushed.
Step 8: Bake Until Golden Brown
Place the tray in the preheated oven and bake for approximately 25–30 minutes, or until the loaves are golden brown and sound hollow when tapped underneath.
For a crustier exterior, place a heatproof pan of hot water on a lower oven rack during the first part of baking. Be careful when handling hot water and opening the oven.
The bread is ready when the crust is nicely browned and the inside is fully baked. If you use a food thermometer, the center should generally reach around 93–96°C (200–205°F).
Step 9: Cool Before Slicing
Remove the loaves from the oven and transfer them to a wire rack.
Let the bread cool for at least 20–30 minutes before slicing. I know it is tempting to cut into a warm loaf immediately, but allowing it to cool helps the inside finish setting and keeps the crumb from becoming gummy.
Once cooled slightly, slice, serve, and enjoy your homemade bread!
Cooking Tips for Perfect Homemade Bread
1. Measure the Flour Correctly
Too much flour is one of the most common reasons homemade bread turns out dry or heavy. For the best results, weigh the flour if possible. If using measuring cups, spoon the flour into the cup and level it off instead of packing it down.
2. Check Your Yeast
Yeast is what gives bread its light, airy texture. If your yeast doesn’t foam after sitting in warm water with sugar for 5–10 minutes, it may be inactive. Check the packet’s expiration date and start again with fresh yeast if necessary.
3. Don’t Rush the Rising Time
The dough needs enough time to develop its structure and flavor. If your kitchen is cold, allow extra time rather than placing the dough in excessive heat.
4. Avoid Adding Too Much Flour
A slightly tacky dough is usually easier to turn into soft bread than a stiff, dry dough. Use only enough flour on your work surface to prevent sticking.
5. Use Steam for a Better Crust
Steam helps keep the crust flexible during the early stage of baking, allowing the loaf to expand before the exterior hardens. A small oven-safe pan of hot water can help create this effect.
6. Let the Bread Cool Properly
Cooling may seem like a small detail, but it makes a real difference to the texture. Cutting too early can leave the middle sticky, even if the bread is fully baked.
7. Watch the Color Toward the End
Every oven is slightly different. If the tops brown too quickly, check the bread a little earlier and adjust the oven temperature if necessary.
What to Serve with Homemade Crusty Bread
One of the best things about fresh bread is how easily it fits into almost any meal.
With Soups and Stews
Serve thick slices with tomato soup, lentil soup, chicken soup, or a hearty vegetable stew. The crust is perfect for soaking up all those delicious juices.
With Butter and Jam
For a simple breakfast, spread warm bread with butter, honey, or your favorite jam. A cup of tea or coffee makes it even better.
For Sandwiches
Once cooled, slice the loaves and fill them with cheese, grilled chicken, eggs, fresh vegetables, or your favorite sandwich fillings.
Alongside Pasta
This bread pairs beautifully with spaghetti, creamy Alfredo pasta, baked lasagna, or a rich tomato sauce. A little garlic butter makes it extra special.
As Garlic Bread
Slice the loaf, spread with a mixture of softened butter, minced garlic, and parsley, then toast until fragrant and lightly crisp.
For a Family Dinner
Serve the bread in a basket alongside roasted vegetables, grilled meat, curries, or salads. It is an easy way to make an ordinary meal feel a little more special.
How to Store Homemade Bread
At room temperature: Once completely cooled, store the bread in a bread box or a paper bag for about 2–3 days. A paper bag helps preserve the crust, while a sealed bag keeps the bread softer.
In the refrigerator: Refrigeration can make bread go stale more quickly, so I generally avoid it unless the bread contains perishable fillings.
In the freezer: Slice the cooled bread, place it in a freezer-safe bag, and freeze for up to 2–3 months for best quality. You can thaw individual slices or toast them straight from frozen.
To refresh the crust: Sprinkle the loaf lightly with water and warm it in a 180°C (350°F) oven for about 5–10 minutes. Keep an eye on it so it doesn’t dry out.
Approximate Nutrition Information
The following nutrition information is an estimate for one serving, assuming the recipe makes 12 servings across both loaves.
- Calories: 165 kcal
- Carbohydrates: 31 g
- Protein: 5 g
- Fat: 3 g
- Saturated fat: 0.4 g
- Fiber: 1.2 g
- Sugar: 1.3 g
- Sodium: 290 mg
Nutrition values vary according to the flour brand, the amount of flour used, and the size of each serving. These estimates do not include butter, spreads, or other toppings.
Frequently Asked Questions
1. Why Is My Homemade Bread Dense?
Dense bread can result from inactive yeast, insufficient rising time, too much flour, or inadequate kneading. Make sure your yeast is active, knead until the dough becomes elastic, and let it rise until visibly puffy.
2. Can I Make This Bread Without a Stand Mixer?
Absolutely! You can mix everything in a large bowl and knead the dough by hand. It takes about 8–10 minutes of kneading, but the results can be just as good as bread made with a mixer.
3. How Do I Get a Crispy Crust on Homemade Bread?
Bake the bread in a fully preheated oven and introduce a little steam during the initial baking stage. Once baked, cool the loaves on a wire rack so steam doesn’t get trapped underneath.
4. Can I Prepare the Dough Ahead of Time?
Yes. After kneading, place the dough in a covered bowl and refrigerate it overnight. The next day, allow it to warm slightly, shape it, and let it complete its final rise before baking. Cold dough may need additional time to become properly puffy.
5. Can I Use Whole Wheat Flour Instead of All-Purpose Flour?
Yes, but the texture will be different. Whole wheat flour absorbs more water and generally produces a denser loaf. For a good balance, try replacing 1 cup of the all-purpose flour with whole wheat flour and add a little extra water if the dough feels too dry.
Final Thoughts
Making homemade crusty bread is much easier than many people expect. With a few everyday ingredients, a little patience, and the right baking temperature, you can create beautiful golden loaves with a tender center and a delicious homemade flavor.
I usually recommend starting with this basic recipe before experimenting with herbs, garlic, seeds, or whole wheat flour. Once you get comfortable with the process, there are so many ways to make the bread your own.
Whether you serve it with soup, turn it into sandwiches, or simply enjoy a warm slice with butter, this homemade bread is a lovely addition to the family table.
Give this easy crusty bread recipe a try, and enjoy the wonderful smell of freshly baked bread filling your kitchen!