
Easiest No-Knead Homemade Bread

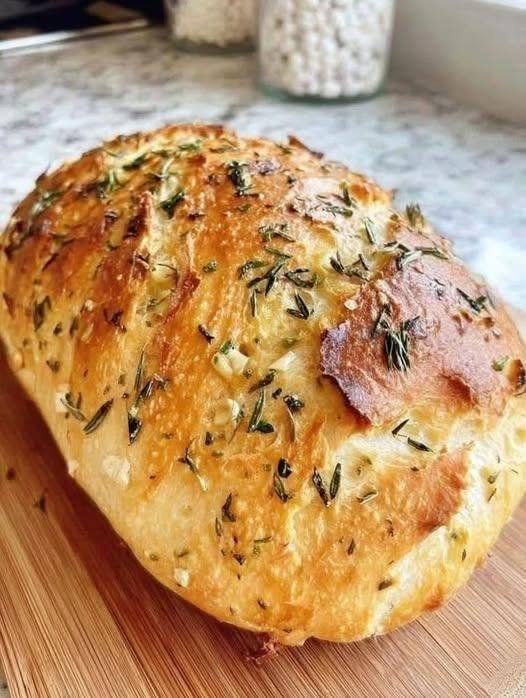
I usually keep a loaf of bread in the kitchen, but honestly, once I started making this no-knead bread, I stopped buying it as often. There’s no kneading, no eggs, no butter, and you don’t need a stand mixer or any fancy equipment.
You basically mix everything in a bowl, let the dough rest, and let time do most of the work.
The result is a gorgeous golden loaf with a crisp, rustic crust and a soft, chewy center. I like adding rosemary and thyme because they make the whole kitchen smell amazing while the bread is baking.
And the best part? The ingredients are cheap and simple.
Why You’ll Love This Homemade Bread
-
No kneading required
-
No eggs or butter
-
Uses simple pantry ingredients
-
No stand mixer needed
-
Crispy, golden crust
-
Soft and chewy inside
-
Fresh herbs add wonderful flavor
-
Perfect for sandwiches, soup, breakfast, or dipping
-
Much cheaper than many bakery-style loaves
Ingredients
For one rustic loaf:
-
3 cups (375 g) all-purpose flour
-
1½ teaspoons salt
-
1 teaspoon instant or active dry yeast
-
1½ cups (360 ml) lukewarm water
-
1 tablespoon olive oil — optional, for a slightly softer crumb
-
1–2 tablespoons fresh rosemary, finely chopped
-
1 tablespoon fresh thyme, chopped
-
1 teaspoon garlic powder — optional
-
A little extra rosemary or thyme for the top
-
A pinch of coarse salt for sprinkling
Tip: The dough should be quite sticky and shaggy. Don’t be tempted to keep adding flour. That’s one of the secrets to getting a light, moist center.
How to Make No-Knead Homemade Bread
1. Mix the dry ingredients
Add the flour, salt, yeast, rosemary, thyme, and garlic powder, if using, to a large mixing bowl.
Give everything a quick stir so the yeast and seasonings are distributed evenly.
2. Add the water
Pour in the lukewarm water and olive oil.
Using a wooden spoon or spatula, stir until there are no obvious dry patches of flour.
The dough will look messy, sticky, and a little rough.
That’s exactly what you want.
No kneading needed!
3. Cover and let it rest
Cover the bowl tightly with plastic wrap, a lid, or a clean kitchen towel.
Let the dough sit at room temperature for about 8–12 hours.
I usually mix it in the evening and let it rest overnight. By morning, it should look noticeably puffier, with bubbles on the surface.
If your kitchen is particularly warm, start checking it around 6–8 hours.
4. Shape the dough
Lightly flour your work surface.
Turn the dough out onto it and gently fold the edges toward the center a few times.
Don’t knead it like traditional bread dough. We’re just giving it enough shape to make a nice loaf.
Form it into a rough round or oval.
5. Let it rest again
Place the shaped dough on a sheet of parchment paper.
Cover it loosely and let it rest for another 30–45 minutes while you heat the oven.
Meanwhile, preheat your oven to 450°F (230°C).
If you’re using a Dutch oven, place it inside the oven while it preheats.
6. Prepare the loaf
Carefully transfer the dough, still on the parchment paper, into the hot Dutch oven.
Sprinkle the top with a little rosemary, thyme, and coarse salt.
For a classic rustic appearance, make one or two shallow cuts across the top with a sharp knife.
7. Bake
Cover the Dutch oven with its lid and bake for 30 minutes.
Then remove the lid and continue baking for another 10–15 minutes, or until the bread is deeply golden brown.
That uncovered baking time is what helps create that beautiful crisp crust.
8. Let it cool
This is the hardest part!
Take the bread out and place it on a wire rack. Let it cool for at least 30–45 minutes before slicing.
I know it’s tempting to cut into it immediately, but allowing the loaf to cool helps the inside finish setting properly.
Then slice and enjoy!
Cooking Tips for Perfect No-Knead Bread
Don’t worry about sticky dough
A sticky dough is normal here. If you add lots of extra flour, the finished bread can become dense and heavy.
Use lukewarm—not hot—water
Very hot water can damage the yeast. The water should feel comfortably warm, not hot.
Give the dough enough time
The long resting period is what develops flavor and texture without kneading. If the dough hasn’t become puffy and bubbly, give it more time.
Preheat the Dutch oven
A properly heated Dutch oven gives the bread a burst of heat and helps produce that bakery-style crust.
No Dutch oven?
No problem. Shape the loaf and bake it on a parchment-lined baking sheet. For extra steam, place a small oven-safe pan on the lower rack and carefully add hot water when the bread goes into the oven.
Don’t slice it while piping hot
I know. It’s difficult.
But waiting a little longer gives you a much better texture and prevents the center from becoming gummy.
Easy Variations
Once you’ve made the basic loaf, you can have fun with it.
Garlic Herb Bread
Add minced fresh garlic or roasted garlic along with the rosemary and thyme.
Parmesan Herb Bread
Add a handful of grated Parmesan to the dough and sprinkle a little more over the top before baking.
Cheesy Bread
Fold shredded mozzarella or cheddar into the dough before shaping.
Olive Bread
Add chopped olives and a little extra rosemary for a Mediterranean-style loaf.
Plain Rustic Bread
Simply leave out the herbs and garlic. You’ll still get a wonderfully crusty homemade loaf.
What to Serve With Homemade Bread
This bread is incredibly versatile.
I love serving thick slices with:
-
Butter or olive oil for dipping
-
Homemade soup
-
Stews and curries
-
Scrambled or fried eggs
-
Cheese and sliced tomatoes
-
Hummus
-
Garlic dip
-
Grilled vegetables
-
Pasta dishes
-
Roast chicken
-
Sandwich fillings
It’s also delicious toasted the next morning with a little jam or honey.
Honestly, sometimes a warm slice with olive oil and a pinch of salt is all I need.
Approximate Nutrition
Nutrition will vary depending on the exact ingredients and slice size.
Estimated per serving, assuming 10 slices per loaf:
| Nutrient | Approximate amount |
|---|---|
| Calories | 155 kcal |
| Carbohydrates | 30 g |
| Protein | 4.5 g |
| Fat | 1.5 g |
| Fiber | 1 g |
| Sodium | 350 mg |
Adding cheese, extra oil, butter, or other toppings will increase the calories and fat.
Frequently Asked Questions
1. Can I make this bread without a Dutch oven?
Absolutely. A Dutch oven gives you the best crust, but you can bake the loaf on a parchment-lined baking sheet. Adding steam to the oven can help create a crispier crust.
2. Can I use whole wheat flour?
Yes, but I recommend replacing only part of the all-purpose flour at first. Try using 1 cup whole wheat flour + 2 cups all-purpose flour. Whole wheat flour absorbs more water and can produce a denser loaf.
3. Can I let the dough rise overnight?
Yes—that’s actually my favorite way to make it. Mix the dough in the evening and leave it covered at room temperature overnight, provided your kitchen isn’t unusually hot.
4. Why is my bread dense?
The most common reasons are insufficient rising time, inactive yeast, or adding too much extra flour. Remember, this dough should be sticky and soft rather than firm.
5. How should I store homemade bread?
Once completely cool, keep it in a bread bag or loosely wrapped at room temperature for about 2–3 days. For longer storage, slice the loaf and freeze it in an airtight freezer bag. You can toast slices directly from frozen.
Final Thoughts
If you’ve always thought homemade bread was difficult, this is the recipe I’d start with.
There’s something so satisfying about mixing a few inexpensive ingredients in a bowl, walking away, and coming back hours later to find a bubbly dough ready to become a beautiful loaf.
No kneading. No eggs. No butter