
Easy Air Fryer Bread Recipe

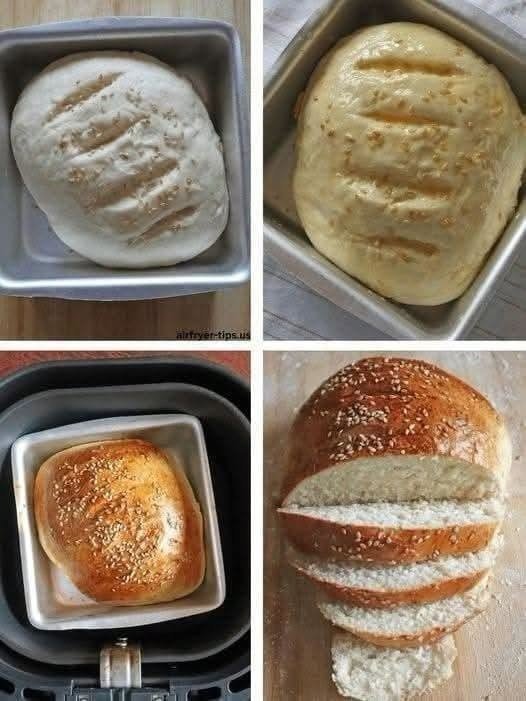
Have you ever wanted fresh homemade bread but didn’t feel like turning on the oven? Honestly, that’s one reason I love making bread in the air fryer. You can prepare a simple dough with everyday ingredients, let it rise, and bake it until the outside turns beautifully golden while the inside stays soft and fluffy.
I usually make this bread when I want something homemade to serve with breakfast, soup, or a quick sandwich. The best part is that you don’t need a bread machine or any complicated equipment. A mixing bowl, a little patience, and an air fryer are enough to get started.
This recipe makes a small loaf that’s perfect for everyday meals. You can sprinkle sesame seeds on top for a bakery-style finish or leave it plain if you prefer a simple homemade loaf. Once you slice into it and see that soft interior, you’ll understand why homemade bread is worth the effort!
Why You’ll Love This Air Fryer Bread
- No traditional oven needed: Perfect for smaller kitchens or hot days.
- Simple ingredients: Made with basic pantry staples.
- Soft and fluffy inside: Ideal for toast, sandwiches, and dipping.
- Golden crust: The air fryer gives the bread an attractive baked finish.
- Easy to customize: Add sesame seeds, herbs, or your favorite seasonings.
Recipe Details
- Prep Time: 15 minutes
- Rising Time: 60–90 minutes
- Cook Time: 20–30 minutes
- Total Time: Approximately 1 hour 35 minutes to 2 hours 15 minutes
- Servings: 6–8 slices
- Difficulty: Easy
- Air Fryer Temperature: 320°F (160°C)
Cooking times vary depending on the air fryer model, loaf size, and baking pan.
Ingredients for Homemade Air Fryer Bread
You’ll need the following ingredients to make one small loaf.
- 2 cups (250 g) all-purpose flour or bread flour
- ¾ cup (180 ml) warm water, approximately
- 2¼ teaspoons (7 g) instant yeast
- 1 tablespoon sugar
- 1 tablespoon olive oil or melted butter
- ¾ teaspoon salt
- 1 tablespoon sesame seeds, optional
- 1 teaspoon milk or beaten egg, optional, for brushing the top
A quick ingredient tip: The water should feel comfortably warm, not hot. Very hot water can damage the yeast and prevent the dough from rising properly.
How to Make Bread in an Air Fryer
Step 1: Prepare the Dough
Add the warm water, sugar, and instant yeast to a large mixing bowl. Stir gently and let the mixture stand for about 5 minutes if you want to check that the yeast is active.
Add the flour, salt, and olive oil. Mix until a rough dough forms.
If the dough feels too dry, add a little extra water, one teaspoon at a time. If it’s extremely sticky, add a small amount of flour. The dough should feel soft and slightly tacky rather than stiff.
Step 2: Knead Until Smooth
Transfer the dough to a lightly floured surface. Knead it for approximately 8–10 minutes by hand, or 5–7 minutes with a stand mixer fitted with a dough hook.
The dough should become smooth, elastic, and easier to handle.
I usually avoid adding too much extra flour during kneading because that can make the finished bread dense instead of fluffy.
Step 3: Let the Dough Rise
Lightly grease a clean bowl with olive oil. Place the dough inside, turn it once to coat the surface, and cover the bowl with a clean kitchen towel or plastic wrap.
Leave it in a warm, draft-free place for about 45–60 minutes, or until it has roughly doubled in size.
The exact rising time depends on your kitchen temperature, so look at the dough rather than relying only on the clock.
Step 4: Shape the Loaf
Gently press the dough to release excess air. Shape it into a smooth round or oval loaf that fits comfortably inside your air fryer basket or baking pan.
Lightly grease a small, air-fryer-safe metal pan. Place the shaped dough inside, with enough room for it to expand.
Cover and let it rise again for approximately 15–25 minutes, until slightly puffy.
Step 5: Add the Topping
If desired, lightly brush the top with milk or beaten egg. Sprinkle sesame seeds over the surface.
Use a sharp knife to make two or three shallow slashes across the top. These cuts help the loaf expand during baking and give it a classic homemade bread appearance.
Step 6: Preheat the Air Fryer
Preheat your air fryer to 320°F (160°C) for about 3 minutes, if your model recommends preheating.
Place the pan inside the basket, making sure it sits securely and does not touch the heating element.
Step 7: Air Fry the Bread
Bake the loaf at 320°F (160°C) for approximately 20–30 minutes.
Check the bread after 15–20 minutes. If the top is becoming too dark before the center is cooked, loosely cover it with a small piece of foil, provided your air fryer manufacturer permits this. The foil must be secured by the pan or food and must never be allowed to fly toward the heating element.
Continue cooking until the loaf is golden brown and fully baked in the center. For a reliable check, the internal temperature should reach approximately 190–200°F (88–93°C).
Step 8: Cool and Slice
Carefully remove the pan from the air fryer and allow the bread to rest for 5–10 minutes. Transfer the loaf to a wire rack and let it cool before slicing.
I know it’s tempting to cut into fresh bread immediately, but allowing it to cool helps the inside finish setting and prevents a gummy texture.
Serve your homemade air fryer bread with butter, jam, eggs, soup, or your favorite sandwich fillings.
Tips for Perfect Air Fryer Bread
1. Don’t Overheat the Water
Warm water helps activate the yeast, but excessively hot water can stop it from working properly. Aim for approximately 100–110°F (38–43°C).
2. Give the Dough Enough Time to Rise
A good rise makes a big difference to the final texture. If your kitchen is cool, the dough may need additional time.
3. Use the Right-Sized Pan
Choose a pan that fits inside your air fryer with space around it for airflow. Avoid a pan that is too deep or too wide for the loaf.
4. Check the Bread Early
Air fryers can cook differently, even at the same temperature. Start checking before the maximum cooking time to prevent the crust from becoming too dark.
5. Protect the Top From Overbrowning
The heating element is close to the food in many air fryers. If the crust darkens too quickly, reduce the temperature slightly or use securely fitted foil if your manufacturer’s instructions allow it.
6. Let It Cool Properly
Cooling improves the crumb and makes slicing easier. Use a serrated bread knife for neat slices.
7. Measure Flour Carefully
Too much flour is one of the most common reasons homemade bread becomes heavy. Weighing the flour gives the most consistent results.
What to Serve with Air Fryer Bread
This homemade bread is versatile enough for breakfast, lunch, or dinner. Here are some of my favorite serving ideas.
- Breakfast toast: Serve with butter, honey, jam, or peanut butter.
- Eggs and toast: Pair with scrambled eggs, fried eggs, or an omelet.
- Soup and bread: Enjoy alongside tomato soup, vegetable soup, or creamy chicken soup.
- Sandwiches: Slice the loaf and fill it with cheese, chicken, tuna, or fresh vegetables.
- Garlic bread: Brush slices with garlic butter and warm them briefly in the air fryer.
- Mediterranean-style snack: Serve with hummus, olive oil, feta cheese, and sliced tomatoes.
How to Store Homemade Air Fryer Bread
At room temperature: Once completely cool, store the loaf in a bread bag or airtight container for up to 2–3 days. Keep it in a cool, dry place.
In the refrigerator: Refrigeration can make bread go stale faster, so I generally prefer room-temperature storage for short periods.
In the freezer: Slice the cooled loaf, separate the slices with parchment paper if desired, and freeze in a freezer-safe bag for up to 3 months for best quality.
To reheat: Toast individual slices directly from frozen or warm them briefly in the air fryer at a low temperature. Check frequently to avoid drying them out.
Nutrition Information
Approximate nutrition per serving, assuming one loaf makes 8 slices:
- Calories: 135
- Protein: 4 g
- Carbohydrates: 26 g
- Fat: 2 g
- Fiber: 1 g
- Sugar: 2 g
- Sodium: 220 mg
These estimates are based on the ingredients listed and do not include optional toppings. Actual values vary depending on the flour, oil, and portion size.
Frequently Asked Questions
1. Can I make bread in any air fryer?
Most air fryers can bake a small loaf if the basket accommodates an oven-safe pan. Check your appliance’s instructions, and make sure the pan leaves enough room for air to circulate.
2. Why is my air fryer bread raw in the middle?
The loaf may be too large, the temperature may be too high for the size of the bread, or the cooking time may be too short. Try shaping a smaller loaf, lowering the temperature slightly, and extending the baking time. Check the center with a food thermometer.
3. Can I use all-purpose flour instead of bread flour?
Yes! All-purpose flour works well for this recipe. Bread flour usually produces a slightly chewier texture because it contains more protein, but both options can make delicious homemade bread.
4. Do I need to let the dough rise twice?
For this yeast-based recipe, yes, the two rises help develop the loaf’s texture and structure. The first rise allows the dough to expand, while the second helps the shaped loaf become light and airy before baking.
5. Can I make this air fryer bread without yeast?
You can make yeast-free quick breads in an air fryer, but they use a different recipe and usually have a denser, more biscuit-like texture. For a soft, traditional loaf like this one, yeast is the better choice.