
Garlic Butter Rosemary Chicken Recipe

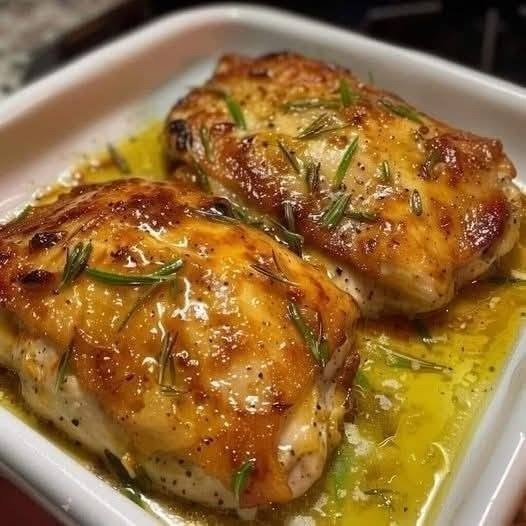
If there is one dinner that makes an ordinary evening feel a little more special, it is garlic butter rosemary chicken. With its beautifully golden crust, juicy center, fresh rosemary, and rich garlic butter sauce, this dish looks impressive but is surprisingly easy to make at home.
I usually turn to recipes like this when I want something delicious without spending hours in the kitchen. Chicken is a regular favorite in my home, and honestly, adding garlic, butter, and fresh herbs is one of the simplest ways to make it taste restaurant-worthy.
What I love most about this recipe is the buttery sauce. As the garlic cooks in the melted butter, it releases an incredible aroma, while the rosemary adds a fresh, earthy flavor that pairs perfectly with the chicken. A little black pepper, salt, and a squeeze of lemon are all you need to bring everything together.
The chicken develops a lovely golden-brown exterior while staying tender and juicy inside. And that glossy garlic butter sauce you see in the picture? It is perfect for spooning over the chicken or soaking up with a piece of warm bread.
Whether you are planning a quick weeknight dinner, preparing a cozy weekend meal, or looking for an easy chicken recipe to serve guests, this garlic butter rosemary chicken is one to keep close.
Why You’ll Love This Garlic Butter Chicken Recipe
- Quick and easy: You can have dinner ready in around 30 minutes.
- Simple ingredients: Chicken, butter, garlic, rosemary, and everyday seasonings do most of the work.
- Juicy and flavorful: A quick sear helps develop a golden crust while the garlic butter keeps the chicken deliciously moist.
- Versatile: Serve it with potatoes, rice, pasta, or roasted vegetables.
- Naturally low in carbohydrates: The basic recipe works well for people following a lower-carb eating plan.
- Perfect for any occasion: It is simple enough for weeknight dinners but looks lovely on a dinner table.
Ingredients for Garlic Butter Rosemary Chicken
This recipe makes 4 servings and works particularly well with boneless, skinless chicken breasts or thick chicken breast fillets.
Main Ingredients
- 4 small boneless, skinless chicken breasts (about 1½ pounds or 680 g): Choose pieces of similar thickness so they cook evenly.
- 3 tablespoons unsalted butter: Creates the rich, glossy sauce shown in the picture.
- 1 tablespoon olive oil: Helps brown the chicken without relying entirely on butter.
- 5 garlic cloves, minced: Fresh garlic gives the sauce its signature savory flavor.
- 2 teaspoons fresh rosemary, finely chopped: Adds a fragrant, earthy note.
- 1 teaspoon fresh rosemary leaves for garnish: Optional, but lovely for presentation.
- 1 tablespoon fresh lemon juice: Brightens the buttery sauce.
- ½ teaspoon paprika: Adds gentle warmth and helps the chicken develop an attractive golden color.
- ¾ teaspoon salt, or to taste: Adjust depending on the size of the chicken breasts.
- ½ teaspoon freshly ground black pepper: Adds a little bite.
- 2 tablespoons chicken broth or water: Optional, for loosening the sauce.
Optional Ingredients
- ¼ teaspoon dried thyme
- 1 tablespoon chopped fresh parsley
- A small pinch of red pepper flakes
- Lemon wedges for serving
I usually prefer fresh rosemary because its aroma works beautifully with garlic and butter. If you only have dried rosemary, use about ½–¾ teaspoon instead of the fresh chopped rosemary, since dried herbs have a more concentrated flavor.
How to Make Garlic Butter Rosemary Chicken
Follow these simple steps to make golden, juicy chicken coated in a delicious homemade garlic butter sauce.
Step 1: Prepare the Chicken
Pat the chicken breasts dry with paper towels. This helps remove excess surface moisture, making it easier to develop a golden crust.
If the chicken breasts are very thick, slice them horizontally into thinner cutlets or gently pound them to an even thickness.
Season both sides with salt, black pepper, and paprika.
I find that evenly sized chicken pieces make a big difference. They cook more consistently, so you are less likely to end up with one dry piece while another is still undercooked.
Step 2: Heat the Pan
Place a large skillet over medium-high heat and add the olive oil.
Once the oil is hot, arrange the chicken breasts in a single layer. Avoid crowding the pan; cook in batches if necessary.
Let the chicken cook undisturbed for about 4–6 minutes on the first side, depending on thickness, until it develops a deep golden-brown crust.
Flip the chicken and cook the other side for another 3–5 minutes.
The chicken may not be fully cooked at this stage, and that is fine. It will finish cooking in the garlic butter sauce.
Transfer the chicken to a plate temporarily if you need more room to prepare the sauce.
Step 3: Make the Garlic Butter Sauce
Reduce the heat to medium-low.
Add the butter to the same skillet and let it melt, scraping up the flavorful browned bits left behind by the chicken.
Stir in the minced garlic and chopped rosemary. Cook for about 30–60 seconds, stirring frequently, until fragrant.
Be careful not to burn the garlic. Burnt garlic can turn bitter and overpower the delicate rosemary flavor.
If you want a slightly thinner sauce, add 2 tablespoons of chicken broth or water and stir until combined.
Honestly, this is the part of the recipe that makes the kitchen smell amazing. The combination of melting butter, fresh garlic, and rosemary is simple but incredibly inviting.
Step 4: Return the Chicken to the Pan
Place the chicken breasts back into the skillet and turn them in the garlic butter sauce so both sides are coated.
Reduce the heat to medium-low, cover loosely if needed, and continue cooking until the chicken reaches an internal temperature of 165°F (74°C) at the thickest part.
Depending on the thickness of the chicken and how much it has already cooked, this may take another 3–7 minutes.
If the pan looks dry, add a small splash of broth or water.
Avoid relying on cooking time alone. A food thermometer is the most dependable way to check that chicken is fully cooked without drying it out.
Step 5: Add Lemon Juice
Once the chicken is cooked through, remove the skillet from the heat.
Stir the fresh lemon juice into the buttery sauce. Spoon the sauce over the chicken several times to coat the surface.
The lemon adds a little brightness that balances the richness of the butter.
Taste the sauce and adjust the seasoning with additional salt or black pepper if needed.
Step 6: Rest and Garnish
Let the chicken rest for about 5 minutes before serving.
Spoon the garlic butter sauce over the top and garnish with fresh rosemary leaves or chopped parsley.
Serve while warm, with extra sauce drizzled over each portion.
The finished chicken should have a golden exterior, a juicy center, and a fragrant buttery coating just like the dish in the picture.
Tips for the Best Garlic Butter Rosemary Chicken
Use Chicken of Even Thickness
Chicken breasts often vary in thickness. Flattening thicker pieces helps them cook evenly and makes it easier to keep the meat juicy.
Pat the Chicken Dry
Moisture on the surface prevents proper browning. A quick pat with paper towels helps you achieve that lovely golden crust.
Don’t Burn the Garlic
Garlic cooks quickly, especially in butter. Keep the heat at medium-low once you add it, and stir frequently.
If the garlic becomes dark brown or smells bitter, it is better to start the sauce again rather than let the burnt flavor spread through the dish.
Use Fresh Rosemary When Possible
Fresh rosemary provides a bright, piney aroma that complements the richness of the butter. Dried rosemary works too, but use less and crush it lightly between your fingers before adding it.
Avoid Overcooking the Chicken
Chicken breasts are lean and can become dry when cooked for too long.
Use a thermometer to check for 165°F (74°C) at the thickest point. Once the chicken reaches that temperature, remove it from the heat and allow it to rest briefly.
Don’t Waste the Pan Sauce
The browned bits left in the skillet add a lot of flavor. When you melt the butter, gently scrape them into the sauce.
If you want more sauce for serving, add a little extra broth and simmer briefly to bring everything together.
Easy Variations to Try
One thing I love about this garlic butter chicken recipe is how easily you can change the flavor.
Garlic Butter Lemon Chicken
Add extra lemon juice and a little lemon zest. This version has a brighter, fresher flavor that works especially well with steamed vegetables.
Creamy Garlic Rosemary Chicken
For a creamy version, transfer the fully cooked chicken to a plate and add about ½ cup of heavy cream to the skillet. Simmer gently until the sauce thickens, then return the chicken to the pan.
Avoid boiling the sauce vigorously.
Garlic Butter Chicken Thighs
Replace the chicken breasts with boneless, skinless chicken thighs. They tend to stay juicy and have a richer flavor. Adjust the cooking time according to their size and check that they reach a safe internal temperature.
Spicy Garlic Butter Chicken
Add a pinch of red pepper flakes or a little cayenne pepper with the seasonings for gentle heat.
Honey Garlic Rosemary Chicken
Stir 1–2 teaspoons of honey into the sauce near the end of cooking for a sweet-savory finish. Keep the heat low because honey can burn easily.
Oven-Baked Garlic Butter Chicken
Sear the seasoned chicken in an oven-safe skillet, prepare the garlic butter sauce, and return the chicken to the pan. Transfer to a preheated 400°F (200°C) oven and bake until the thickest part reaches 165°F (74°C). Cooking time will vary with thickness.
What to Serve with Garlic Butter Rosemary Chicken
This chicken is rich, savory, and versatile, so it pairs well with plenty of simple side dishes.
Roasted Potatoes
Crispy roasted potatoes are one of my favorite sides for garlic butter chicken. Their golden edges and fluffy centers pair beautifully with the buttery sauce.
Creamy Mashed Potatoes
If you enjoy classic comfort food, serve the chicken over mashed potatoes. The sauce seeps into the potatoes and makes every bite delicious.
Steamed Rice
White or brown rice is an easy option, especially when you want something that absorbs the garlic butter sauce without adding too much extra work.
Roasted Vegetables
Try roasted carrots, broccoli, zucchini, or green beans. Their natural sweetness and slightly crisp texture balance the richness of the chicken.
Pasta
Toss cooked pasta with a little of the garlic butter sauce and serve it alongside the chicken. Add Parmesan cheese and fresh parsley if you like.
Fresh Salad
A simple green salad with cucumber, tomatoes, and a lemon vinaigrette brings freshness to the meal.
Warm Crusty Bread
Do not underestimate a good piece of bread for soaking up the leftover sauce. It is a simple addition that makes this meal feel extra satisfying.
How to Store and Reheat Garlic Butter Chicken
Refrigerating Leftovers
Allow the chicken to cool slightly, then transfer it to an airtight container with the garlic butter sauce.
Refrigerate within 2 hours of cooking and consume within 3–4 days.
Freezing
You can freeze cooked garlic butter chicken, although the sauce may change texture slightly after thawing.
Place the cooled chicken and sauce in a freezer-safe container. For best quality, use within 2–3 months.
Thaw overnight in the refrigerator before reheating.
Reheating on the Stovetop
Place the chicken and sauce in a covered skillet over low heat. Add a splash of broth or water to loosen the sauce and heat until the chicken is warmed through.
Avoid cooking it over high heat, as that can dry out the chicken.
Reheating in the Microwave
Place a portion in a microwave-safe dish and cover loosely. Heat in short intervals, turning or stirring the sauce as needed, until the chicken is steaming hot throughout.
For food safety, reheat leftovers to 165°F (74°C).
Approximate Nutrition Information
The following estimates are for one serving, assuming the recipe makes four servings and includes the chicken, butter, olive oil, garlic, and seasonings. The optional extra broth is not expected to change the totals significantly.
- Calories: 340
- Protein: 42 g
- Carbohydrates: 3 g
- Fat: 17 g
- Saturated fat: 7 g
- Fiber: Less than 1 g
- Sugar: Less than 1 g
- Sodium: Approximately 500–650 mg
These are approximate values. Actual nutrition will vary depending on the size of the chicken breasts, how much sauce is consumed, and the amount of salt and butter used. Side dishes are not included.
Frequently Asked Questions
1. Can I use chicken thighs instead of chicken breasts?
Yes! Boneless chicken thighs work beautifully in this recipe and tend to stay juicy because they contain more fat than chicken breasts. Adjust the cooking time based on their thickness and use a thermometer to confirm they reach a safe internal temperature of at least 165°F (74°C).
2. Can I use dried rosemary instead of fresh rosemary?
Absolutely. Use approximately ½–¾ teaspoon of dried rosemary in place of the 2 teaspoons of fresh chopped rosemary. Crush the dried leaves slightly before adding them to help release their aroma.
3. Why is my garlic butter sauce bitter?
The most common reason is burnt garlic. Garlic cooks very quickly in butter, so it is best to lower the heat before adding it and stir continuously for 30–60 seconds. If the garlic turns very dark or smells burnt, it can make the entire sauce taste bitter.
4. How do I keep chicken breasts juicy?
Start by choosing chicken pieces of similar thickness and patting them dry before seasoning. Sear them in a hot pan, then finish cooking over moderate heat. Most importantly, check the internal temperature and remove the chicken from the heat once it reaches 165°F (74°C). Letting it rest for about 5 minutes also helps.
5. Can I make garlic butter rosemary chicken ahead of time?
Yes. You can cook the chicken a day or two ahead and refrigerate it with the sauce. Reheat gently in a covered skillet with a splash of broth or water to prevent the meat from drying out. For the freshest flavor, you can also chop the rosemary and garlic in advance and store them separately in the refrigerator until you are ready to cook.