
Savory Puff Pastry with Minced Meat and Cheese

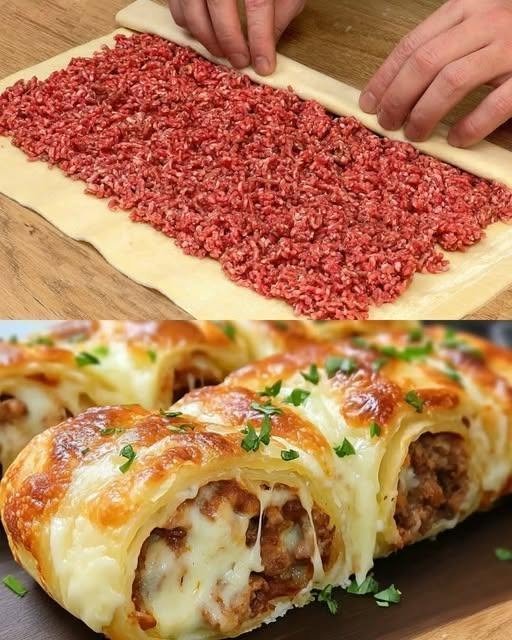
There are some recipes that look impressive but are actually surprisingly easy to make, and this savory puff pastry with minced meat and cheese is definitely one of them.
I usually make this when I want something a little more special than ordinary sandwiches or meat pies, but I don’t want to spend the entire day in the kitchen. The combination of seasoned minced meat, gooey melted cheese, boiled eggs, parsley, and buttery puff pastry is honestly hard to resist.
The pastry comes out beautifully golden and crisp on the outside, while the filling stays juicy and flavorful inside. And that cheese? It melts into the meat in the best possible way.
It’s also a great recipe for using ingredients you probably already have in the fridge. I like beef for a richer flavor, but chicken or pork works perfectly well too.
Why You’ll Love This Recipe
-
Easy to prepare with simple everyday ingredients
-
Crispy, buttery puff pastry on the outside
-
Juicy minced meat and melted cheese filling
-
Boiled eggs add extra richness and texture
-
Great for breakfast, lunch, dinner, or a party snack
-
Can be prepared ahead of time
-
Easy to customize with your favorite herbs and cheese
Ingredients
For the Filling
-
1 sheet puff pastry, thawed according to package directions
-
Butter, for greasing
-
1 medium onion, finely chopped
-
1 teaspoon dried basil
-
300 g minced meat – beef, chicken, or pork
-
Salt, to taste
-
Black pepper, to taste
-
100 g grated cheese, such as mozzarella or cheddar
-
1 bunch fresh parsley, finely chopped
-
2 boiled eggs, peeled and chopped
For Finishing
-
1 egg, beaten, for brushing the pastry
-
A little extra grated cheese, optional
-
Fresh parsley, for garnish
How to Make Savory Puff Pastry with Minced Meat and Cheese
1. Prepare the Eggs
Start by boiling the two eggs until they are fully cooked. I usually cook them for about 9–10 minutes once the water reaches a boil.
Let them cool, peel them, and chop them into small pieces.
You don’t want huge chunks of egg in the filling because they can make the pastry difficult to roll.
2. Cook the Onion and Minced Meat
Heat a little butter in a large skillet over medium heat.
Add the finely chopped onion and cook for about 3–4 minutes, until softened and lightly golden.
Add the minced meat and break it apart with a wooden spoon or spatula.
Season with salt, black pepper, and dried basil.
Cook for approximately 7–10 minutes, stirring occasionally, until the meat is completely cooked through and no longer pink.
A little tip from my kitchen:
Don’t skip draining excess liquid or fat from the meat. Honestly, this makes a big difference. If the filling is too wet, the puff pastry can become soggy instead of beautifully crisp.
Remove the meat from the heat and allow it to cool slightly.
3. Add the Rest of the Filling
Once the cooked meat has cooled for a few minutes, stir in:
-
Chopped boiled eggs
-
Fresh parsley
-
Grated cheese
Mix everything gently until evenly combined.
I usually reserve a small handful of cheese for the top because I love that extra golden, bubbly layer.
4. Prepare the Puff Pastry
Preheat your oven to 200°C (400°F).
Lightly grease a baking tray with butter or line it with parchment paper.
Place the thawed puff pastry on a lightly floured work surface.
If the pastry is very thick, gently roll it out a little. Don’t make it paper-thin—you want enough pastry to hold all that delicious filling.
5. Add the Meat Filling
Spread the minced meat mixture evenly over the pastry, leaving a small border around the edges.
Try not to pile the filling too thickly in the center. A relatively even layer makes rolling much easier and helps the pastry cook evenly.
6. Roll the Pastry
Starting from one long side, carefully roll the pastry over the filling to create a log.
Don’t roll it extremely tightly. Puff pastry needs a little room to expand as it bakes.
Pinch the seam gently to seal it, then place the roll seam-side down on your prepared baking tray.
If you’re worried about the roll opening during baking, gently tuck the ends underneath.
7. Brush with Egg
Beat one egg in a small bowl.
Brush the entire surface of the pastry with the beaten egg. This is what gives it that beautiful glossy, golden-brown finish.
For an extra cheesy topping, sprinkle a little grated cheese over the top.
You can also make a few small cuts across the top of the pastry with a sharp knife. These vents allow steam to escape and give the finished pastry a nice appearance.
8. Bake Until Golden and Crisp
Place the pastry in the preheated oven and bake for approximately 25–35 minutes, depending on the size and thickness of your roll.
You’re looking for a deep golden-brown, puffed, crisp exterior.
If the top starts browning too quickly while the pastry underneath still needs time, loosely cover it with aluminum foil and continue baking.
9. Rest, Slice, and Serve
This is the hardest part for me because it smells amazing!
Let the baked pastry rest for about 10 minutes before slicing. This gives the melted cheese and meat filling a chance to settle, making it much easier to cut.
Slice into thick pieces and garnish with fresh chopped parsley.
Serve warm and enjoy.
Cooking Tips for the Best Meat-Filled Puff Pastry
Don’t use hot filling
Allow the cooked meat mixture to cool before putting it on the puff pastry. Hot filling can soften the pastry and make it harder to work with.
Keep the pastry cold
Puff pastry works best when it stays relatively cold before baking. If your kitchen is warm and the pastry becomes soft or sticky, pop it into the refrigerator for 10–15 minutes.
Don’t overfill
It’s tempting to add as much filling as possible, but too much can cause the pastry to split. Leave a border around the edges and spread the filling evenly.
Drain excess moisture
This is especially important with minced meat. Excess liquid is one of the easiest ways to end up with soggy pastry.
Use good melting cheese
Mozzarella gives you those wonderful stretchy cheese strands, while cheddar gives the filling a stronger, sharper flavor. A mixture of the two is honestly one of my favorite combinations.
Let it rest before cutting
Give the pastry a few minutes to cool. If you slice it immediately, the cheese and juices can spill out and the pastry may not hold its shape as well.
Variations You Can Try
This recipe is very forgiving, so don’t be afraid to change it.
Add garlic
Cook 1–2 finely minced garlic cloves with the onion for extra flavor.
Make it spicy
Add chili flakes, cayenne pepper, or a little chopped fresh chili to the meat mixture.
Try different cheese
Cheddar, mozzarella, gouda, Monterey Jack, or a combination can all work beautifully.
Add vegetables
Finely diced bell peppers, mushrooms, spinach, or grated zucchini can be added to the filling. Just make sure vegetables that release a lot of moisture are cooked first.
Use different meat
Beef gives the richest flavor, while chicken creates a lighter version. Pork works particularly well with herbs and cheese.
What to Serve with Savory Meat Puff Pastry
This pastry is filling enough to serve on its own, but I usually like adding something fresh alongside it.
Try serving it with:
-
A simple green salad
-
Tomato and cucumber salad
-
Coleslaw
-
Roasted vegetables
-
Pickles or olives
-
Garlic yogurt sauce
-
Sour cream
-
Tomato or chili sauce
For breakfast or brunch, serve slices with fresh fruit, tea, or coffee.
For dinner, a crisp salad and a light soup make this a surprisingly satisfying meal.
How to Store Leftovers
Allow leftover pastry to cool completely before storing.
Keep it in an airtight container in the refrigerator for up to 3 days.
For the best texture, reheat it in an oven or air fryer rather than the microwave. Reheating at around 180°C (350°F) for several minutes helps bring the crispiness back.
You can also freeze the baked pastry. Wrap individual portions well and freeze for up to about 2 months. Thaw in the refrigerator and reheat until hot.
Approximate Nutrition Information
Per serving, assuming 8 servings:
-
Calories: 350–400 kcal
-
Protein: 17–20 g
-
Carbohydrates: 20–25 g
-
Fat: 22–26 g
-
Saturated fat: 8–10 g
-
Fiber: 1–2 g
-
Sodium: approximately 500–650 mg
Nutrition will vary depending on the type of minced meat, puff pastry, cheese, and amount of butter used.
Frequently Asked Questions
1. Can I use frozen puff pastry?
Yes. Frozen puff pastry works very well. Thaw it according to the package instructions, but don’t let it become warm and overly soft. You want it flexible enough to roll but still cool.
2. Can I prepare this recipe ahead of time?
Absolutely. You can prepare the meat filling a day ahead and keep it refrigerated. When you’re ready to bake, assemble the pastry, brush it with egg, and put it straight into the oven.
3. Can I use chicken instead of beef?
Yes. Ground chicken works nicely and gives the pastry a lighter flavor. Because chicken can be lean, you may want to add a little extra cheese or butter to keep the filling moist.
4. Why is my puff pastry soggy underneath?
The most common causes are a wet filling, overly hot filling, or insufficient oven temperature. Make sure you drain excess liquid from the meat and let the filling cool before assembling the pastry. Also, fully preheat the oven before baking.
5. Can I make smaller individual pastries?
Definitely. Instead of making one large roll, cut the puff pastry into smaller rectangles or squares, add a spoonful of filling, fold, seal, and brush with egg. Bake until puffed and golden. These are fantastic for parties and lunchboxes.
Final Thoughts
I honestly love recipes like this because they look like you’ve put in much more effort than you actually have. Savory puff pastry with minced meat and cheese has everything I want in a comforting homemade dish: crispy pastry, flavorful meat, creamy melted cheese, and a little freshness from parsley.
The boiled eggs make the filling extra hearty, while the onion and basil add just enough seasoning without overpowering the meat.
If you’re making it for the first time, don’t worry too much about getting the roll absolutely perfect. Puff pastry is wonderfully forgiving. Just keep the filling relatively dry, don’t overstuff it, and bake until it’s deeply golden and crisp.