
Sticky Honey Garlic Chicken Wings Recipe

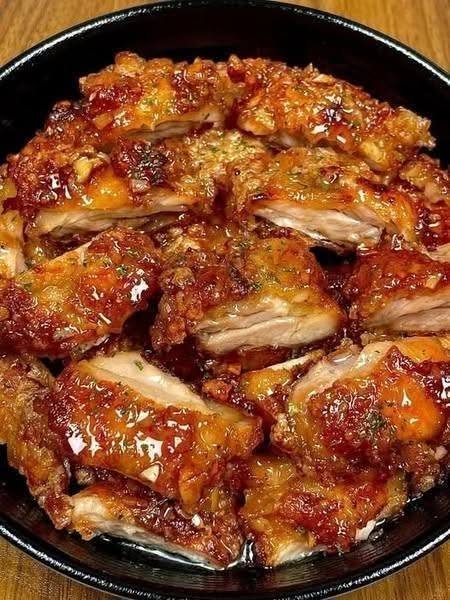
If there’s one chicken recipe that always gets everyone reaching for another piece, it’s these sticky honey garlic chicken wings. They’re juicy on the inside, beautifully browned on the outside, and coated in a rich, glossy sauce that combines sweet honey, savory soy sauce, fresh garlic, and a little tanginess.
Honestly, I love recipes like this because they make an ordinary dinner feel a little special without requiring hours in the kitchen. I usually make these wings when we’re craving something flavorful for a weekend dinner, family gathering, or movie night. The smell of garlic and honey simmering together is enough to make everyone wander into the kitchen asking when dinner will be ready!
What makes this recipe so good is the balance of flavors. The honey gives the sauce its sticky sweetness, the garlic adds a wonderful savory aroma, and the soy sauce brings depth. A little vinegar or lemon juice keeps everything from tasting too sweet.
And just look at that glossy coating! These homemade honey garlic chicken wings are perfect served straight from the pan, with plenty of napkins nearby.
The best part? You don’t need a deep fryer. I’ll show you how to make delicious glazed chicken wings in the oven, along with tips for getting that irresistible caramelized finish.
Why You’ll Love These Honey Garlic Chicken Wings
- Sweet and savory: Honey, garlic, and soy sauce create a deliciously balanced glaze.
- Juicy chicken: The wings stay tender inside while the outside develops a lovely browned finish.
- Easy ingredients: Most of the ingredients are common pantry staples.
- Perfect for sharing: Serve them at parties, family dinners, game nights, or weekend gatherings.
- Customizable flavor: Make them spicy, extra garlicky, or less sweet depending on your taste.
- No deep fryer needed: The oven does most of the work, making cleanup easier.
Ingredients You’ll Need
This recipe makes approximately 4 servings as an appetizer or 3–4 servings as part of a meal.
For the chicken wings
- 1 kg (2.2 lb) chicken wings, split at the joints and tips removed if desired
- 1 tablespoon olive oil or vegetable oil
- 1 teaspoon garlic powder
- 1 teaspoon paprika
- 1/2 teaspoon black pepper
- 1/2 teaspoon salt, adjusted to taste
- 1 tablespoon cornstarch, optional, for a crispier exterior
For the honey garlic sauce
- 1/3 cup honey
- 4–5 garlic cloves, finely minced
- 1/4 cup soy sauce
- 2 tablespoons ketchup
- 1 tablespoon rice vinegar or apple cider vinegar
- 1 tablespoon butter
- 1/2 teaspoon grated fresh ginger, optional
- 1/4 teaspoon chili flakes, optional
- 1 teaspoon cornstarch mixed with 1 tablespoon cold water, optional, for thickening
For garnish
- 1 tablespoon chopped fresh parsley or spring onions
- 1 teaspoon sesame seeds, optional
- A few extra chili flakes, optional
A few ingredient tips
Chicken wings: Fresh or thawed frozen wings work well. Pat them dry thoroughly before seasoning to help them brown.
Honey: Regular honey gives the sauce its sticky texture. You can adjust the amount depending on how sweet you like your wings.
Garlic: Fresh minced garlic provides the best flavor. I usually use at least four cloves because garlic is one of the main stars of this recipe.
Soy sauce: Regular soy sauce gives a deep savory flavor. If you’re watching your sodium intake, use a reduced-sodium variety.
Vinegar: A small amount balances the sweetness and brightens the sauce.
Cornstarch: This is optional, but tossing the wings with a little cornstarch can help create a crispier surface when baking.
How to Make Sticky Honey Garlic Chicken Wings
Follow these easy steps for delicious, glossy chicken wings with a homemade honey garlic glaze.
Step 1: Prepare the chicken
Preheat your oven to 220°C (425°F).
Line a baking tray with foil for easier cleanup and place a wire rack on top if you have one. Lightly grease the rack.
Pat the chicken wings thoroughly dry with paper towels. This step is important because excess moisture can prevent the skin from browning properly.
Place the wings in a large bowl and add the oil, garlic powder, paprika, black pepper, and salt. If you want a crispier exterior, add the cornstarch and toss until the wings are evenly coated.
I usually take a little extra time to dry the wings properly. Honestly, it’s one of the easiest ways to improve the final texture.
Step 2: Arrange and bake the wings
Arrange the seasoned wings in a single layer on the prepared rack, leaving space between each piece.
Bake for 20 minutes, then turn the wings over and bake for another 20–25 minutes, or until they’re browned, crisp around the edges, and fully cooked.
Cooking time will depend on the size of the wings and your oven. The safest way to check doneness is to measure the thickest part of the meat without touching the bone. Chicken should reach an internal temperature of 74°C (165°F).
If needed, bake a little longer to develop more color.
Step 3: Prepare the honey garlic sauce
While the chicken is baking, place a small saucepan over medium-low heat.
Add the butter and minced garlic. Cook for about 30–60 seconds, stirring frequently, until fragrant. Don’t let the garlic burn, as it can become bitter.
Add the honey, soy sauce, ketchup, vinegar, grated ginger, and chili flakes if using.
Stir everything together and bring the sauce to a gentle simmer. Cook for 2–3 minutes, stirring regularly.
If you prefer a thicker glaze, stir in the cornstarch slurry and simmer briefly until the sauce becomes glossy and coats the back of a spoon.
Remove the pan from the heat. The sauce will thicken a little more as it cools.
Step 4: Coat the chicken wings
Once the wings are cooked and nicely browned, transfer them to a large mixing bowl.
Pour most of the warm honey garlic sauce over the wings and toss gently until every piece is coated.
I like to reserve a little sauce for drizzling over the wings just before serving. It makes the finished dish look extra glossy and gives everyone a little more of that delicious garlic flavor.
Step 5: Caramelize the glaze
For a sticky, caramelized finish, return the coated wings to the baking tray.
Bake at 220°C (425°F) for another 3–5 minutes, watching carefully so the honey doesn’t burn. You can also broil them briefly, but keep a close eye on them because honey can darken very quickly.
The glaze should look shiny and cling to the chicken rather than running off.
Step 6: Garnish and serve
Transfer the wings to a serving plate. Sprinkle with chopped parsley or spring onions and sesame seeds if desired.
Drizzle over any reserved sauce that has not touched raw chicken, and serve immediately while the wings are warm and sticky.
Get ready for messy fingers and plenty of compliments!
Cooking Tips for the Best Honey Garlic Chicken Wings
1. Dry the wings before seasoning
Moisture is one of the main reasons chicken skin doesn’t crisp well. Use paper towels to dry the wings thoroughly before adding oil and seasoning.
2. Don’t overcrowd the baking tray
The wings need space for hot air to circulate. If they’re packed too tightly together, they’ll steam instead of browning. Use two trays if necessary.
3. Add the sauce near the end
Honey contains sugar, so it can burn at high temperatures. Baking the wings before coating them helps the skin brown without scorching the glaze.
4. Keep the garlic moving
Fresh garlic cooks quickly. Stir it constantly and use medium-low heat to prevent it from turning dark and bitter.
5. Adjust the sauce to your taste
- For sweeter wings, add another tablespoon of honey.
- For a more savory flavor, use a little extra soy sauce.
- For extra tanginess, add a splash more vinegar or lemon juice.
- For spicy honey garlic wings, add chili flakes, cayenne pepper, or a little hot sauce.
If you add more soy sauce, remember that it can increase the saltiness of the finished dish.
6. Use a thermometer
Chicken wings can look browned before they’re fully cooked inside. Check the thickest portion of the meat and make sure it reaches 74°C (165°F).
7. Don’t waste the glaze
If you want extra sauce for serving, reserve some before tossing the cooked wings. Never reuse sauce that has been in contact with raw chicken unless you bring it to a thorough boil.
Alternative Cooking Methods
Air fryer honey garlic chicken wings
Preheat the air fryer to 200°C (400°F). Arrange the seasoned wings in a single layer and cook for approximately 20–25 minutes, turning halfway through. Cook in batches if needed.
Once the wings are fully cooked, toss them with the prepared honey garlic sauce. Return them to the air fryer for another 2–3 minutes if desired, watching carefully to prevent the glaze from burning.
Pan-fried honey garlic chicken wings
Heat a little oil in a large skillet over medium heat. Add the wings in batches and cook, turning regularly, until browned and cooked through. Depending on their size, this may take approximately 25–35 minutes.
Reduce the heat before adding the prepared sauce and toss the wings until glazed. Make sure the chicken is fully cooked before serving.
Grilled honey garlic chicken wings
Grill the seasoned wings over medium heat, turning regularly until fully cooked. Brush on the honey garlic glaze during the final few minutes, turning frequently so the sauce caramelizes without burning.
What to Serve With Honey Garlic Chicken Wings
These wings are delicious on their own, but the right side dishes can turn them into a complete meal.
Rice and noodles
Serve the wings over steamed jasmine rice, fried rice, or garlic noodles. The rice is especially good for soaking up any extra sauce.
Roasted or crispy potatoes
Oven-roasted potatoes, potato wedges, or crispy fries are excellent choices when you’re serving the wings as a casual dinner.
Fresh salad
A crunchy cucumber salad, coleslaw, or mixed green salad balances the rich, sweet glaze.
Steamed vegetables
Broccoli, carrots, green beans, and bell peppers add freshness and color to the plate.
Dipping sauces
Try garlic yogurt sauce, ranch dressing, or a little spicy mayonnaise. Since the wings are already flavorful, a simple dip often works best.
Party platter
For a gathering, arrange the wings on a large platter with cucumber sticks, carrot sticks, lemon wedges, and extra spring onions. Serve with napkins because these wings are wonderfully sticky!
Storage and Reheating
Refrigeration: Let the wings cool slightly, then refrigerate them in an airtight container within two hours of cooking. Use within 3–4 days.
Freezing: Freeze the cooked wings in a freezer-safe container for up to 3 months for best quality. Store extra sauce separately when possible.
Oven reheating: Place the wings on a baking tray and reheat at 180°C (350°F) until heated through, usually around 10–15 minutes depending on size.
Air fryer reheating: Reheat at 180°C (350°F) for approximately 5–8 minutes, checking that the centers are hot.
Microwave reheating: The microwave works when you’re short on time, although the skin will be softer rather than crispy.
For the best texture, I usually prefer reheating these wings in the oven or air fryer.
Nutrition Information
The following values are estimates for one serving, assuming the recipe makes four servings and includes the chicken, seasoning, and honey garlic glaze. Actual nutrition will vary with wing size, skin, and how much sauce is consumed.
| Nutrient | Approximate amount per serving |
|---|---|
| Calories | 450–550 kcal |
| Protein | 30–38 g |
| Carbohydrates | 25–35 g |
| Fat | 22–30 g |
| Sugar | 20–28 g |
| Sodium | 900–1,300 mg |
To reduce the calories, use less butter and honey, choose reduced-sodium soy sauce, and avoid adding extra oil. Keep in mind that the skin and the amount of glaze used can significantly affect the nutritional values.
Nutrition information is an estimate for general guidance, not a laboratory analysis.
Common Mistakes to Avoid
Adding honey sauce too early: The sugar can burn before the chicken is cooked. Bake the wings first, then glaze them near the end.
Skipping the drying step: Wet wings tend to steam rather than brown properly.
Using too much heat for the garlic: Burnt garlic can spoil the flavor of the entire sauce.
Pouring all the sauce into the pan at once: Too much liquid can soften the skin. Toss the cooked wings in sauce and finish them briefly in the oven.
Forgetting to check the internal temperature: Golden skin doesn’t guarantee that the chicken is fully cooked. Always check the thickest pieces.
Frequently Asked Questions
1. Can I make honey garlic chicken wings ahead of time?
Yes! You can season the wings and prepare the sauce a day ahead, storing both separately in the refrigerator. When you’re ready to eat, bake the wings until fully cooked, warm the sauce, and toss them together. For the best texture, add the glaze just before serving.
2. How do I make the honey garlic sauce thicker?
Mix 1 teaspoon of cornstarch with 1 tablespoon of cold water. Stir the mixture into the simmering sauce and cook briefly until it thickens. Add the slurry gradually because the sauce will continue to thicken slightly as it cools.
3. Can I use frozen chicken wings?
Yes, but thaw them completely in the refrigerator before cooking for the most even results. Pat them thoroughly dry before seasoning. Avoid leaving raw chicken at room temperature to thaw.
4. How can I make these wings spicy?
Add chili flakes, cayenne pepper, chopped fresh chili, or your favorite hot sauce to the honey garlic mixture. Start with a small amount, taste the sauce, and adjust until you reach your preferred heat level. A little extra vinegar can help balance the sweetness.
5. Why are my honey garlic chicken wings not crispy?
The wings may have been too wet, crowded on the baking tray, or coated in sauce too early. Dry them thoroughly, leave space between the pieces, and bake until browned before adding the glaze. Finish with a short additional bake to help the sauce caramelize.