
Loaded Beef Crunch wrap Recipe

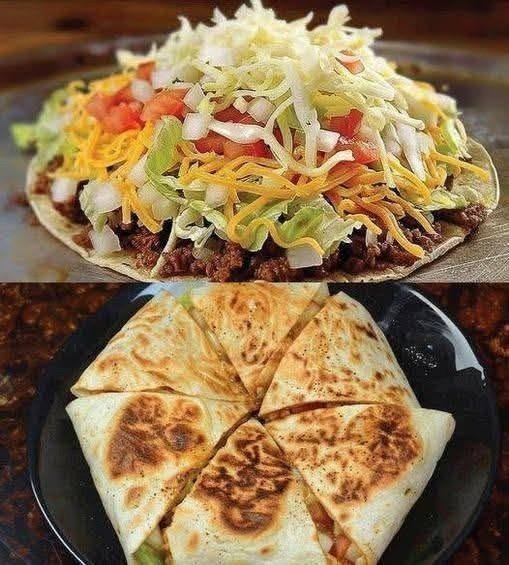
If there’s one thing I love about homemade wraps, it’s how you can turn a few simple ingredients into something that feels like a restaurant-style meal. These loaded beef crunchwraps are a perfect example. They’re packed with juicy seasoned ground beef, plenty of shredded cheese, crunchy lettuce, fresh tomatoes, and a creamy sauce, all wrapped in a tortilla and toasted until beautifully golden.
Honestly, this is the kind of recipe I make when everyone is craving fast food but I’d rather prepare something fresh at home. The ingredients are easy to find, the filling is simple to customize, and that crispy tortilla exterior makes every bite extra satisfying.
I usually season the beef with garlic, paprika, cumin, and chili powder to give it a bold, savory flavor. Then I pile on the toppings, fold the tortillas into neat little pockets, and toast them in a skillet until the outside is crisp and the cheese melts inside.
The best part? You don’t need a deep fryer or any special equipment. A regular frying pan works perfectly.
Whether you’re preparing a quick family dinner, making a fun weekend lunch, or looking for a homemade alternative to takeout, these cheesy beef crunchwraps are worth trying. Serve them hot with salsa, sour cream, or your favorite dipping sauce, and watch them disappear!
Why You’ll Love These Homemade Crunchwraps
- Crispy on the outside: Toasting the tortilla creates a delicious golden crust.
- Cheesy and satisfying: Melted cheddar and Monterey Jack bring everything together.
- Packed with flavor: Seasoned beef makes every bite savory and delicious.
- Fresh toppings: Lettuce, tomatoes, and onions balance the rich filling.
- Easy to customize: Add beans, jalapeños, guacamole, or your favorite sauce.
- Perfect for busy days: The beef filling can be prepared ahead of time for faster assembly.
Preparation and Cooking Time
- Prep time: 20 minutes
- Cook time: 20 minutes
- Total time: 40 minutes
- Servings: 4 large crunchwraps
- Difficulty: Easy
Ingredients
For the seasoned ground beef
- 1 pound ground beef
- 1 tablespoon olive oil, if needed
- 1 small onion, finely diced
- 2 cloves garlic, minced
- 1 teaspoon chili powder
- 1 teaspoon ground cumin
- 1 teaspoon paprika
- 1/2 teaspoon dried oregano
- 1/2 teaspoon black pepper
- 3/4 teaspoon salt, or to taste
- 2 tablespoons tomato paste
- 2–3 tablespoons water
For assembling the crunchwraps
- 4 large flour tortillas, about 12 inches each
- 4 small tostada shells, or sturdy round tortilla chips arranged in a single layer
- 1 cup shredded cheddar cheese
- 1 cup shredded Monterey Jack cheese, or mozzarella
- 1 cup shredded lettuce
- 2 medium tomatoes, diced
- 1/2 small onion, finely chopped
- 1/2 cup sour cream
- 1/2 cup salsa
- 1 tablespoon butter or oil, for toasting
Optional creamy sauce
- 1/4 cup mayonnaise
- 2 tablespoons sour cream
- 1 teaspoon lime juice
- 1/2 teaspoon garlic powder
- A pinch of chili powder
- Salt to taste
Mix the sauce ingredients in a small bowl until smooth. Refrigerate until you’re ready to assemble the crunchwraps.
Ingredient Notes
Ground beef: I usually use ground beef with around 85% lean meat because it offers a good balance of flavor and moisture. Drain excess fat after browning if necessary.
Large flour tortillas: Large tortillas are essential because they need to fold over the filling. If yours are stiff, warm them briefly before assembling.
Tostada shells: These create the signature crunchy middle. If you can’t find tostadas, use tortilla chips in a compact, overlapping layer.
Cheese: Cheddar adds a sharp flavor, while Monterey Jack melts beautifully. Mozzarella is another good option.
Fresh vegetables: Lettuce, tomatoes, and onions provide a refreshing contrast to the warm, cheesy beef filling.
Step-by-Step Instructions
Step 1: Cook the ground beef
Heat a large skillet over medium-high heat. Add the ground beef and cook for about 5–7 minutes, breaking it into small pieces with a wooden spoon.
Once the beef is browned, add the diced onion and cook for another 2–3 minutes until softened. Stir in the minced garlic and cook for about 30 seconds.
If the beef releases a lot of fat, carefully drain the excess before continuing.
Step 2: Season the beef filling
Add the chili powder, cumin, paprika, oregano, salt, black pepper, and tomato paste.
Stir everything together so the beef is evenly coated with the spices. Add 2–3 tablespoons of water and cook for another 2 minutes until the mixture is juicy but not watery.
I usually let the beef simmer briefly rather than leaving it dry. That little bit of moisture helps the filling taste richer and keeps the crunchwrap from becoming bland.
Remove the skillet from the heat and set the beef aside.
Step 3: Prepare the vegetables and sauce
Shred the lettuce, dice the tomatoes, and chop the onion.
If the tomatoes are particularly juicy, remove some of their seeds and excess liquid. This helps prevent soggy tortillas.
Prepare the optional creamy sauce by mixing the mayonnaise, sour cream, lime juice, garlic powder, chili powder, and salt in a bowl.
You can use plain sour cream and salsa instead if you prefer to keep things simple.
Step 4: Warm the tortillas
Place each flour tortilla in a dry skillet for about 10–15 seconds per side, just until it becomes soft and flexible.
Alternatively, wrap the tortillas in a slightly damp paper towel and microwave them for 15–20 seconds.
This step is important because cold tortillas can crack when folded. I usually warm all the tortillas before assembling so everything goes smoothly.
Step 5: Assemble the crunchwraps
Place one large tortilla on a clean work surface.
In the center, layer the ingredients in this order:
- A generous spoonful of seasoned ground beef.
- A handful of shredded cheese.
- A tostada shell.
- Sour cream or creamy sauce.
- Shredded lettuce.
- Diced tomatoes and chopped onions.
- Salsa, if desired.
- A little more shredded cheese.
Keep the filling in a compact circle in the middle, leaving enough tortilla around the edges to fold.
Avoid overfilling the wrap. Honestly, it’s tempting to add everything at once, but too much filling makes folding difficult and can cause the tortilla to tear.
Step 6: Fold the tortilla
Starting at one edge, fold a section of the tortilla toward the center over the filling.
Continue working around the tortilla, folding small sections inward until the filling is enclosed in a roughly hexagonal shape.
If the tortilla doesn’t quite reach the center, place a small piece of an extra tortilla over the filling before folding. This helps seal the wrap.
Turn the crunchwrap seam-side down so it stays closed during cooking.
Step 7: Toast until golden and crispy
Heat a nonstick skillet over medium heat and add a small amount of butter or oil.
Place the crunchwrap seam-side down in the skillet. Cook for about 2–3 minutes, pressing gently with a spatula, until the bottom is golden brown.
Carefully flip and cook the other side for another 2–3 minutes.
Repeat with the remaining crunchwraps, adding a little more oil if needed.
The outside should be crisp and golden, and the cheese inside should be melted. If the tortilla browns too quickly, reduce the heat slightly so the filling has time to warm through.
Step 8: Slice and serve
Transfer the cooked crunchwraps to a cutting board and let them rest for about a minute.
Cut each one in half or into wedges using a sharp knife. Serve immediately with extra salsa, sour cream, guacamole, or your favorite dipping sauce.
I love serving these while they’re still warm because the contrast between the crispy tortilla, melted cheese, seasoned beef, and cool fresh toppings is what makes them so good.
Cooking Tips for the Best Crunchwraps
1. Don’t make the filling too wet
Excess liquid can soften the tortilla and make the crunchwrap difficult to flip. Simmer the beef until it’s flavorful and moist, but not swimming in sauce.
2. Use a large tortilla
A 12-inch flour tortilla gives you enough room to fold everything securely. Smaller tortillas can be difficult to seal when you’re adding several layers.
3. Keep cold toppings away from the hottest ingredients
Allow the beef to cool for a couple of minutes before assembly. This helps prevent the lettuce from wilting too quickly and reduces excess steam inside the wrap.
4. Put the crunchy layer in the middle
The tostada shell or tortilla chips are what give crunchwraps their signature texture. Placing this layer between the beef and fresh toppings helps keep it crisp.
5. Toast seam-side down first
This helps seal the folds and prevents the filling from spilling out when you flip the wrap.
6. Use medium heat
High heat can burn the tortilla before the cheese melts. Medium heat gives the wrap time to turn golden and warm through.
7. Prepare your ingredients before assembling
I recommend having the beef, cheese, vegetables, sauce, and tostadas ready before you start folding. Assembly becomes much faster when everything is within reach.
Delicious Variations to Try
Chicken crunchwraps: Replace the ground beef with seasoned shredded chicken or finely chopped cooked chicken.
Spicy beef crunchwraps: Add diced jalapeños, extra chili powder, or a few drops of hot sauce.
Vegetarian crunchwraps: Replace the beef with seasoned black beans, pinto beans, or a mixture of beans and sautéed vegetables.
Bean and cheese crunchwraps: Add refried beans beneath the cheese for a creamy, filling alternative.
Loaded nacho crunchwraps: Include crushed tortilla chips, nacho cheese sauce, and pickled jalapeños.
Breakfast crunchwraps: Use scrambled eggs, breakfast potatoes, cheese, and cooked sausage for a hearty morning meal.
What to Serve with Beef Crunchwraps
These crunchwraps are satisfying on their own, but a few simple sides can turn them into a complete meal.
- Mexican-style rice: Fluffy rice seasoned with tomato, garlic, and cumin pairs beautifully with the beef.
- Refried or black beans: Add extra protein and make the meal even more filling.
- Guacamole: Creamy avocado adds freshness and a smooth texture.
- Fresh salsa or pico de gallo: A bright tomato salsa balances the richness of the cheese.
- Corn salad: Sweet corn, lime juice, cilantro, and a little chili powder make a refreshing side.
- Tortilla chips and salsa: A simple option for casual dinners or gatherings.
- Lime wedges: A squeeze of fresh lime brightens the flavors just before eating.
For a relaxed family meal, I usually serve the crunchwraps with salsa, sour cream, and a simple salad. Everyone can add their own toppings, which makes dinner feel a little more fun.
Storage and Reheating Instructions
Storing leftovers
Store leftover cooked crunchwraps in an airtight container in the refrigerator for up to 3 days.
For the best texture, keep extra lettuce, tomatoes, salsa, and sour cream separate whenever possible. Fresh toppings can release moisture and make the tortillas soggy.
Reheating in a skillet
Heat a nonstick skillet over medium-low heat. Add the crunchwrap and warm it for about 3–4 minutes per side, until heated through and crisp again.
This is my preferred method because it brings back much of the original crunchy texture.
Reheating in an air fryer
Heat the air fryer to 350°F (175°C). Cook the crunchwrap for approximately 4–7 minutes, turning halfway through, until hot and crisp. Timing will vary depending on its size and whether it was refrigerated.
Can you freeze crunchwraps?
Yes, but it’s best to freeze them before adding fresh lettuce, tomatoes, sour cream, or other watery toppings. Wrap the cooled cooked beef-and-cheese crunchwraps individually and freeze for up to 2 months for best quality.
Thaw them in the refrigerator before reheating, then add the fresh toppings after warming.
Nutrition Information
The following is an approximate estimate per serving, assuming the recipe makes four large crunchwraps.
| Nutrient | Approximate amount |
|---|---|
| Calories | 780 kcal |
| Protein | 35 g |
| Carbohydrates | 62 g |
| Total fat | 43 g |
| Saturated fat | 17 g |
| Fiber | 5 g |
| Sugar | 7 g |
| Sodium | 1,250 mg |
Actual nutrition will depend on the tortillas, ground beef, cheese, sauces, and amount of oil used. Adding the optional creamy sauce or extra cheese will increase the calories and fat.
For a lighter version, use lean ground beef, reduced-fat cheese, less sauce, and extra lettuce and tomatoes. Smaller tortillas can also help reduce the portion size.
Frequently Asked Questions
1. What is a crunchwrap made of?
A typical crunchwrap contains a large flour tortilla filled with seasoned meat, cheese, a crispy tostada shell, creamy sauce, lettuce, tomatoes, and other toppings. The tortilla is folded around the filling and toasted in a skillet until golden and crispy.
2. Can I make crunchwraps without tostada shells?
Absolutely! You can use a layer of sturdy tortilla chips instead. Arrange them close together in the center to create a crunchy layer. The texture won’t be exactly the same as a tostada shell, but it still tastes delicious.
3. How do I stop my crunchwrap from falling apart?
Use a large, warm tortilla, keep the filling in the center, and avoid overfilling it. Fold the edges inward in small sections, then cook the wrap seam-side down first to help seal everything in place.
4. Can I prepare beef crunchwraps ahead of time?
Yes. You can cook and season the beef, shred the cheese, chop the vegetables, and prepare the sauce a day ahead. Store each component separately in the refrigerator and assemble the crunchwraps just before cooking for the best texture.
5. Can I make crunchwraps in an air fryer?
Yes. Assemble and fold the crunchwrap, lightly brush the outside with oil, and place it seam-side down in the air fryer. Cook at 350°F (175°C) for approximately 5–8 minutes, turning halfway through if needed. Check that the tortilla is golden and the filling is heated through. Depending on your air fryer, you may need to secure the folds carefully so the wrap doesn’t open.
Conclusion
These homemade loaded beef crunchwraps are a delicious way to enjoy crispy tortillas, savory ground beef, melted cheese, and fresh toppings all in one satisfying meal.
What I like most about this recipe is how flexible it is. You can keep it simple with beef, cheese, lettuce, and tomatoes, or make it extra indulgent with creamy sauce, jalapeños, beans, and guacamole. It’s also a great way to use ingredients you already have in the refrigerator.
The secret is to avoid overfilling the tortillas, keep the beef mixture fairly thick, and toast each wrap over medium heat until the outside is golden and the cheese melts.
Serve them fresh from the skillet with your favorite dipping sauces, and you’ve got an easy homemade dinner that’s every bit as enjoyable as a restaurant-style wrap.
If you’re craving something crispy, cheesy, and full of flavor, give these beef crunchwraps a try. They might just become a new favorite in your kitchen!