
Chocolate Peanut Butter Crunch Bars Recipe

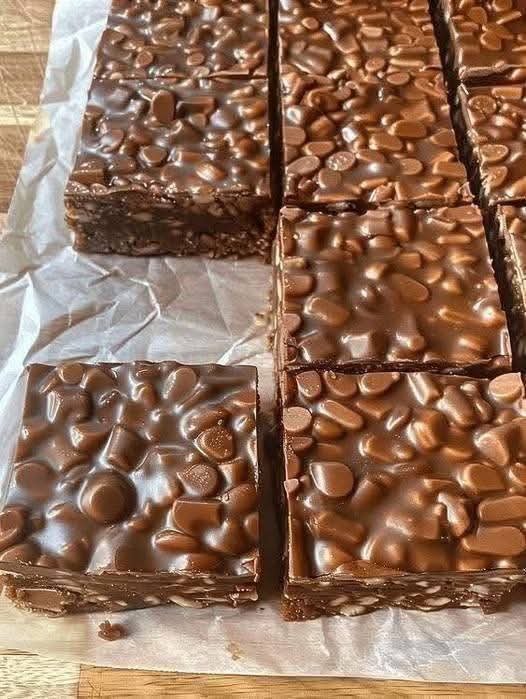
If you’re a chocolate lover who enjoys a little crunch in every bite, these chocolate peanut butter crunch bars are going to be a favorite. They’re rich, glossy, packed with crunchy peanuts, and filled with that irresistible combination of smooth chocolate and nutty flavor.
The first thing I love about recipes like this is how impressive they look without requiring much effort. You don’t need to turn on the oven, prepare a complicated batter, or spend hours decorating a dessert. Just melt the chocolate, stir in the crunchy ingredients, spread everything into a pan, and let it set.
Honestly, I usually turn to no-bake chocolate bars when I need something sweet for a family gathering or want a homemade treat to keep in the refrigerator. These bars are especially satisfying because the chocolate creates a smooth, fudgy base while the peanuts add plenty of crunch.
The bars in the photo have a beautiful chocolate coating filled with nuts, cut into thick squares that look perfect for sharing. This homemade version recreates that style with chocolate, peanut butter, and roasted peanuts. You can also use milk chocolate chips or a combination of milk and dark chocolate to get the flavor you prefer.
Whether you serve them with coffee, pack them into lunch boxes, or make a batch for the holidays, these chocolate peanut butter crunch bars are wonderfully easy to prepare.
Why You’ll Love These Chocolate Crunch Bars
- No baking required: Everything comes together on the stovetop or in the microwave.
- Rich chocolate flavor: A combination of milk and dark chocolate gives the bars a delicious balance of sweetness and depth.
- Lots of crunch: Roasted peanuts add a satisfying texture to every bite.
- Easy to customize: Add crispy rice cereal, pretzels, or your favorite nuts.
- Perfect for sharing: Cut the chilled mixture into squares for parties, dessert platters, or homemade gifts.
- Great make-ahead dessert: Prepare them in advance and keep them chilled until you’re ready to serve.
Recipe Details
- Prep time: 15 minutes
- Cooking time: 5 minutes
- Chilling time: 2 hours
- Total time: Approximately 2 hours and 20 minutes
- Servings: 16 bars
- Course: Dessert or snack
- Cuisine: American-inspired
- Difficulty: Easy
Ingredients for Chocolate Peanut Butter Crunch Bars
The ingredient list is short, and most of these items are easy to find at a grocery store. I prefer using good-quality chocolate because chocolate is the main flavor, and a smooth, glossy finish makes these bars especially tempting.
For the Chocolate Bars
- 2 cups (340 g) milk chocolate chips
- 1 cup (170 g) semi-sweet or dark chocolate chips
- ½ cup (125 g) creamy peanut butter
- 2 cups (280 g) roasted peanuts, preferably unsalted
- 1 tablespoon coconut oil or neutral vegetable oil, optional
- 1 teaspoon vanilla extract
- A small pinch of salt, if using unsalted peanuts and unsalted peanut butter
Optional Add-Ins
- ½ cup crispy rice cereal for extra crunch
- ¼ cup chopped almonds or cashews
- ¼ cup mini chocolate chips
- 2 tablespoons crushed pretzels
- A light sprinkle of flaky sea salt for the top
Ingredient tip: If you want bars that look similar to the photo, use whole or halved roasted peanuts rather than finely chopped nuts. They create a chunky, textured surface and give every square plenty of crunch.
How to Make Chocolate Peanut Butter Crunch Bars
Step 1: Prepare Your Baking Pan
Line an 8-by-8-inch (20-by-20-cm) square baking pan with parchment paper, leaving some extra paper hanging over the sides.
The overhanging paper will act as handles when it’s time to lift the chilled chocolate mixture out of the pan.
Smooth the paper into the corners as much as possible so the finished bars have neat edges.
If you’re making these for a crowd and want thinner bars, you can use a slightly larger pan, but the bars will set into a thinner layer.
Step 2: Melt the Chocolate
Place the milk chocolate chips and dark chocolate chips in a heatproof bowl.
Microwave method: Heat the chocolate in 20–30-second intervals, stirring thoroughly after each interval until the chocolate is mostly melted and smooth.
Stovetop method: Place the chocolate in a heatproof bowl over a saucepan of gently simmering water. Make sure the bottom of the bowl doesn’t touch the water, and stir until melted.
Be careful not to overheat the chocolate. Chocolate can burn or become thick and grainy if it gets too hot.
I usually stop heating when a few small pieces remain and stir until the residual heat melts them completely.
Step 3: Add the Peanut Butter
Stir the creamy peanut butter into the warm melted chocolate until the mixture looks smooth and glossy.
Add the vanilla extract and optional coconut oil, mixing well.
The peanut butter softens the chocolate flavor and gives the bars a richer, creamier texture. The coconut oil is optional, but a small amount can make the melted mixture easier to stir and spread.
If your peanut butter is naturally oily, stir it well before measuring.
Step 4: Fold in the Roasted Peanuts
Add the roasted peanuts to the chocolate mixture and stir until they’re evenly coated.
If you’re adding crispy rice cereal, chopped almonds, cashews, or pretzels, fold them in now.
Make sure the peanuts are distributed throughout the mixture rather than gathering at the bottom of the bowl.
Honestly, this is the fun part. The mixture becomes thick and chunky, and you can already see the texture the finished bars will have.
Step 5: Transfer the Mixture to the Pan
Pour the chocolate and peanut mixture into your prepared pan.
Use a silicone spatula to spread it evenly into the corners. Gently tap the pan on the counter to help settle the mixture and remove any large air pockets.
For a smooth, glossy top, lightly run the spatula across the surface.
If you want the bars to look extra appealing, reserve a small handful of peanuts and scatter them over the top before chilling.
Step 6: Chill Until Firm
Place the pan in the refrigerator for about 2 hours, or until the chocolate mixture is completely firm.
If you’re in a hurry, you can place it in the freezer for around 30–45 minutes, checking periodically to make sure it doesn’t become excessively hard.
The bars need to be firm enough to cut cleanly without the chocolate sticking heavily to your knife.
Step 7: Cut Into Bars
Once the chocolate has set, use the parchment paper to lift the mixture out of the pan and place it on a cutting board.
Use a large, sharp knife to cut it into 16 squares or rectangles.
For cleaner cuts, let the bars sit at room temperature for a few minutes if they’re very hard. Warm the knife under hot water, wipe it completely dry, and slice through the chocolate with steady pressure.
Wipe the knife between cuts for neat edges.
Your chocolate peanut butter crunch bars are now ready to enjoy!
Cooking Tips for the Best Chocolate Crunch Bars
1. Choose Chocolate You Enjoy Eating
Since chocolate is the main ingredient, use a brand you like. Milk chocolate makes sweeter bars, while dark chocolate adds a deeper cocoa flavor.
I usually prefer mixing the two because it gives the finished bars a nice balance.
2. Keep Water Away From the Chocolate
Even a small amount of water can cause melted chocolate to seize and become thick or grainy. Make sure your bowl, spatula, and utensils are completely dry.
3. Use Roasted Peanuts for Extra Flavor
Roasted peanuts have a richer, nuttier taste than raw peanuts. Unsalted peanuts also give you more control over the final flavor.
If you only have raw peanuts, roast them until lightly golden, then let them cool completely before mixing them into the chocolate.
4. Don’t Overheat the Chocolate
Melt the chocolate slowly and stir frequently. Gentle heating helps keep the mixture smooth and makes it easier to combine with the peanut butter.
5. Let the Bars Set Completely
Cutting the bars before they’re fully firm can cause them to crumble or smear. Give them enough time in the refrigerator to set all the way through.
6. Make the Recipe Your Own
Try adding crispy rice cereal for a lighter crunch, pretzels for a sweet-and-salty flavor, or chopped almonds for a slightly different nutty texture.
Just keep the overall quantity of add-ins reasonably close to the original recipe so the chocolate can hold everything together.
Serving Suggestions
These chocolate peanut butter crunch bars are delicious straight from the refrigerator, but there are plenty of ways to serve them.
With Coffee or Tea
Serve a small square with a cup of coffee, espresso, or black tea. The slightly bitter drink balances the sweetness of the chocolate.
On a Dessert Platter
Arrange the bars alongside brownies, cookies, chocolate truffles, and fresh strawberries for an easy dessert spread.
As a Homemade Gift
Cut the bars into neat squares and place them in small paper candy cups inside a gift box. Keep them chilled until gifting, especially in warm weather.
For Parties and Celebrations
Make a batch ahead of time, cut it into bite-sized squares, and arrange the pieces on a serving plate. They’re a convenient option when you need a dessert that doesn’t require last-minute baking.
As an Afternoon Treat
Enjoy a small piece when you’re craving something chocolatey. Because the bars are rich and satisfying, a modest serving can go a long way.
Easy Variations to Try
One of the best things about this recipe is how easily you can change the ingredients to suit your taste.
- Dark chocolate crunch bars: Replace the milk chocolate with additional dark chocolate for a less sweet flavor.
- Crispy chocolate bars: Add 1 cup of crispy rice cereal for a lighter, crispier texture.
- Chocolate almond bars: Replace some or all of the peanuts with roasted almonds.
- Sweet-and-salty bars: Add crushed pretzels and finish with a small sprinkle of flaky sea salt.
- White chocolate peanut bars: Replace some of the milk chocolate with white chocolate for a sweeter flavor.
- Extra peanut butter bars: Add another tablespoon or two of peanut butter for a stronger peanut flavor, keeping in mind that too much may soften the bars.
- Trail mix chocolate bars: Add a small amount of raisins or dried cranberries for a sweet, chewy contrast.
Can You Make Them Without Peanut Butter?
Yes. You can omit the peanut butter and use a little extra chocolate instead, or replace it with a suitable seed butter if you need a peanut-free alternative. Check all ingredient labels carefully if you’re cooking for someone with a nut allergy.
How to Store Chocolate Peanut Butter Crunch Bars
In the refrigerator: Store the bars in an airtight container for up to 2 weeks for best quality. Place parchment paper between layers to prevent sticking.
At room temperature: If your kitchen is cool, the bars may hold their shape for a short time, but they can soften in warm weather. Refrigeration is the safer choice for maintaining their texture.
In the freezer: Place the bars in a freezer-safe airtight container, separating the layers with parchment paper. Freeze for up to 2–3 months for best quality.
To serve from frozen: Transfer the desired number of bars to the refrigerator or let them soften briefly at room temperature before eating.
I usually keep a few bars in the refrigerator for an easy sweet treat and freeze the rest if I’ve made a large batch.
Nutrition Information
The following values are approximate and based on the recipe made with chocolate chips, peanut butter, and roasted peanuts, divided into 16 bars. Actual values will vary depending on the chocolate and peanut butter brands you use.
Estimated nutrition per bar:
- Calories: 330
- Protein: 7 g
- Carbohydrates: 25 g
- Total fat: 24 g
- Saturated fat: 10 g
- Sugar: 19 g
- Fiber: 3 g
- Sodium: 80 mg
Peanuts and peanut butter contribute protein and unsaturated fats, while chocolate provides the rich flavor that makes these bars such a satisfying dessert. They’re still an energy-dense treat, so serving size matters.
Nutrition information is an estimate and has not been laboratory tested.
Frequently Asked Questions
1. Why didn’t my chocolate peanut butter bars set properly?
The mixture may contain too much peanut butter or oil, or it may not have had enough time to chill. Make sure you measure the ingredients accurately and refrigerate the bars until completely firm. If they’re still soft, give them more chilling time.
2. Can I make chocolate peanut butter crunch bars without baking?
Absolutely! This is a completely no-bake recipe. Simply melt the chocolate, mix it with the peanut butter and peanuts, transfer the mixture to a lined pan, and refrigerate until firm.
3. Can I use milk chocolate instead of dark chocolate?
Yes. You can use all milk chocolate if you prefer a sweeter bar. The mixture will generally be sweeter and may set a little differently depending on the chocolate brand, so allow plenty of time for chilling.
4. Can I use other nuts instead of peanuts?
Yes. Roasted almonds, cashews, hazelnuts, and chopped pecans all work well. You can also combine several types of nuts for a more varied texture. If you are making the bars for someone else, always check for allergies before choosing the ingredients.
5. How do I cut the bars without cracking the chocolate?
Allow the bars to soften slightly if they’re very cold. Use a large, sharp knife warmed under hot water and wiped dry before cutting. Press down steadily rather than sawing back and forth, and clean the knife between slices.
Conclusion
These chocolate peanut butter crunch bars are proof that a delicious homemade dessert doesn’t need to be complicated. With melted chocolate, creamy peanut butter, and plenty of roasted peanuts, you can create a rich, crunchy treat with just a handful of ingredients.
Honestly, I love recipes like this because they’re easy enough for an ordinary afternoon but special enough to share with friends and family. There’s no need to preheat the oven, and once the mixture is in the refrigerator, most of the work is already done.
Serve them with coffee, add them to a dessert platter, or wrap a few squares as a homemade gift. You can even experiment with crispy rice cereal, pretzels, or different nuts to create your own favorite version.