
Classic New York Cheesecake Recipe

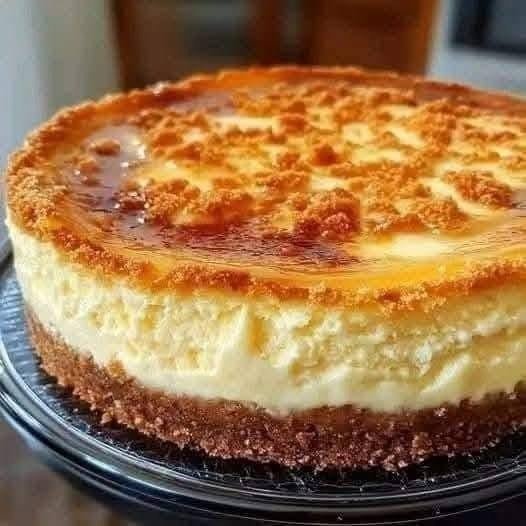
There’s something truly special about a homemade cheesecake. That thick, creamy filling, the buttery biscuit crust, and the lightly golden top make it one of those desserts that feels fancy without needing complicated decorating or special ingredients.
This classic New York-style cheesecake is inspired by the beautiful cheesecake in the photo, with its rich, smooth center, deep golden surface, and firm crumb crust. It’s the kind of dessert I’d happily make for a birthday, a family gathering, or simply when I’m craving something sweet and comforting.
Honestly, the secret to a great cheesecake isn’t just the ingredients. It’s also about taking your time, using room-temperature cream cheese, and allowing the cake to cool slowly. I usually prepare cheesecake the day before I plan to serve it because the overnight chill helps the filling become beautifully firm while developing its full flavor.
If you’ve ever worried about making cheesecake at home, don’t worry! This recipe walks you through every step, including how to prevent cracks, achieve a creamy texture, and get that lovely golden top.
Why You’ll Love This Homemade Cheesecake
- Rich and creamy: Cream cheese and sour cream create a smooth, luxurious filling.
- Buttery biscuit crust: A crunchy graham cracker or digestive biscuit base balances the creamy center.
- Beautiful golden top: A little extra baking time gives the surface a lightly caramelized appearance.
- Perfect for special occasions: Serve it at birthdays, holidays, dinner parties, or weekend gatherings.
- Make-ahead friendly: Cheesecake tastes even better after resting overnight in the refrigerator.
- Easy to customize: Add fresh berries, chocolate sauce, caramel, or your favorite fruit topping.
Recipe Details
- Prep time: 25 minutes
- Bake time: 60–75 minutes
- Cooling time: 2 hours
- Chilling time: At least 6 hours, preferably overnight
- Total time: Approximately 9–10 hours, including chilling
- Servings: 12 slices
- Course: Dessert
- Cuisine: American
- Difficulty: Intermediate
Ingredients for Classic New York Cheesecake
The ingredients are simple, but their quality and temperature make a big difference. I recommend full-fat cream cheese for the richest flavor and best texture.
For the Biscuit Crust
- 2 cups (200 g) graham cracker crumbs or finely crushed digestive biscuits
- 6 tablespoons (85 g) unsalted butter, melted
- 2 tablespoons (25 g) granulated sugar
- A small pinch of salt
For the Creamy Cheesecake Filling
- 24 ounces (680 g) full-fat cream cheese, softened to room temperature
- 1 cup (200 g) granulated sugar
- 3 large eggs, at room temperature
- ¾ cup (180 g) sour cream, at room temperature
- ¼ cup (60 ml) heavy cream
- 2 teaspoons vanilla extract
- 1 tablespoon all-purpose flour
- 1 teaspoon finely grated lemon zest (optional)
- 1 tablespoon fresh lemon juice (optional)
Optional Toppings
- Fresh strawberries or blueberries
- Strawberry sauce or raspberry coulis
- Caramel sauce
- Chocolate shavings
- A light dusting of powdered sugar
Ingredient tip: If digestive biscuits are easier to find where you live, use those instead of graham crackers. They make an excellent cheesecake base and have a delicious buttery flavor.
How to Make Classic New York Cheesecake
Step 1: Prepare Your Pan and Oven
Preheat your oven to 325°F (160°C). Lightly grease the sides of a 9-inch (23 cm) springform pan and line the bottom with parchment paper.
A springform pan is ideal because its removable sides make it easier to release the cheesecake without damaging the edges.
If you plan to use a water bath, wrap the outside of the pan securely with two or three layers of heavy-duty aluminum foil. This helps prevent water from leaking into the crust.
Step 2: Make the Biscuit Crust
Place the graham crackers or digestive biscuits in a food processor and pulse until they form fine crumbs. If you don’t have a food processor, put the biscuits in a sealed bag and crush them with a rolling pin.
Mix the crumbs with the melted butter, sugar, and salt until the mixture resembles damp sand.
Pour the mixture into the prepared springform pan. Press it firmly and evenly into the bottom using the back of a spoon or the flat bottom of a measuring cup.
Bake the crust for 8–10 minutes, then remove it from the oven and let it cool slightly while you prepare the filling.
I usually take an extra minute to press the crumbs firmly around the edges. A compact crust holds together better when you slice the finished cheesecake.
Step 3: Beat the Cream Cheese and Sugar
Place the softened cream cheese in a large mixing bowl. Beat on medium-low speed until smooth and creamy, scraping down the sides of the bowl as needed.
Add the sugar and beat until fully combined.
Try not to beat the mixture too aggressively. Too much air can cause the cheesecake to rise excessively in the oven and then sink or crack as it cools.
For the smoothest filling, make sure the cream cheese is completely softened before you start.
Step 4: Add the Eggs One at a Time
Add the eggs one at a time, mixing on low speed after each addition until just incorporated.
Avoid adding all the eggs at once, and don’t overmix after they go in. A gentle mixing technique helps produce that dense, creamy New York-style texture.
Scrape the bowl occasionally to ensure there are no hidden lumps of cream cheese.
Step 5: Add the Remaining Filling Ingredients
Add the sour cream, heavy cream, vanilla extract, flour, and optional lemon zest and lemon juice.
Mix on low speed until the batter looks smooth and uniform.
The sour cream adds a gentle tang, while the heavy cream contributes richness. The small amount of flour helps stabilize the filling without making it feel heavy.
At this stage, the batter should be thick, silky, and easy to pour.
Step 6: Pour the Filling Over the Crust
Pour the cheesecake filling over the prepared biscuit crust.
Gently tap the pan against the counter a few times to release any large air bubbles. If you see bubbles on the surface, you can pop them carefully with a toothpick.
Smooth the top with a spatula.
This is where the cheesecake starts to look especially inviting, even before it goes into the oven!
Step 7: Bake the Cheesecake
Place the springform pan in the preheated oven and bake for approximately 60–75 minutes.
The edges should look set, while the center should still have a slight wobble when you gently move the pan. It shouldn’t look liquid, but it doesn’t need to be completely firm in the oven.
For a more evenly baked cheesecake, you can use a water bath. Place the foil-wrapped springform pan in a larger roasting pan and carefully pour hot water into the roasting pan until it comes about halfway up the sides of the springform pan.
The water bath creates a gentler baking environment and helps reduce cracking. If using one, make sure the foil is secure and check the water level occasionally.
For the golden top shown in the photo: If your cheesecake is fully baked but still looks pale, you can briefly increase the oven temperature or use the broiler for a very short time while watching it constantly. This is optional, and you should avoid letting the top burn or the filling overcook.
Step 8: Cool the Cheesecake Slowly
Turn off the oven and leave the cheesecake inside with the door slightly open for about 30–60 minutes.
Remove it from the oven and let it cool to room temperature. Don’t rush this stage by putting a hot cheesecake directly into the refrigerator.
Slow cooling helps reduce sudden temperature changes, which can contribute to surface cracks.
Once the cheesecake has cooled, cover it and transfer it to the refrigerator.
Step 9: Chill Until Firm
Refrigerate the cheesecake for at least 6 hours, although overnight is even better.
This step is important because the filling continues to set as it chills. The result is a firmer, creamier cheesecake that slices neatly and tastes even better.
I know it’s tempting to cut into it early, but honestly, waiting until the next day is worth it!
Step 10: Slice and Serve
Run a thin knife around the inside edge of the springform pan before releasing the sides.
For neat slices, dip a sharp knife in hot water, wipe it dry, and cut the cheesecake. Clean the knife between slices.
Serve plain to enjoy the rich cream cheese flavor, or add fresh berries, caramel sauce, or a spoonful of fruit compote.
Expert Tips for the Best Cheesecake
1. Use Room-Temperature Ingredients
Cold cream cheese can leave lumps in the filling. Let the cream cheese, eggs, and sour cream sit at room temperature for about 30–60 minutes before mixing, while keeping food safety in mind.
2. Avoid Overmixing
Once the eggs are added, mix only until the batter is combined. Excess air can cause the cheesecake to puff up and then sink as it cools.
3. Don’t Overbake
One of the biggest cheesecake mistakes is waiting until the center looks completely firm. The center should retain a slight wobble when you remove the cake from the oven.
The residual heat will continue to cook the filling gently.
4. Consider Using a Water Bath
A water bath helps maintain a moist, even baking environment. If you prefer not to use one, bake at the recommended temperature and avoid opening the oven repeatedly.
5. Let It Cool Gradually
Sudden temperature changes can cause cracks. Gradual cooling is one of the simplest ways to improve the final appearance.
6. Chill Before Slicing
Cheesecake is much easier to slice after several hours in the refrigerator. For especially clean slices, use a warm, dry knife and wipe it between cuts.
7. Don’t Worry About Small Cracks
Honestly, even experienced home bakers occasionally end up with a cracked cheesecake. A few cracks won’t affect the flavor, and you can cover them with fresh fruit, whipped cream, or sauce.
Serving Suggestions
This cheesecake is rich enough to stand on its own, but the right topping can make each slice feel a little more special.
Fresh Berries
Serve each slice with strawberries, raspberries, or blueberries. Their natural tartness balances the creamy filling beautifully.
Strawberry Sauce
Warm fresh or frozen strawberries with a little sugar and lemon juice until they soften into a thick sauce. Let it cool before spooning it over the cheesecake.
Chocolate Drizzle
Add melted dark chocolate or chocolate ganache for a richer dessert. Chocolate pairs especially well with the buttery biscuit crust.
Caramel Sauce
A light drizzle of caramel adds sweetness and a lovely contrast to the tangy cream cheese filling.
Coffee or Tea
Serve a slice alongside freshly brewed coffee, black tea, or espresso. The slight bitterness of the drink balances the richness of the dessert.
Holiday Dessert Platter
Arrange cheesecake slices with fresh fruit, cookies, and small chocolate treats for a dessert platter that’s ideal for family gatherings.
Easy Cheesecake Variations
Once you’ve mastered this classic recipe, you can experiment with different flavors.
- Lemon cheesecake: Add extra lemon zest and a little more lemon juice for a brighter citrus flavor.
- Chocolate cheesecake: Add melted, cooled chocolate to the filling and use a chocolate biscuit crust.
- Strawberry cheesecake: Swirl a small amount of thick strawberry sauce through the filling before baking.
- Caramel cheesecake: Drizzle caramel sauce over the chilled cheesecake and sprinkle with a little sea salt.
- Vanilla bean cheesecake: Replace the vanilla extract with vanilla bean paste for a more pronounced vanilla flavor.
- Biscoff cheesecake: Replace the graham crackers with crushed Biscoff biscuits and use a little melted Biscoff spread as a topping.
How to Store Homemade Cheesecake
In the refrigerator: Store the cheesecake in an airtight container or cover it well. Refrigerate at 40°F (4°C) or below and enjoy within 3–5 days for the best quality.
In the freezer: Cheesecake freezes well. Chill it completely, then wrap individual slices or the whole cheesecake tightly in plastic wrap and a layer of foil. Freeze for up to 2 months for best quality.
To thaw: Transfer frozen cheesecake to the refrigerator and allow it to thaw overnight. Avoid thawing it at room temperature for extended periods.
Don’t leave cheesecake out at room temperature for more than 2 hours, or more than 1 hour when temperatures are above 90°F (32°C).
Nutrition Information
The following values are approximate and based on 12 slices made with the ingredients listed above. Actual nutrition will vary depending on the brands and toppings used.
Estimated nutrition per slice:
- Calories: 430
- Protein: 7 g
- Carbohydrates: 35 g
- Total fat: 30 g
- Saturated fat: 17 g
- Sugar: 25 g
- Fiber: 1 g
- Sodium: 350 mg
Cheesecake is a rich dessert, so the values can vary significantly with portion size and toppings. Fresh fruit is a lovely addition if you’d like to serve it with a little extra freshness.
These nutrition figures are estimates, not laboratory-tested values.
Frequently Asked Questions
1. Why did my cheesecake crack on top?
Cheesecake can crack if it’s overmixed, overbaked, or cooled too quickly. To reduce cracking, mix gently after adding the eggs, remove the cheesecake while the center still has a slight wobble, and let it cool gradually. A water bath can also help.
2. How do I know when cheesecake is done baking?
The edges should look set, but the center should still wobble slightly when you gently move the pan. The middle shouldn’t look liquid. If using a food thermometer, the center should generally reach approximately 150°F (66°C), though the visual signs and cooling process are also important.
3. Can I make cheesecake without a water bath?
Yes! A water bath is helpful but not essential. Bake at a moderate temperature, avoid overmixing, and cool the cheesecake slowly. The top may develop a few cracks, but the flavor and texture can still be excellent.
4. Can I make this cheesecake a day ahead?
Absolutely. In fact, I recommend it. Preparing the cheesecake the day before serving gives it enough time to chill and set properly. Keep it covered in the refrigerator, then add fresh fruit or sauce just before serving.
5. Can I use digestive biscuits instead of graham crackers?
Yes. Digestive biscuits are an excellent substitute and work particularly well for home baking. Crush them finely, mix them with melted butter and sugar, and press the mixture firmly into the pan. The resulting crust will be buttery, crisp, and delicious.
Conclusion
This classic New York cheesecake is a wonderful dessert to have in your baking collection. With its buttery biscuit crust, creamy cream cheese filling, and golden top, it’s the kind of homemade treat that looks impressive and tastes even better.
The key is to keep things simple: use room-temperature ingredients, mix gently, avoid overbaking, and give the cheesecake plenty of time to cool and chill.
I usually find that the hardest part of making cheesecake is waiting for it to set overnight. But once you cut into that first smooth, creamy slice, you’ll understand why it’s worth the wait.
Serve it plain or add your favorite topping, and enjoy a dessert that’s perfect for birthdays, holidays, celebrations, or a cozy weekend at home.